

In the previous Photography Location Guide I discussed some of my favorite shooting locations. More particular I talked about the Zeeland Bridge and the Chrysler Building. This series isn’t about just naming some random spots in the world. I will give you detailed advice on how to get to a certain location, I’ll talk over the best vantage points and when and how to shoot on that location. This will give you a better understanding on how I work and, better yet, you can go out and shoot it your self.
This time I’ll discuss the Salk Institute (located in San Diego, CA) and the Scoop (located in London).
The Salk Institute
In 2010 I photographed The Salk Institute while working on a promo for Nik Software’s Silver Efex Pro. The Salk Institute is a building I was specifically interested in shooting as it represented a design and symbolic meaning that matched my artistic vision at that time. The Salk Institute is designed by architect Louis Kahn, and like in most of his creations, the interaction between light and shadows, and his idea on the purpose and meaning of shadows, played an important role and inspired me to shoot this building.
Where And When To Shoot

Where is it located?
The Salk Instute is located in San Diego, CA. It can be found in the La Jolla area, near the University of California San Diego. The visiting adress is 10010 N Torrey Pines Rd, La Jolla, CA 92037.

Where to park and how do i get there?
Parking is available on several locations near the Institute. The Salk Institute offers a campus map with more detail. If using public transportation, a taxi is the easiest according to The Salk Institute itself.
Where To Shoot?
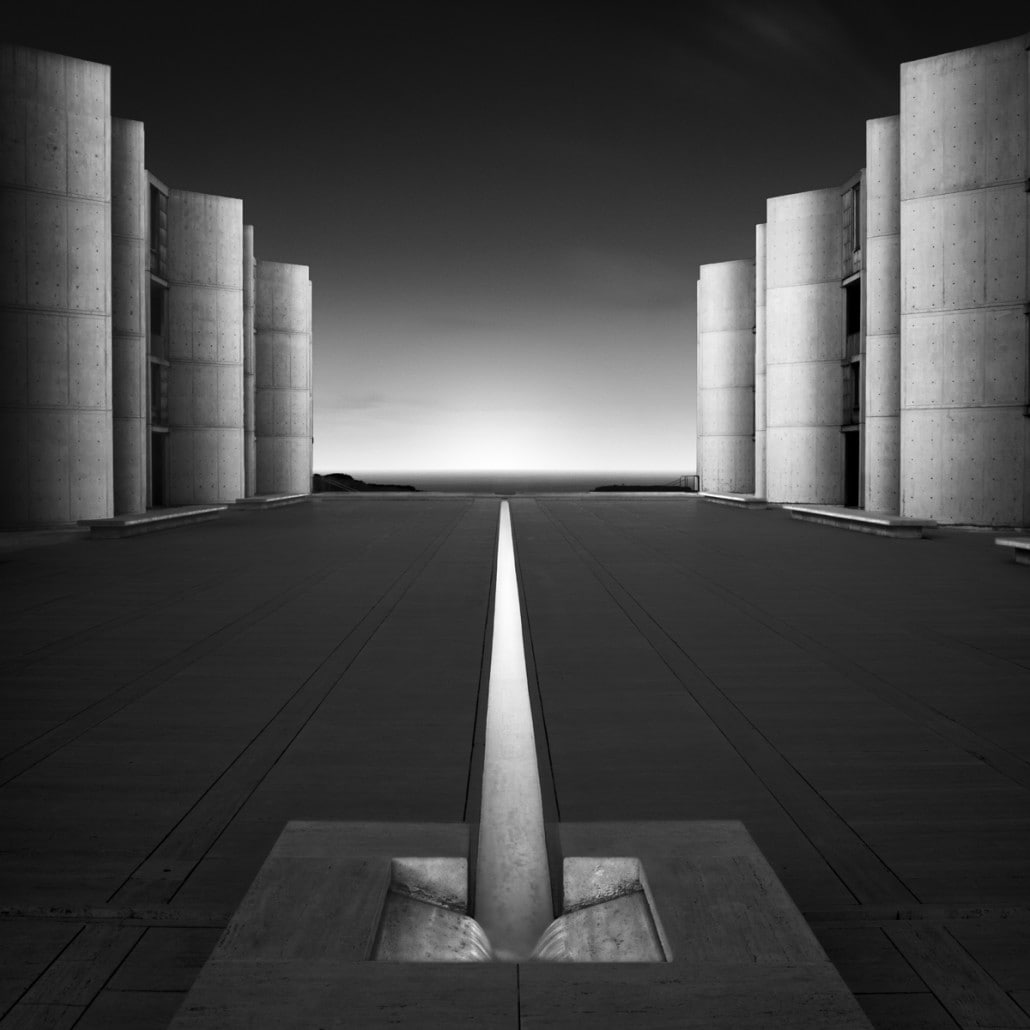
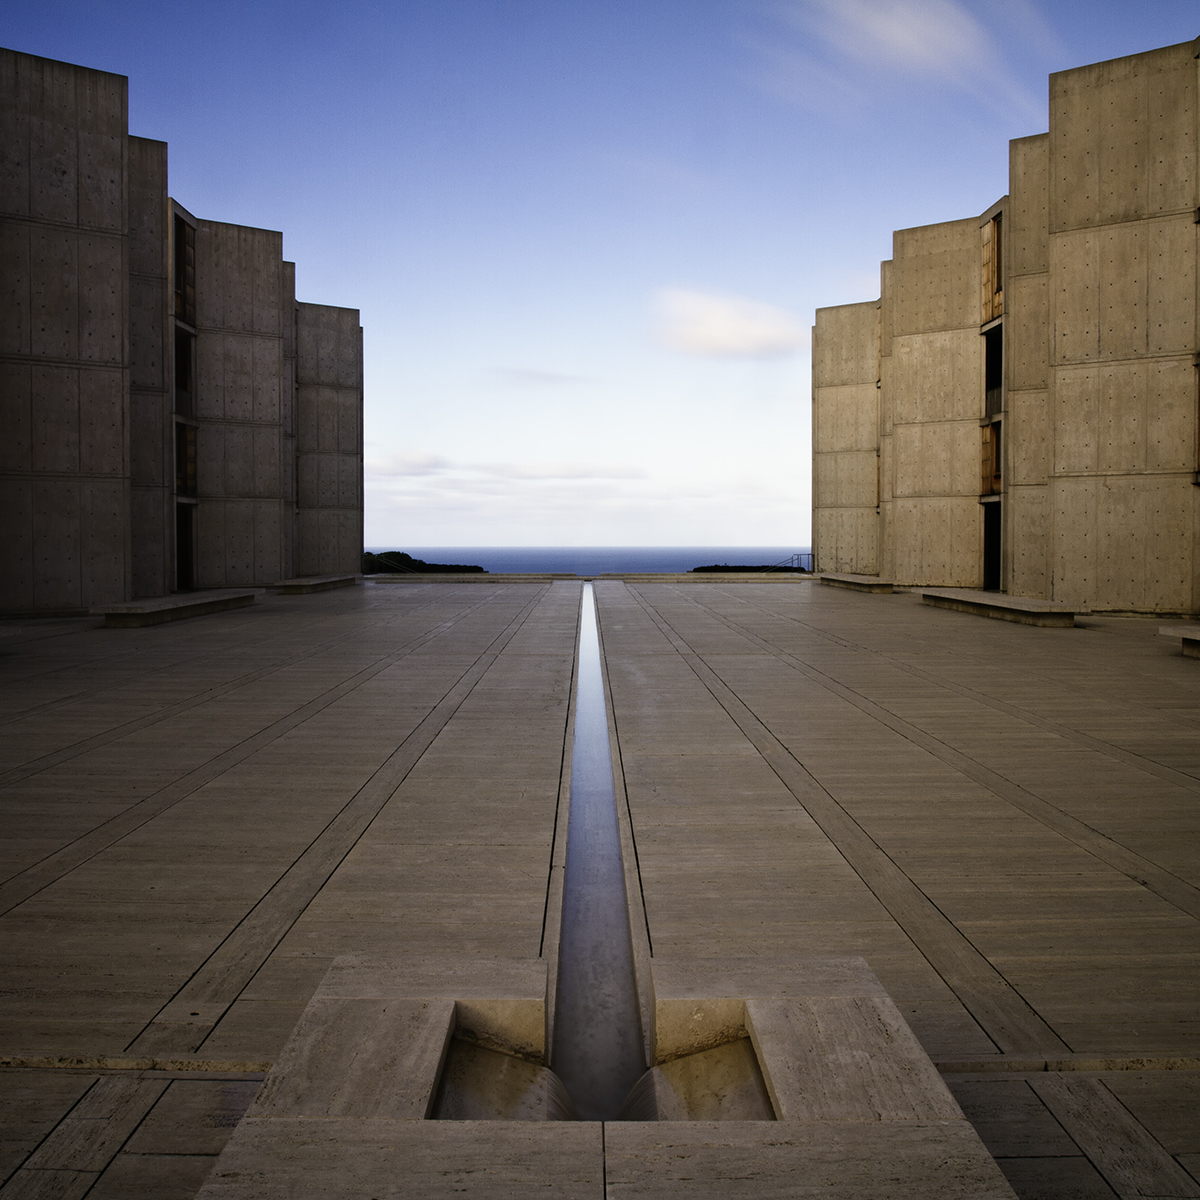
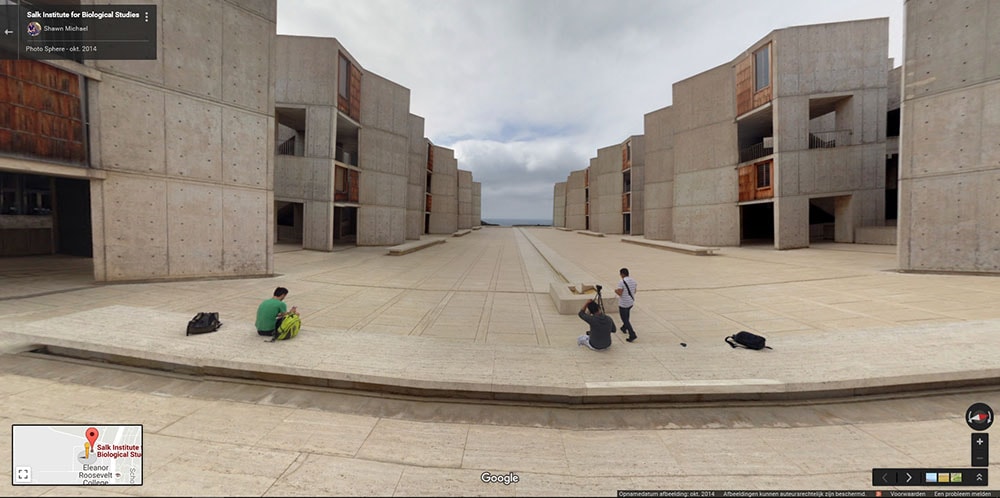
Of course the Salk Institute can be photographed from various vantage points but the one that really mattered to me is when you enter the plaza and choose a vantage point facing the ocean. Facing the Salk Institute from the opposite direction isn’t a view that I find favorable. It looks very busy and very different from the spot where you’re facing the ocean. I went straight to the concrete bench you can see in the photo below, and stood behind the fountain that feeds the small water channel towards the ocean.
It’s recommended to shoot with a not so wide angle lens. If you shoot with a full frame DSLR and a 17mm lens for example, that would be too wide to my taste and result in a view of the institute that places too much emphasis on the width of the plaza and not so much on the depth of it. It’s recommended to go with a focal length of around 24mm on full frame. I find the best results to be when I was taking up a higher point of view, by standing on the concrete bench. Ideally this place can be photographed best with a tilt shift lens with the lens slightly shifted upwards. A low point of view, just a bit higher than the fountain, results in a too dominant presence of the fountain, which is not what I preferred.
If you don’t have a tilt shift lens you could try to take up a higher vantage point and tilt the camera down just a little bit. You will see that the plaza with the small water channel gets a more prominent place in the photo and the view of the entire institute is very compact. Of course you may have to correct the perspective in post-production for straight verticals.
When To Shoot
Best time is early morning as you will have the sun in your back. Preferably go out shooting when it’s overcast with small chances of the sun coming through. If you shoot on a sunny day, the plaza will be so bright and the shadows and contrasts so hard that it takes away from the serene atmosphere that I encountered here.
A word on security: when I visited this location no one tried to prevent me from shooting it. In fact, I had a very nice chat with one of the personnel working there. But I know from other people visiting this place they had to deal with security.
How To Shoot
I’ve suggested how to shoot the Salk Institute in the previous paragraph, and I will try to suggest a few other interesting vantage points, but of course you have to experiment with it yourself. Another recommendation for example, would be to point the camera to one side of the Institute instead of the central view facing the ocean with the water channel and fountain in the frame. Generally I would approach either view with a long exposure and I would bring my 16 stops ND Firecrest filter so you won’t see any people in your photo. Having said that, I didn’t encounter too many people in the early morning.
Another way of photographing the Salk Institute is without long exposure and going for a more abstracted view of parts of the Salk Institute. If you walk around the Salk you will encounter various darker corners and openings, that are the deliberate intent of architect Louis Kahn who propagated the use of shadows in specific areas, as places to retreat yourself and find silence and awe, as if you were in a dark cloister. I personally experienced an almost mystical sensation when I visited this place. I can recommend reading this interesting article on Kahn’s ideas and use of shadows.
The Scoop
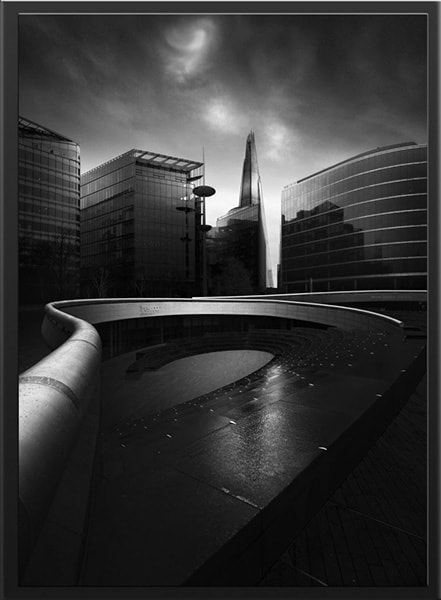
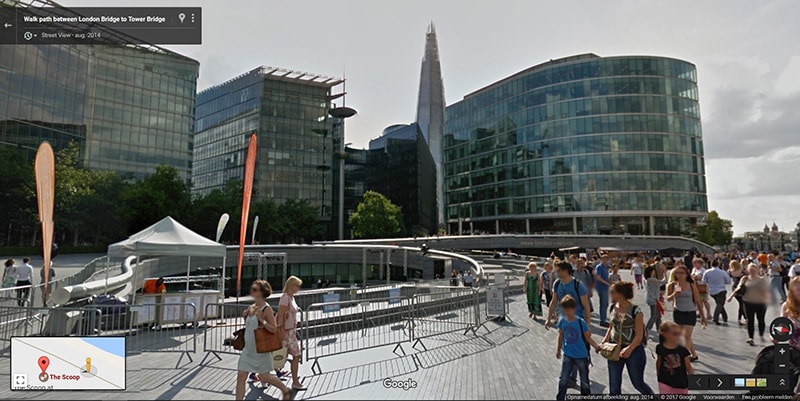
The Scoop is the name of a sunken amphitheater, adjacent to the City Hall in London on the South Bank of the river Thames near the Tower Bridge. This location drew my interest because of the typical design of the City Hall and the handrails that lead up to the City Hall. Instead of going with the obligatory shot of City Hall I decided the shape of the handrails and the curved benches of the amphitheater, with in the background the Shard, would form a more interesting shot for me.
Where And When To Shoot

Where is it located and how do i get there?
The Scoop (adress: Queen’s Walk, London SE1 2DB) at More London is located adjacent to the City Hall in London on the South Bank of the River Thames. It’s very easily accessible by Underground trains. When using the Circle or District line, you can get out at Tower Hill and simply cross the Tower Bridge to reach The Scoop. If you’re travelling with the Northern or Jubilee line, you can get out at London Bridge Station and after a short walk along the Thames you will reach The Scoop.
Where To Park
There is a Q-Park near the Tower Bridge, but getting around London is usually more convenient by tube or bus.
Where To Shoot?
The view I wanted to go for and didn’t include the City Hall is actually easy to find: when at City Hall you will see the beautifully curved handrails at the Scoop on the right when standing in front of City Hall with your back towards the Tower Bridge. I took position at the corner of one of the handrails on the left with my tripod positioned against the handrail. Facing down, I could see the sunken amphitheater. I’ve initially tried various other positions: a bit more to the back, a bit more to the front, a bit more to the right, the camera positioned higher and lower. But I didn’t like any of them better than the one I found where all lines seemed to make sense and made up for an aesthetic composition.
When To Shoot
The best time to shoot it is early morning when there aren’t too many people walking around and sitting on the benches. I went there between 8 and 9 on a Sunday morning. An hour later when I had my shots in the bag, there were already so many people that this shot wouldn’t have worked out anymore. As for the best weather conditions, I would suggest to go there on a cloudy day so the sun won’t cast any disturbing shadows.
How To Shoot
The shot that you see as the final result was taken with a 24mm Tilt shift lens and is only possible with a tilt-shift lens. The final photo consists of three different shots that are stitched together in Photoshop. The first one was with the lens shifted down to the maximum position so the sunken amphitheater would be visible. The second photo was taken with the lens in the neutral position with the Shard as most important element. The third shot was taken with the lens in maximum upwards shifted position for the sky. It may be possible to take this photograph with a very wide angle lens but the actual scene as depicted in the photo would look much smaller with many more other elements on the sides. A crop could solve it but the trade-off is a loss of pixels and resolution. I didn’t use a long exposure for this photo since the clouds were very static and too gray and there were no people there anyway that I could reduce to ghosts with a long exposure.A Few More Thoughts
My photography location tips are highly personal and based on my own experience. If you have additional location tips for the locations I’ve described, then feel free to add your comments below. Don’t be afraid to share your secret tips, it will result in some competition indeed, but authentic artistic vision and interpretation will always remain unique. I would love to see photos that will render my photographs obsolete. If you want to know more on architectural photography then I can highly recommend the eBook From Basics to Fine-art, that I co-wrote with Julia Anna Gospodarou. And if you want to know more on shooting long exposure photography in the field then I can recommend the video tutorial ‘Mastering Long Exposure Photography‘ with information in video and accompanying eBook that hasn’t been covered anywhere. A novelty for example is my approach towards architecture that is called ‘The maximum point of Perspective’. An approach that adds the maximum amount of dynamics to an architectural photograph. This new video tutorial has been released Wednesday, April 12, 2017 with an introduction discount.


7 Responses
I struggled to find The Scoop (!) in December 2016 but eventually I stood in exactly the same spot as Joel. It was 4pm on a very cold windy overcast day and very few people were about. An interesting sky of cloud. I then struggled to work out how to capture an image based on his example using a full frame camera/24 mm lens. Despite that not being possible, I actually managed to achieve a very pleasing colour photograph with distorted verticals – the late afternoon light and tonal values were superb.
I will return though – I haven’t got a tilt shift camera but I want to try stitching a set of 24mm shots in portrait mode and see what I can achieve in post-processing. I am fascinated by Joel’s image because it is a quite unique point of view – not seen by by any of my fellow amateur colleagues. The foreground of the handrail swooping into the centre of the frame must have loads of potential in all sorts of light – I’ll be going back next time I am in London.
Incidentally, I took some stunning steel and glass shots earlier in the day whilst looking for The Scoop. I think the light was especially good that day. London is a superb playground – always something round the next corner, or above you, if you look up.
Many thanks Joel for this location info.
Thanks Mike – London is a fantastic city for all types of photography and not only that. Even though in this day and age it is very hard to come up with original compositions, I believe it is still possible, but you must be willing to look a bit further and really see. One tip: most people would always try to back up a bit to have more in the frame when shooting architecture. My tip: try to get even closer, you will be surprised how much that adds in terms of perspective and drama to an image. Good luck! – Joel
Good info; I live in California and Salk Institute is right down the road…..based on info from their website looks like some major construction work in process and a good deal of scaffolding on the exterior of many buildings. Link: http://www.salk.edu/wp-content/uploads/2016/12/Salk-Scaffolding-10-26-16.jpg.jpeg.
Thanks!
Bill
Oh that’s not good, better wait a while till it’s finished, happy you liked the info though. Thanks – Joel
Interesante trabajo…
Thanks so much for sharing these locations Joel.
The Scoop is an amazing spot indeed. The first time I visited London it was packed and I couldn’t take a single decent shot… the second time I managed to find it empty enough and with a little bit of patience I managed to take some great pictures.
My favorite is actually taken from inside the scoop towards the city hall and tower bridge.
https://www.yuvalshiboli.com/exposures-lasts-forever/scooped
As it was quite windy that day all it took was 20 sec exposure with a 9 stops ND filter the lens is 10mm to get a super wide angle.
Thank for the inspiration Joel.
Best regards
Yuval Shiboli
Thanks Yuval, that shot of the Scoop is also a very good one. A very good find! I love how you took advantage of the perspective distortion of an extreme wide angle lens to add to the aesthetics of your image and at the same time avoided distorted lines. I hope you know what I mean. Very beautiful and glad you like my articles.
Joel