


Essential Equipment For Long Exposure Photography
The gear you need for long exposure photography: minimal requirements and suggestions
Camera With Bulb Mode
Obviously you will need a camera. I recommend any camera that has a bulb mode. Any conventional DSLR with bulb feature will do, as will a mirrorless camera with bulb. Of course analog cameras will also work for long exposure photographs, even better than with digital cameras since the issue with increasing noise with extended long exposures is largely a digital camera issue. Analog cameras are more suitable for extreme long exposures and with that I mean long exposures that are extended up to an hour or even longer at night.
Most camera’s have a maximum exposure time of 30 seconds, which is not long enough most of the time for long exposure photography. The bulb mode allows you to go past that point of 30 seconds. Most models like the Canon 5D Mark III have a dial with the B(ulb) setting that’s easy to find. If you have a brand that doesn’t have this explicit Bulb mode setting on the dials then most of the times it’s hidden somewhere under the Manual setting. Just dial in an exposure time past the 30 seconds and you will see the bulb mode.
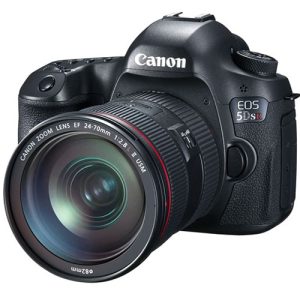
The 50MP Canon 5DS/R DSLR. Lots of megapixels, great quality but perhaps not a great fit for long exposure photography due to the high noise levels with long exposures. At least, this is what some consumers say about it. Personally, I’m also using the 5DS/R and I never ran into issues with noise. The majority of images are free of noise unless I use it under very extreme conditions. It has a bulb mode for long exposure photography.
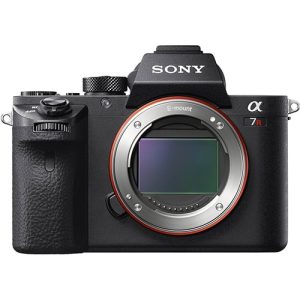
Sony’s A7RII is a 42.5 MP mirrorless camera that’s a bit lighter than a comparable DSLR. It remains to be seen if this camera is also usable for long exposure photography, in spite of the excellent quality under normal conditions and its bulb mode feature.
Recommendable Cameras And The Noise Issue With Long Exposure Photography
At the time of writing the update on this tutorial there’s an increasing amount of cameras emerging that have 30MP or more. The Nikon line of DSLR cameras were one of the first DSLRs that exceeded 30MP and along with that also the issue of increased noise with long exposure photography became an increasing problem. The high megapixel cameras, and with high megapixel I mean any DSLR or CMOS sensorcamera with a resolution of more than 30MP weren’t equipped for long exposure photography. They will do extremely well for normal use of the camera but they perform not as well as the older generation of relatively low megapixel cameras like the Canon 5D mark III, when shooting long exposure photographs. The amount of megapixels packed up on just a small digital CMOS sensor simply approach the limits of such a sensor, especially in extreme conditions as in long exposure photography where sensors will heat faster, the thermal noise issue. However, Nikon now has released a camera, the D810A with 36MP, intended for astrophotography and long exposure photography specifically, but not exclusively, and has far less of an issue with noise. Even more, the Nikon D810A comes with a so-called soft release button so you won’t even need a remote control to take long exposure photographs up to 10 minutes to avoid the inevitable vibration.
Sony, also recently released the mirrorless Sony A7RII with 42.5 MP and the first reviews, here, indicated that also this camera isn’t performing as expected with long exposure photography but it looks like Sony is actually seriously working on a solution for the noise issue with long exposure photography by releasing a firmware update. Apart from those rumours, and I have to emphasize they’re just rumours or second hand information since I haven’t tested any of those new high megapixel cameras myself, and there are simply just very few actual reviews that I could find specifically targeted at long exposure photography. It’s too early to say anything definitive on the long exposure photography capabilities of these new high megapixel cameras. Please bear in mind that these new cameras are all fantastic high resolution cameras and will perform extraordinarily well as long as you don’t need to take long exposure photographs with these cameras. The exception is, as mentioned earlier, the new Nikon D810A and judging the reviews I’ve seen so far that were focused on astrophotography and not so much on daytime long exposure photography, I’m leaning towards recommending it for daytime long exposure photography as well, if you’re also in need of high megapixel photographs. Note that I’m not talking about the Nikon D810 which also seemed to have noise issues when used for long exposure photography.
In-Camera Noise Reduction (NR) Feature: Not The Solution For Noise
Some of you may ask: then why not turn on the in-camera noise reduction or NR feature? Let me state that when using the NR feature on a DSLR to get rid of the noise issue, it isn’t a solution for a long exposure photographer as I am, nor should it be the solution in general: turning on the NR feature doesn’t take away the real issue and that is that the sensor cannot handle long exposures. I’m discussing this topic in a bit more detail later in this tutorial but right now I just want to state that I never use in-camera NR simply because the advantages of using in-camera NR don’t weigh up against the disadvantages of using in-camera NR. My most important argument against use of in-camera NR is that it doubles the time of your exposure. That shouldn’t be a problem if you take long exposures of 30 seconds or less, if you’re not into more extreme long exposure photography like I am. On average it takes me 30 minutes to take one long exposure photograph varying in exposure time between 6 and 8 minutes, my preferred long exposure time, because I need to find a good composition and angle first, manually focus the lens and level the camera on my tripod, take a proper meter reading, take a test shot, correct the settings, take another reading, attach the ND filters (trust me, that isn’t always easy and can take some time!) and remote control, cover the viewfinder and any other cracks and holes on your camera with black tape or a hat, and then finally wait for the ideal moment, if that moment didn’t already pass (in bold because this is an important moment) and then take the actual long exposure photo. That’s all in all 30 minutes on average for one photograph. If you have extensive experience in long exposure photography and with actually shooting out in the field then you know that light and weather conditions can change rapidly, so I’m already taking away from my time and photographic opportunities by needing 30 minutes on average for just one photograph: you might just miss out on that fantastic cloud sequence, that fantastic light, while still setting up and taking that one photograph. You would miss out on even more weather and photography opportunities if you use in-camera NR to increase the time that you would need for just one photograph with an additional 6 or 8 minutes. That’s almost 40 minutes for one long exposure photograph. That’s really too much: even though I’m a slow photographer, taking his time for every photograph, I simply don’t like wasting any of my time, not one minute of my time, because I need to wait for the in-camera NR to get rid of sensor noise because the sensor can’t handle it. A problem that should’ve been solved by the manufacturer.
Tripods
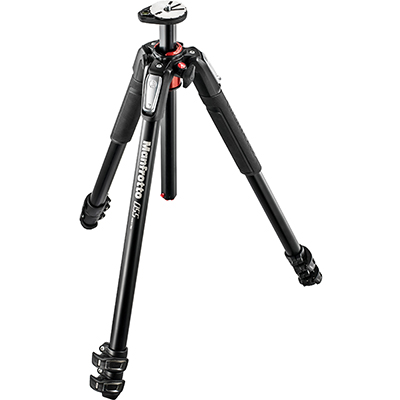
A reliable, relatively heavy but sturdy aluminum tripod with flip locks and 2 sections and a center column from Manfrotto, the 055XPRO3, a budget line tripod with a lot of value for money. Heavier than carbon fiber or basalt tripods.
A beautifully designed, top of the line carbon fiber tripod from Really Right Stuff, with 4 leg sections, twist locks and without a center column: the TVC-24 is a tripod for the demanding photographer that also comes with a price.
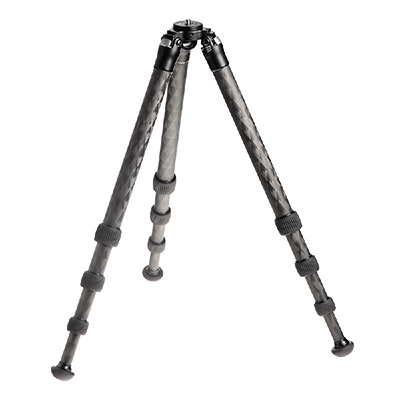
Carbon Fiber, Basalt Or Aluminum Tripods. Twist Locks Or Flip Locks (Lever Locks)
The sturdier the tripod, the better. I have used all kinds of tripod over the years and you can take this from me and from other experienced long exposure photographers: don’t buy the cheap tripods. In the end it will only cost you more money. It really depends on the type of long exposure photographer you are if I am to recommend any tripod to you. When I was exclusively shooting long exposure landscapes and seascapes some years ago I needed a tripod that was more sturdy and heavy and one that’s easy to clean when shooting out in the sea. One that’s heavy enough to eliminate as much vibration as possible on a windy beach and usually those tripods are not very easy to travel with. If you travel a lot you might be better served with a compact tripod that you can easily put in your suitcase and also in your backpack. One that’s compact, light but not too light. These days I shoot a lot of architecture and now I prefer a tripod that I can easily travel with in the subway without hitting someone in the face accidentally with the tripod for example, so it should be relatively compact. At the same time it should be extendable to at least 6 foot or 1.80 meters, preferably even larger, so I can use it to tower above the traffic in a city if I need to. Well, compact and extendable to an extra large format, usually don’t really go together. Even more if you want something that’s not too heavy but still has enough weight to resist any vibration. In other words: the perfect tripod doesn’t exist. It’s for that reason I have a few different tripods: one light and compact one for architecture and a more heavy tripod for seascapes. I’m now looking for a bigger but still a light weight tripod for architecture that’s not going to hurt my back when traveling extensively.
When looking for a tripod pay attention to the following aspects:
- Material: aluminum or carbon fiber or basalt. Aluminum is cheaper and heavier but can serve a purpose when you’re shooting in windy conditions to provide more stability. Carbon fiber is more expensive and also lighter. Basalt is somewhere in between in terms of weight and price. Travelers would benefit more from a light weight carbon fiber tripod. If it’s too light for shooting in windy conditions then attaching a weight (your backpack for example) to the hook under the tripod can solve this problem.
- Leg sections and extendable height of the tripod: tripods with more leg sections usually have a larger maximum height and can have more compact dimensions ideal for traveling. Note that when you’re not so tall it doesn’t mean that it’s not recommendable to buy a tripod with a 7 foot maximum height for example. Such a tripod could come in very handy in situations where you need to tower out above the direct environment. You will need to use a ladder in that case or stand on another artificial platform, obviously.
- Twist locks or flip locks (lever locks): Personally I prefer the twist locks. Very easy and fast to lock, unlock, set up and take down compared to the flip locks. But I’ve heard of many other photographers who claim exactly the opposite! It’s a matter of personal preference but usually tripods with flip locks or lever locks cannot have too many leg sections. Furthermore I find that flip locks can get stuck easily when there’s a bit of sand in the flip locks. Gitzo and Really Right Stuff have a large assortment of mainly twist lock tripods.
- Center column or not: The purposes of a center column are various. To some it’s a way to have additional height, to others it’s useful to be able to tilt the center column, if it has this feature. Some others claim that since the hook, to attach additional weight to, is right under the center column this will directly reduce any vibration in the camera. I find this a bit far fetched but I’m not necessarily saying it’s nonsense. Some center columns can be inverted, now that’s a feature I’ve found to be quite handy at times. Whatever you decide, it’s not recommended to extend the center column if you don’t need to, it will only increase chances of vibration in your camera and will make the tripod less stable.
A tripod that I can recommend and is very affordable and a great entry level tripod in general, besides being sturdy and reliable as well, is the Manfrotto 055XPROB. It’s versatile and you can use it for both architectural photography and for seascapes. If you want to spend a bit more money then I can recommend the Gitzo series of tripods. They have tripods for the more demanding photographer up to the professional photographer. They have a large assortment of carbon fiber tripods. If you want something in between, that’s lighter than an aluminum tripod but heavier than a carbon fiber tripod, than Gitzo also have basalt tripods. If you’re looking for the top of the line tripods then Really Right Stuff (RRS) might be something for you. They have beautifully crafted carbon fiber tripods in all sizes, and they don’t only have a high quality and robust feel, they also look good. This is for example an RRS tripod that I can recommend: it’s extendable to 175cm and has a good load capacity. The latter is an important aspect to factor in if the weight of your camera and lens combined is heavier than usual. But the RRS tripods come with a price. There are many other good tripods that are very affordable and still very good but be prepared to pay at least a few hundred dollars for a good tripod.
Tripod Heads And Quick Release Systems
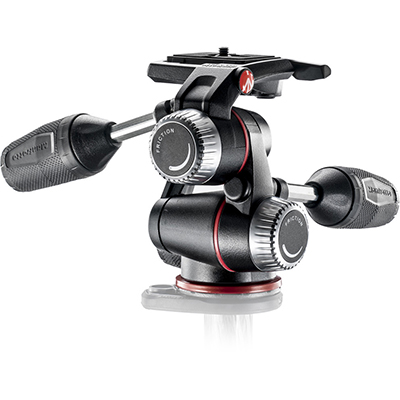
A typical example of a good but very affordable pan/tilt or 3 way head: the Manfrotto MHXPRO 3W one of many good tripod heads from Manfrotto that has the quick release system included.
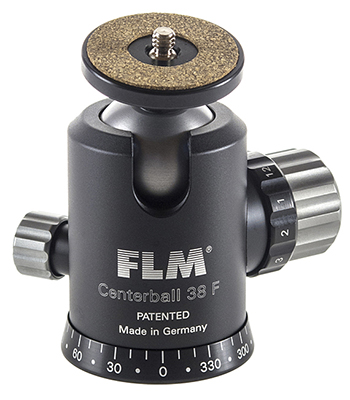
A typical high quality but affordable ball head: the FLM CB38F from German manufacturer FLM. This ball head doesn’t come with the Arca-Swiss compatible Quick Release system from FLM which needs to be purchased separately. Note that you could also attach a third party Arca-Swiss quick release system to this ball head or even a non Arca-Swiss quick release system.
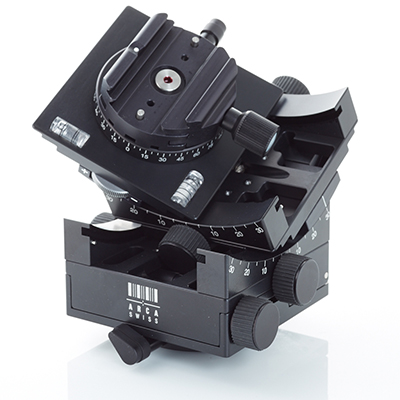
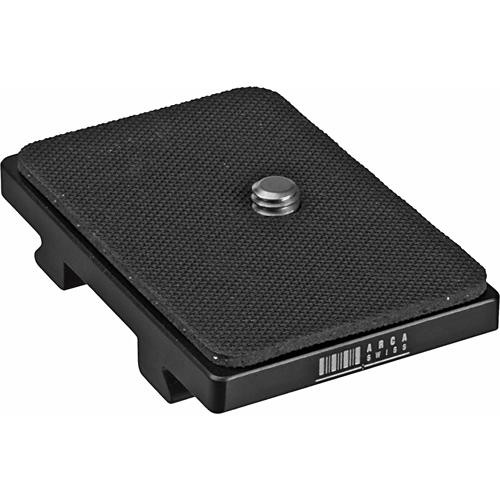
A geared head tripod head from Arca-Swiss. This is the C1 Cube that looks fantastic and is of the highest quality but it is also very expensive. It comes with the Arca-Swiss flip lock quick release system.
Various Types Of Tripod Heads And The Importance Of A Good Tripod Head – Suggestions And An Overview
Not only a good sturdy and reliable tripod is important for the long exposure photographer, but also a good tripod head as it is the connection between tripod and camera and it needs to be as sturdy and reliable as the tripod itself. In the intro part of this section I’m referring to a tripod head as the entire device of tripod head and quick release system together but I will discuss them separately when I describe the various tripod heads and quick release systems. An expensive tripod with a cheap, low quality tripod head will eliminate the positive qualities of your tripod and the feeling of security for your expensive camera and lens: if your camera is locked on your tripod head, you need to be able to rely that it’s tightly locked to the clamp under all circumstances and that the ball doesn’t slip out of position after a few seconds. Apart from that, and here I’m addressing the quick release systems more specifically, it’s equally important that you can easily and safely remove the camera from your tripod head and that you don’t have to pay a high price for every mistake you make. Safety pins on the quick release system of a tripod head will give you additional safety. Furthermore, attaching your camera to the tripod head and any adjustments to the camera position should be done, just as safe and smoothly and accurately. Keep in mind that with long exposure photography all these aspects and requirements are more critical than with normal exposure times. The extended long exposure times make the whole set up of camera, tripod and tripod head even more sensitive for vibrations and knobs that won’t lock the ball tightly enough for a longer time. There are several types of tripod heads and what you choose is dependent on the personal preferences but all types of tripod heads are suitable for long exposure photography. The ball head however is the more obvious choice for long exposure photographers, for its flexibility and quick operation, while the geared head is more the choice for photographers who need accurate adjustments and levelling like architectural photographers.
- PAN/TILT HEADS – These are tripod heads that have 3 way movements, making it easy to adjust the head in all directions with the use of handles. The separate handles make levelling a camera in all directions very easy, by independently tilting and locking the head vertically, horizontally and 360 degrees around since each axis can be operated and locked independently. A major disadvantage of such a head is that they’re usually quite large due to the handles and they will make carrying this around with you a little less comfortable. Also storing this type of tripod head in your backpack or suitcase takes up more space. Manfrotto has a few affordable 3 way tripod heads that I can recommend. Here’s an example of a good 3 way tripod head with smaller handles. The load of these tripod heads are enough for most DSLRs but if you’re using medium format or large format cameras then pay attention to the load capacity as well.
- BALL HEADS – These are the most popular types and there are some very beautifully designed and high quality ball heads from all the popular brands on the market. Ball heads can be adjusted in any direction by using the camera that’s attached on top of the ball head, as a ‘handle’. This method gives you a lot of flexibility and speed while working, but at the same time it’s not really easy to level the camera exactly horizontal and vertical since none of the axes can be locked separately. What you have to look for when considering a ball head are the following:
- Ball diameter: ball heads come in several sizes and the larger the more easy it will be to adjust and the more stable they will be with heavier loads. They can vary in size up to around 58mm for some of the biggest ball heads.
- Load capacity: this is related to the ball diameter and it will be obvious that you will need a higher load capacity if you’re working with larger and heavier telephoto lenses or with medium format cameras. A heavy camera with heavy lenses on a ball head that doesn’t support the load will cause the ball head to move off position and will also make it far more difficult to adjust the position. Ball heads with a large ball diameter and therefore also higher load capacity are more expensive and will also increase the weight of your backpack/suitcase when travelling.
Ball heads come in several price ranges with more or less options but it’s recommendable to have a ball head with a knob to adjust the friction depending on the weight of your camera and lens. In general, a ball head is considered to be more ‘professional’ than a pan/tilt head. It’s true that ball heads come in a larger variety and often also in higher price ranges but I think that the normal ball head without any possibility to adjust friction and fix at least one axis are terrible when you need to have accurate and quick levelling. No matter how expensive they are. When shooting architecture and giving long exposure demonstrations at workshops, I find using most ball heads really annoying. I think you’re better off with a cheaper pan/tilt head then. If you still want to go for a ball head type tripod head then there are a few features that will make using ball heads less annoying and even highly recommendable.
- Friction adjustment: a knob or ring with which you can adjust the friction to the weight of the camera and your personal preferences. This feature will help a lot, but not enough for someone like me who prefers more precise adjustment control.
- Tilt locking: now this is going to make a big difference. With this feature, only available from a few brands, you can lock the ball head on one or even more axes. Most of the time they will lock only one axis, like the horizontal axis. So after you’ve levelled the camera horizontally, you can lock the horizontal axis and then continue levelling the camera on the other axis without having to lose the horizontal levelling. Something that happens to me all the time and is disturbing. FLM, a German manufacturer, who produces some very high quality ball heads that are very affordable and come with features that you won’t see anywhere, produces ball heads with this feature, like the FLM CB58 FTR that I can highly recommend. Very recently I’ve decided to buy this FLM ball head myself, after a neck-and-neck race with the Arca-Swiss Monoball Z2, that even has 2 tilt locks: a horizontal and a vertical lock. The FLM is definitely cheaper and in terms of quality absolutely not less. But I decided it would give me just a bit more flexibility and speed if I only had one tilt lock.
Recommended brands for ball heads are Arca-Swiss, the Swiss manufacturer who basically invented the ball head and set the standard for the quality and functionality of ball heads and the quick release systems in this industry and Really Right Stuff. Unfortunately Really Right Stuff doesn’t have a ball head with the tilt lock. Both these brands are among the best. But there are many other familiar or less familiar manufacturers that produce high quality ball heads. German manufacturer Novoflex is another example of high quality and aesthetic German engineering and an example of one of the many other brands.
- GEARED HEADS – there are just a few brands that have geared heads in their line of tripod heads which I think is a bit disappointing. This type of tripod heads have my absolute preference since you can very accurately fine tune the level on all axes with a geared head in small incremental steps, which is absolutely not the case with ball heads. Often I get so frustrated working with ball heads without any tilt locking feature and it can take me sometimes minutes to level my camera correctly with a ball head only to see it’s still not levelled. Using geared heads will save you the annoyance, but the comfort and accuracy of geared heads come with a price. The best geared heads are from Arca-Swiss. The cheapest version, the D4 will cost you around $ 1,000. Their top model is the C1 Cube that will sell for around $ 1,700. Manfrotto also has a few geared heads in their line up that are between $300 and $800 but are either too bulky or simply not as robust as their Arca-Swiss counterparts and can’t support a too heavy load. Another disadvantage of the Manfrotto tripod heads is that they don’t come with the Arca-Swiss type of quick release, making it rather limited in using brand independent interchangeable accessories. Having said that, Manfrotto recently released a few models like the XPRO and 468MGQ6 Hydrostatic that come with an Arca-Swiss compatible quick release system called Manfrotto Top Lock that can also be purchased separately to fit to a select few Manfrotto tripod heads. If you’re interested in the Manfrotto geared heads and want the versatility of the Arca-Swiss system, it’s worth looking into this. Besides these brands there are virtually no other manufacturers with geared heads. If you are an architectural photographer, then either go for the ball heads with a tilt lock or go for the geared heads. In the video below the Arca Swiss C1 Cube geared head is being demonstrated by Robert White to give you an idea how a geared head works.
Arca Swiss Or Arca Style Quick Release Systems And Uniq/C Systems
Discussing the various types of tripod heads without addressing the topic of the Arca-Swiss or Arca style universal quick release systems wouldn’t be complete. A quick release system (QR) is any system of plates and clamps or adapters, that accept those plates, to ensure quick releasing of your camera from the tripod head. Often the tripod heads come with a quick release system, specifically made for the tripod head, but sometimes you have to purchase it separately. In almost all cases you’re free to ignore the quick release system that came with the tripod head or is suggested by the brand, and go for a third party quick release system. Whatever type of tripod head/quick release combination you’re going to choose, if you buy one, consider going for a quick release system of the so-called Arca-Swiss type quick release, system, although the new UniQ/C system looks like it’s going to be a good alternative as well. The Arca-Swiss type, or often referred to as Arca type or Arca style, is a universal system of camera plates and clamp design, invented by Arca-Swiss, to ensure compatibility and interchangeability between plates and clamps, so the plates that you have for your camera will fit on other third party Arca-Swiss type ball heads, or more precisely, clamps. As addressed under tripod heads, a reliable and high quality quick release system as part of the entire tripod head, is essential for the safety of your expensive gear. The Arca-Swiss system is a proven and reliable system. Furthermore, this system can save you money on the long run, especially if you want to extend your ball head with accessories like L-plates from other brands.
IMPORTANT NOTE: even though there’s a universal system of quick release, called the Arca-Swiss system, and most manufacturers propagate and claim to have this system, this is in practice not always true. If you want to make sure your camera plate will fit on a Arca-Swiss system clamp, or vice versa, then check out this very elaborate and detailed matrix of quick release clamps and plates and their actual compatibility with the Arca system. It’s also due to this relative compatibility, or incompatibility if you like, that a new initiative has started recently with another system of quick releases that’s also largely Arca-Swiss compatible: the German UniQ/C style of interchangeable clamps and plates. Leading, high quality German manufacturers like FLM, Novoflex and Linhof for example now produce quick release systems that are compatible according the UniQ/C system, and on top will also accept Arca type plates, but of course with the same reservation that applies to other Arca style compatible systems. Here’s an overview of brands that have adopted the UniQ/C system and what plates will fit to what clamps. Although in most cases Arca-Swiss type plates will be accepted by UniQ/C type clamps, what usually won’t work is the safety pin on UniQ/C type clamps to prevent the camera from gliding off the clamp when it’s unlocked. For those safety pins to work properly, UniQ/C type plates are necessary.

Arca-Swiss 802010 Quick Release adapter or clamp with so-called flip lock. This part is attached on top of the tripod head. The camera plate, that needs to be inserted into this clamp, can be any third party camera plate, as long as it is compatible with the Arca-Swiss system standard.
Arca-Swiss universal Quick Release camera plate that will fit most cameras and that will go into the Arca-Swiss quick release clamp in the previous picture or in any other Arca style QR clamp.
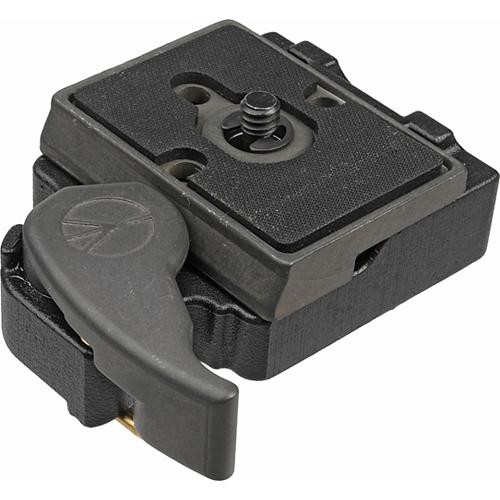
The Manfrotto 323 RC2 Quick Release system with clamp and plate. An example of a budget priced QR system that’s not Arca-Swiss compatible.
Why ND Filters?
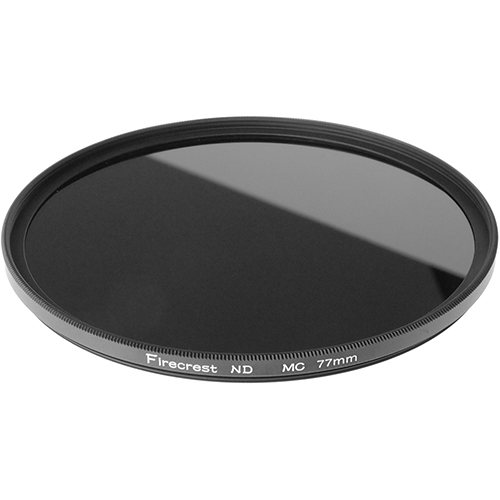
In another section in this tutorial on long exposure photography, and even more extensively in the 424 pages eBook From Basics to Fine Art – Black and white photography, architecture and beyond, written by me and co-author Julia Anna Gospodarou, I’m going into more detail why I prefer to shoot during daytime with exposure times varying between 3 and 7 minutes. The only way to do long exposure photography, in normal conditions, during daytime is by using very dark neutral density or ND filters. There’s no other way to stop the light effectively and increase exposure times than by using ND filters in front of your lens. If you aim to have long exposure times between 3 and 7 minutes, then you will need at least 10 stops ND filters. At this moment the ND filters that I prefer and personally use are the Formatt-Hitech Firecrest 16 stops circular ND filters. These are the only 16 stops ND filters in the world and on top of that, they’re also the most neutral ND filters without any noticeable color cast. You can read more on these filters on theFormatt-Hitech website or here in the independent reviews on my website, and in my own review which is obviously more subjective since these filters also carry my name, or in the product section of my website.
Circular Or Rectangular ND Filters
ND filters in general come as either circular screw-on ND filters and as rectangular slide in filters for which you need an additional filter holder.
The choice between circular screw-on filters like the ones from Formatt-Hitech and B+W on one hand and the rectangular ND filter systems, comprising of ND filter, filter holder and adapter, from Formatt-Hitech and Lee on the other hand, is a very personal and subjective one. Before I started using the Formatt-Hitech rectangular filters a few years ago, I’ve always used the circular B+W filters as there were no other easily accessible alternatives. Lee’s ND filter with holder system were quite difficult to get and still are difficult to get your hands on since they’re quite often out of stock. These days several manufacturers like Formatt-Hitech and Singh-Ray have both rectangular and circular filter systems and choosing either one of them isn’t based on accessibility and availability of one of those filters anymore. It will be a choice based on personal preference.
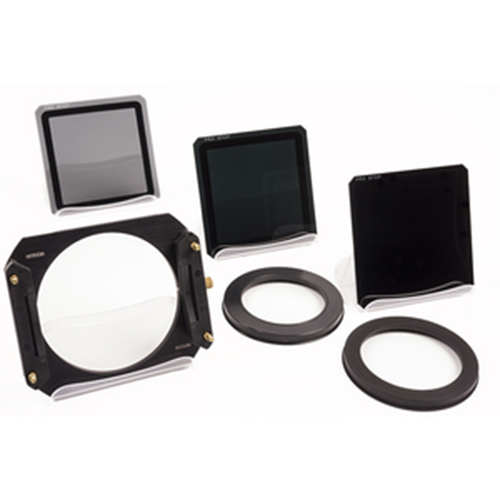
With a rectangular filter system, you will need an adapter to attach the filter holder to the lens. This is a 77mm adapter for a 100mm filter holder
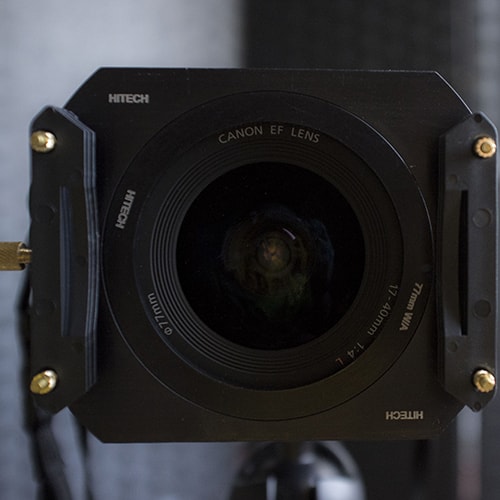
After that, an aluminum Formatt-Hitech filter holder for regular 100mm rectangular ND filters, or any other compatible filter holder like the one from Lee, is attached to the adapter.
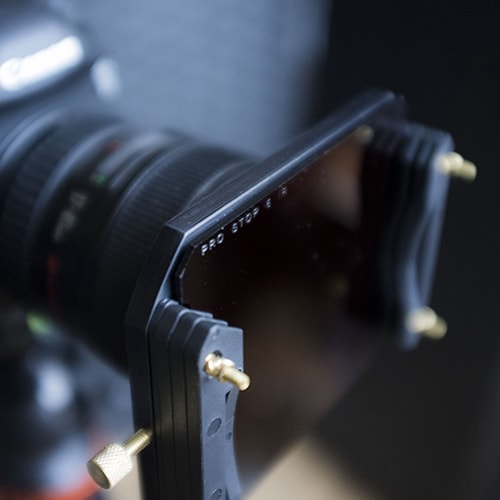
Finally you need to insert the rectangular ND filter into the filter holder. Most filter holders will have spacers to stack multiple filters.
I have both types of ND filters. In the past I preferred the rectangular filters to the circular ones. Most of the times I thought, and many others with me, it would be easier to attach your ND filters to your lens using rectangular filters since you only have to slide them into the filter holder that’s attached to the front part of your lens. With circular filters you always run the risk that you accidentally adjust the focus on your lens when trying to screw the filters onto your lens. Furthermore the filter-holders can be attached to any size lens using an adapter ring, usually they come in the sizes 77 and 82mm to accommodate the most commonly used lenses.
These days however, with the arrival of the Firecrest filters that also come as very slim filters, I find it easier to use the circular filters. Due to the size they’re easier to attach and they take up almost no space in your backpack compared to the rectangular filters with filter holders. When I’m out shooting I just carry them around in my pockets, which I find is more practical and saves me valuable time.
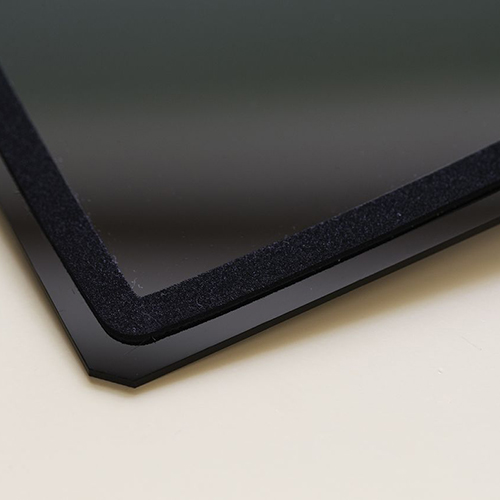
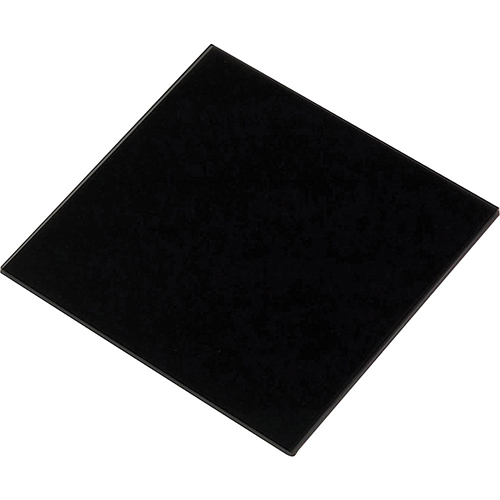
A rectangular filter from Formatt-Hitech with a gasket to avoid light leaking through the sides of the filter. In spite of the gasket, it’s almost impossible to avoid light leakage with extended long exposures
Black tape on the sides of two stacked rectangular filters in a regular 100mm filter holder to avoid light leaking through the openings between the stacked filters and filter holder during extended long exposures in bright daylight.
Another important reason for me to use circular screw on filters: I don’t need to tape the sides of the filter since the screw construction will leak no light, which is different with rectangular filters: even though filter holders and filters are constructed very solidly and have a gasket to make the filter and filter holder construction more light-proof, it’s almost impossible to avoid light leaking through the sides of the filters. Especially with extended long exposures and in bright light conditions. You will always need to tape the sides where the filter on one side and the holder on the other side, leaves an opening.
The above were my personal arguments for using circular filters these days. If I would be using ND gradient filters, then my choice would be different. If you want to make an informed decision, then have a look at the table below with the pros and cons for going either with a rectangular ND filter or with a circular ND filter. In the end one system is not better than the other, but it will be a personal preference.
Pro and cons of rectangular slide-in filters vs circular screw-on filters
| Filter Type | Pros | Cons | Remark |
|---|---|---|---|
| Circular | – Easy to transport and store, takes up little space. you can put it in your pocket while shooting and on the move– Not so easy to break due to the ring that serves as protection– No light leakage through the sides of the filters– Easier to attach: just screw it on your lens (subjective)– Easy to stack– Less expensive than a set of rectangular filters with filter holder and adapter | – Not possible or very hard to stack with neutral gradient filters– Sometimes the filter is hard to remove from the lens or other filter when stacked: it gets stuck sometimes– Sircular filters will cause some vignetting due to its size and the ring if they’re thick rings– One size doesn’t fit all: you need different filter sizes for different lens sizes if you don’t use step up adapters– Screwing on the filter on your lens can cause your lens to get out of focus– You can’t use circular filters on bulgy lenses like the canon 17mm ts-e or nikon 14-24 | Formatt-hitech has superslim and ultraslim circular filters that don’t cause any vignetting– My personal experience is that the superslim circular filters are far easier to attach than rectangular filters– Tip: when your filter gets stuck then screw it even tighter, then unscrew it. this will work most of the times– You can use one circular filter to fit most of your lenses (not the bulgy lens types) if you buy cheap step up rings. make sure then that you buy the largest filter to fit on the smaller lenses as well to avoid vignetting |
| Rectangular | – Can be easily combined with neutral gradient filters– You can slide in the filters into the filter holder while the filter holder is already attached to the lens. chances of your lens getting out of focus are less (subjective)– Easy to stack– Ene size fits all lenses. you only need an adapter ring for your filter holder. note: when you have a bulgy lens like the nikon 14-24 or canon ts-e 17mm then you will need a lucroit filter holder | – You always need a filter holder and adapter to fit it to your lens. this takes up space in your bag.– I find it more cumbersome and time consuming to attach a rectangular filter with filter holder in-between each shot than simply screwing and unscrewing a circular filter– The sides of the filter holder with filter will cause light leakage most of the times: you need to cover it with black tape– A set of rectangular filters with filter holder and adapter is more expensive than a circular filter | – Some people find it easier to attach a rectangular filter with filter holder in-between shots. personally i think it’s easier to screw it on. circular filters have my preference |
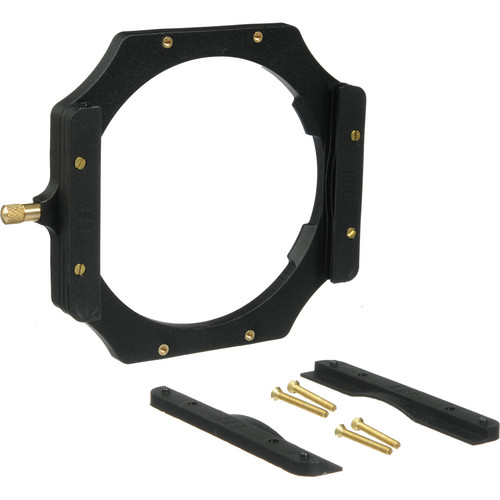
The Lee filter holder foundation set for rectangular ND filters, for use with most regular lenses, without the adapter ring to attach to the lens. It has several slots for use with multiple ND or ND grad filters at the same time.
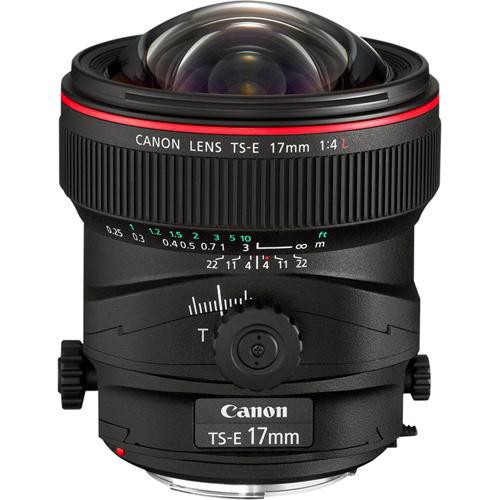
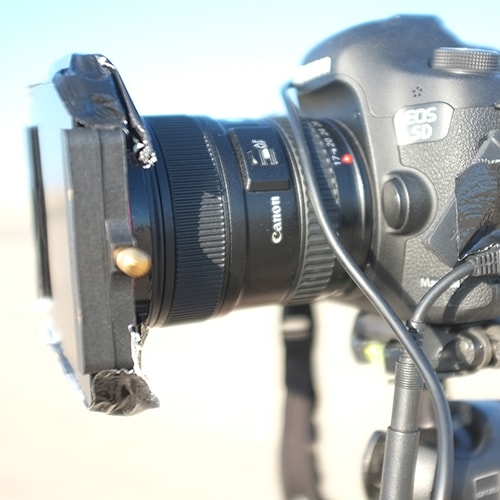
A typical ‘bulgy’ lens, the Canon 17mm TS-E lens. Regular filter holders like in the image before this, or circular filters cannot be used on a lens as this. Lucroit developed filter holders for a lens like this.
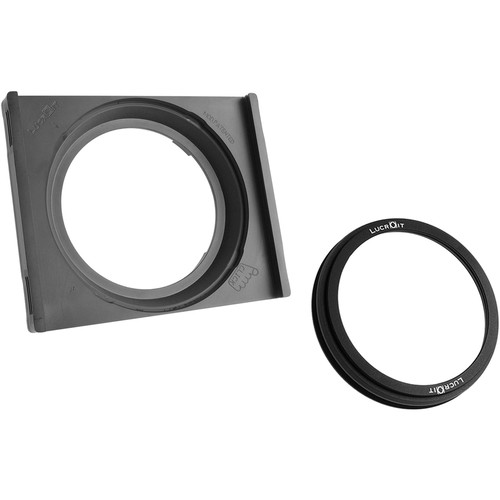
The Lucroit filter holder, in this case for Nikon lenses, for use with 165mm rectangular ND filters on atypical bulgy lenses such as the Nikon 14-24mm where the regular filter holders from Lee or Formatt-Hitech won’t fit.
Vignetting And Stacking ND Filters
Many long exposure photographers use multiple filters at once. They might use a 10 stops, a 6 stops and a GND. Using multiple filters at once is called stacking. There is nothing wrong with stacking and it is even recommended when you need 16 stops of ND filters but don’t have a 16 stops ND Firecrest filter for example. You just need to stack it then. Before I had the Firecrest 16 stops ND filter, I used to stack my 10 stops ND with my 6 stops ND almost on every occasion since it was the only way to achieve 16 stops of ND filtration. There’s however a disadvantage to stacking: vignetting. This is far more related to stacking circular ND filters where the thickness of the ring of the filter will determine the amount of vignetting. It’s less or no problem with stacking rectangular ND filters. I wouldn’t recommend stacking more than 2 filters at the same time for circular filters and not more than 3 filters for rectangular filters. Especially ultra wide angle lenses at their furthest reach will then encounter vignetting and also other issues like reflections in one of the stacked rectangular filters. Best thing is to just one filter at the same time to avoid those issues.
Overview Of Most Popular ND Filters
There are many ND filter manufacturers, some produce only light ND filters, some produce a whole range of them. Some are very well known brands, some are lesser known. The filters come in different price ranges and in different sizes. Instead of listing them all here I will only list the more important brands here, how they perform and what I prefer.
- Formatt-Hitech – Formatt-Hitech produces filters for video and photography and has every filter you could possibly think of, including a line of ND filters from 3 stops up to 16 stops, as circular screw on filters or as rectangular slide in filters, as separate filters or as complete, value for money kits. In August 2014 Formatt-Hitech released the very neutral Firecrest IRND 16 stops filter, the world’s first 16 stops ND filter without any noticeable color cast or vignetting at all, not even in poor light conditions. I’ve tested it extensively here and more independent reviews here, and I was very impressed with the absolute neutrality of it. The Firecrest line of ND filters are available as rectangular slide-in resin filters in the sizes 100x100mm or 165x165mm, that you can use with the aluminum Formatt-Hitech filter holder or compatible Lee filter holder, or, for the 165mm rectangular filters, with the Lucroit filter holder to use it on wide angle bulgy lenses such as the Nikon 14-24mm or the Canon 17mm TS-E lens. The Firecrest filters are also available as superslim circular glass filters (stackable 5.5mm rings) available in the sizes 72, 77 and 82mm. The circular filters will also be available as non-stackable ultraslim filters: 3mm rings which makes them the thinnest filters in the world, ideal for ultra wide angle lenses and even less vignetting. All filters, rectangular and circular Firecrest filters are, available in the densities 3, 6, 10, 13 and 16 stops Firecrest ND filters. The Firecrest filters are also available as complete ND filter kits, the Joel Tjintjelaar Signature Edition kit. The older line of Prostop IRND filters are also still available and are all made from Resin and have slightly more color cast compared to the Firecrest filters. At this moment (October 2015) there’s a backlog in shipping the filters worldwide but Formatt-Hitech has been taken over by Kenko Tokina from Japan in October 2015 and this will ensure that Formatt-Hitech can meet market demands in time. If you want to purchase the Firecrest filters, then click here.
- B+W – B+W Produces some great filters that I’ve been using myself for years before Formatt-Hitech released their latest IRND filters. The B+W filters are available only as circular screw on filters in any size and up to 10 stops. It’s very easy to stack a 10 stops ND filter with a 6 stops ND filter for example, thanks to the filter thread on both the front and the back of each filter. B+W filters are very reliable and have a slightly warm color cast that is also easy to correct in post.
- Lee filters – for a few years the Lee filters have been one of the most popular filters on the market and pushed B+W from the number one spot in the ND filter market. Especially their so called Big Stopper 10 stops ND filter have been in demand widely. They’re only available as rectangular filters to be used with a filter holder that’s also provided by Lee. The Lee has a blue color cast which is easy to correct in post-processing. The only major disadvantage of the Lee Big Stopper is that ever since their release in 2010 they were out of stock everywhere in the world and hard to get. Another, smaller, disadvantage is that they’re not exactly 10 stops but more close to 11 stops. In 2014 Lee also released the Lee Little stopper with 6 stops ND filtration to easily stack it with the 10 stops ND filter to make it 16 stops. But taking into account that the 10 stops is more close to 11 stops you would actually have almost 17 stops of ND filtration which would require very long long exposure times – a bit too long to my taste.
- Singh-Ray – Singh-Ray filters are among the most expensive filters in the market but they have a great range of filters. Until recently they didn’t have ND filters with more than 8 stops but they have hit back with their recent release of a 1o stops and even a 15 stops ND filter. Definitely something to consider seriously but the high price will be an obstacle to many. Singh-Ray also have a so-called Vari ND filterwith adjustable stops varying from 1 to 8 stops. The disadvantage with variable ND filters is that they’re constructed from polarizing filters that are placed on top of each other and will filter the light out as if they’re neutral density filters. This can lead to some strange and unpredictable results when using those vari ND filters. I would always recommend going for solid and fixed neutral density filters.
- The rest – There are a lot of other brands out there, some with absolute horrible color cast and poor construction, others with a good price-quality ratio. Hoya for example is a brand that produces some fantastic filters, especially Infra Red filters but their 9 stops ND filter is very usable but with just not enough ND stops.
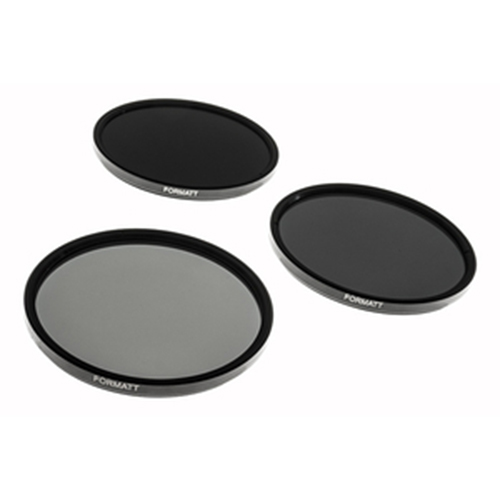
The very neutral Formatt-Hitech Firecrest 16 stops ND circular screw on filter. The circular screw on filters come as superslim and ultraslim filters that will reduce vignetting significantly at very wide angles.
The Lee Big Stopper, 10 stops ND rectangular filter which in practice is more close to 11 stops. It has a slight blue cast that can be corrected easily in post production.
Lenses
Lenses in long exposure photography
For long exposure photography no specific lenses are needed. But in general, wide-angle lenses are used most of the time in long exposure photography and longer lenses less often. There are several reasons for this.
- The typical use of long exposure photography is in landscapes, seascapes, and architectural photography, and to include moving objects in those scenes such as skies and water. Those genres usually are the domain of wider angle lenses to capture the entirety of a specific scene.
- The longer the lens, the more sensitive the whole setup will be to vibrations. Shooting long exposure photographs for example with a 70-200mm telephoto zoom lens is not impossible but they’re more likely to fail, especially in windy conditions than when using a 24mm lens. In those conditions when zooming in with a 200mm lens and with the camera and lens on a tripod, you will already see that the scene is constantly moving and cannot be made fixed and still. But even in less windy conditions when you think the lens is stable and the scene isn’t moving, it will only take a few windy moments during your long exposure shot to fail the end result. The whole setup is simply more prone to vibrations. I’ve been photographing a lot of long exposure photographs in very windy conditions with a wide angle lens at the beach with great and sharp results. If I’ve tried that with my telephoto lens then perhaps 90% of the shots would have failed due to vibrations in the lens. But if you manage to set up your camera with a long lens on a very stable platform in which the lens is supported securely and stable as well, then you might be more successful. Roughly speaking, and depending on the type of lens, there shouldn’t be a problem shooting long exposures with lenses up to 50mm. Those are relatively compactly built lenses. As soon as you need to extend your lens then it’s going to be less stable. Again, this doesn’t mean that longer lenses than 50mm aren’t going to work for long exposure photography, but as a rule of thumb, I would say that anything longer than 70mm is going to be increasingly difficult but not impossible.
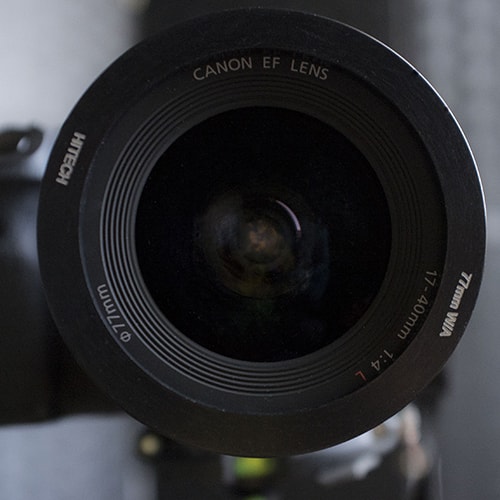
Lenses I would recommend for long exposure photography are solidly and compactly built lenses, preferably prime lenses but wide-angle zoom lenses will also work very well. Any lens you would also use for shooting landscapes or seascapes or architecture in normal situations without the intention to shoot long exposure, will do. At this moment I’m almost exclusively using my manual Canon 24mm TS-E lens and the 17-40mm Canon lens without any problem for long exposure photography.
Just make sure that if you use tilt-shift lenses to cover the lens with an old lens bag for example to prevent the light from leaking in through the lens. Tilt-shift lenses are usually not built for long exposure photography and will leak light through the hinges and other openings of a typical tilt-shift lens.
Basically, any lens can be used for long exposure photography, but if you use a tilt-shift lens like this one from Canon, with all the moving mechanical parts and openings, you will need to cover the lens with a dark cloth or, what I prefer, with an old lens bag, to prevent light from leaking in through the T-S mechanisms in the 24 TS-E lens.
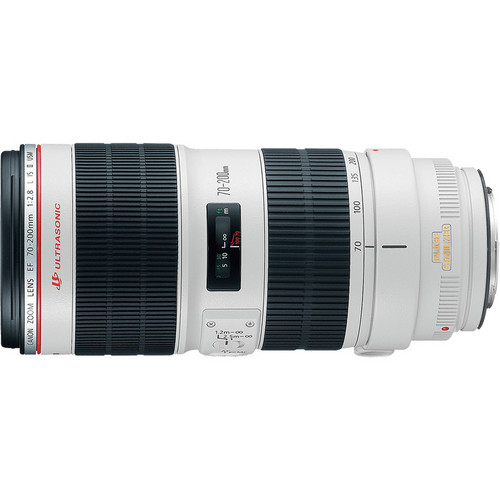 The Canon EF 70-200mm telephoto zoom lens is a fantastic lens with a very solid construction, but not the ideal lens for long exposure photography in windy conditions: too much visible vibration.
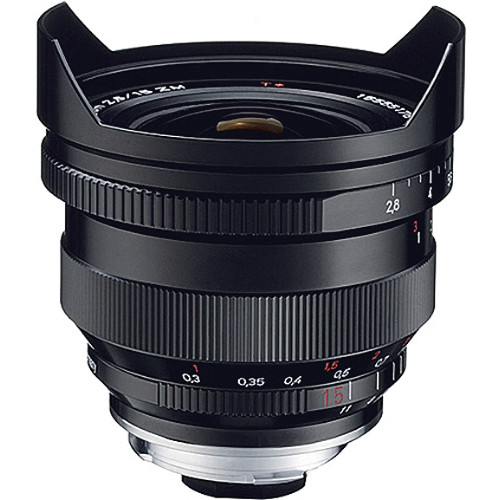
A wide-angle lens, and even more a prime lens, like this Carl Zeiss 15mm Distagon manual focus lens, are the ideal lenses for long exposure photography. But any other wider lens should do fine.
Other Useful Accessories
Polarizers
Many photographers use polarizer filters also in combination with ND filters. The great thing about polarizer filters is that not only do they give a little color boost, but also reduce the light with 2 additional stops. There are two types of polarization filters: the circular polarizer (CP) and the linear polarizer (LP). There is some talk that an LP filter isn’t suitable for DSLRs, it seems to disable the autofocusing of your camera and the built-in light metering. I can’t say for a fact whether that is true or not. But why risk it? Just use a CP. Besides, most polarization filters are CP. Also, know that the so-called variable ND filters are based on the concept of 2 polarizing filters to reduce the light. It’s therefore recommended if you use a variable ND filter to not use it in combination with a polarizer filter because the outcome will be very unpredictable.
Step-Up And Step-Down Rings
A lot of people who use circular screw-on filters will encounter the problem that one size doesn’t fit all. So your newly bought 10 stops ND filter worth $ 100 or more, does fit your 82mm wide-angle, but not your 77mm zoom lens. There’s a quick and easy remedy to this: using step-up/down rings. A step-up/down ring is a thin ring that you mount onto the front of your lens. You can screw your ND filter onto the ring.
You use a step-up ring to fit a filter onto a lens that has a smaller diameter than the filter. For example: using a 77mm ND filter on a 58mm lens. There won’t be any vignetting, since the filter is bigger than the lens.
You use this ring to fit a filter onto a lens that has a bigger diameter than the filter. For example: using a 58mm ND filter on a 77mm lens. This will cause vignetting. As stated here before: it’s a quick and easy fix. But don’t expect any miracles for that kind of price. It’s better to buy one large diameter ND circular filter that can fit to your largest lens without using a step-up ring and will fit all your smaller lenses with the step-up ring to avoid vignetting.
Remote Shutter Release
Another important accessory is a remote that locks. You simply cannot do long exposure photography if you don’t have a remote shutter release. If you manually press the shutter button, the camera moves just a little bit which results in unsharp pictures. And of course, you don’t want to keep pressing that shutter button for 5 minutes or longer when taking long exposure photographs. It really doesn’t matter if you buy a $ 400 dollar wireless remote with multiple functions or a simple $ 10 dollar no brand remote. As long as it remotely presses and depresses the shutter button and it can lock the shutter button.
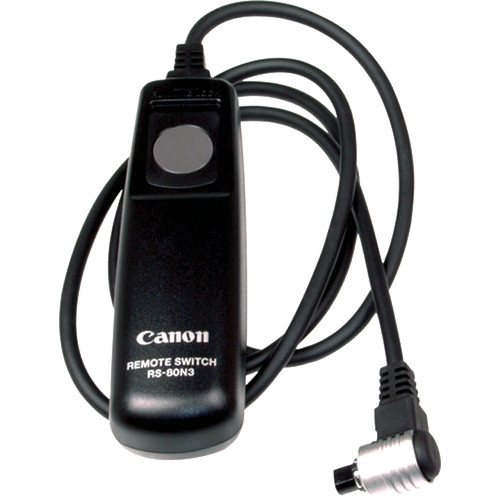
A basic Canon remote shutter release with shutter lock that does the job for long exposure photography
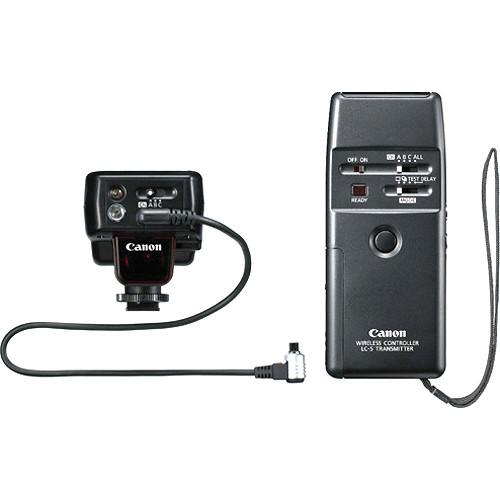
A wireless remote shutter release with other interesting remote features from Canon. Wireless can come in quite handy.
Black Tape
Yes, black tape. Probably the cheapest accessory in your bag but also one that can save you a lot of frustration. Use it to cover the viewfinder to prevent the light from leaking in if your camera doesn’t come with a built-in cover like the Nikon. Use it to tape your lens bag around your tilt-shift lens. And there are so many other uses when out in the field. Light leakage is the most common mistake beginners make and it will show in your photo as a strange overexposed purple or magenta-like area in your photo. Most of the time, that is light leaking into your camera. Remember that most cameras are not specifically built for long exposure photography.
Taking Long Exposure Photographs
A practical step-by-step guide for taking long-exposure photographs
Introduction
Now you have all the necessary equipment you would need for long exposure photography and you like the effects as demonstrated in the examples or you may have seen some other striking and inspiring examples of long exposure photography, now how to proceed and what to do?
The following steps may look like many steps but once you’ve done this a few times, it will all go very easily and naturally. The steps aren’t the hardest part, they’re actually very easy to execute, but what you had in mind and how to exactly (re)create what you had in mind, that’s the hardest part and is a matter of practice. Just practice a lot and at some point, you will find the location, the subject, the exact camera settings, and the exposure time that will suit your artistic vision in a very natural way. Don’t worry about the correct expression of your original artistic vision just yet, that will come in time. Most of the time you will start by copying other artists, and other photographs, which is perfectly natural because it’s the easiest way to learn things fast. Your work may not look very original or authentic at first, but that’s not a problem. As long as you’re still in the learning phase and practicing this technique, it’s normal to emulate other artists and photographs and I would even recommend doing that in the beginning. As long as at some point you start dictating your artistic direction and use the skills you’ve learned to support your vision. Instead of using someone else’s original vision to support your skills.
Before You Go Out Shooting – Preparations And Tips
Usually, before I grab my gear and actually go out shooting on location, especially if I haven’t been there before, I’ve already done some research on the location I want to visit and its environment. Careful preparation is an important aspect of especially long exposure photography since the nature of long exposure photography is such that every shot matters and weather conditions or any other environmental conditions need to be very specific to take full advantage of long exposure photography. You can’t just click away. Most of the time, if you’re lucky, you will find yourself coming home from a day of shooting with just a handful of good photos. Setting up just one shot usually takes up 20 to 30 minutes so time is of the essence.
Here are a few pointers that will help you prepare for a successful long exposure photography session.
Preparations At Home
Things you have to keep in mind if you want to increase the chances of getting some good results are:
- Check the weather. Are there enough relatively fast-moving clouds? Check the weather forecast, or go outside and check it out yourself. If you’re shooting architecture and there are no clouds then usually it’s no use shooting long exposure photographs, unless you also go for capturing other moving elements in an urban scene like traffic or crowds of people. Then long exposure makes more sense. If you shoot with your camera straight up to the sky then I prefer a different sky than when shooting architecture with the camera pointed to and leveled with the horizon. Here are my preferences, depending on the subject matter, but feel free to do something different:
- When shooting architecture with my camera pointed straight to the sky: in this case, I prefer a good mix of blue sky and fast-moving clouds. Blue sky – cloud ratio: 60% blue sky and 40% clouds. This will result in distinctive long streaks of clouds. Keep in mind that the longer the exposure time, the more transparent and longer the clouds are. See the section on Long exposure times and its effect on moving objects.
- When shooting architecture with my camera pointed straight forward and leveled with the horizon without any distorted lines: In this case, I prefer far less blue sky or no blue sky at all. Fast-moving clouds in a dark, contrasty ominous sky, in between rain showers, for example, are my preferred weather conditions. This will result in some streaks of clouds, but with a different shape that will especially suit architectural photographs of more classic architecture. Again, see Long exposure times and its effect on moving objects.
- For seascapes any type of weather will work, even clear blue skies, the long exposure effect will then be visible only in the smooth water. The quality of the sky is more important for architectural long exposure photography than for seascape long exposures simply because seascapes always have 2 distinctive long exposure elements: sea and sky. Architecture is usually just one unless you’re also capturing other moving elements like traffic or crowds of people. I prefer to shoot seascapes in between heavy rain showers with fast-moving storm clouds. But also seriously consider shooting seascapes in very foggy conditions. If you like minimalism then the fog will add to the minimalism but also adds a sense of mystery.
- If you’re shooting seascapes, then check the tides in advance. Sometimes it’s needed to have a high tide to remove all the junk you find on beaches or the seaweed around posts or piers. Sometimes you need the low tide to access a specific location. Therefore, checking the location in advance using Google maps is an important aspect of my preparations.
- Scout locations using Google Maps/Streetview and find out more about the object you’re shooting.
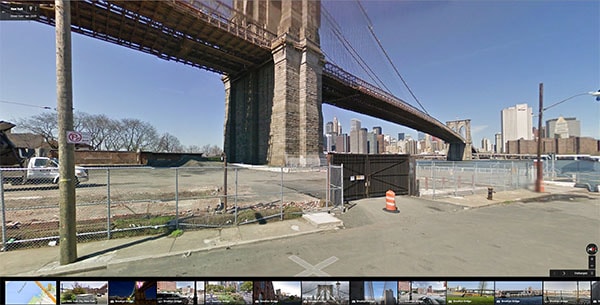
An example of how using Google Maps/Streetview can help you look for possible vantage points from behind your computer. Here’s an example of the Brooklyn Bridge in New York.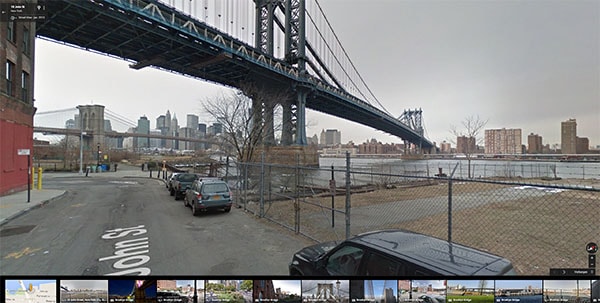
Here’s another view on the Brooklyn Bridge in New York from behind the Manhattan Bridge. Good preparation and location scouting can save you valuable time when shooting on location.
What I usually do when running out of subject matter in my direct area, is to find new locations and new subject matter anywhere around the world that will suit my artistic vision. I find new locations by looking up photos on the Internet on a specific subject for example, and if it’s interesting to me, then I would scout those locations online by using Google maps and/or Google Earth. Just zoom in to street level and look at your destination from various viewpoints. It can save you a lot of disappointments or give you other points of view you didn’t anticipate. But I’m not only looking up photos, I also try to find other information on Wikipedia or any other source of a certain area or building I want to shoot. I also never forget to check the tides in a certain area, if I plan to go out shooting seascapes. Maybe there are no tides or maybe the area you want to access is dangerous. The type of location I find particularly interesting is based on my preference for a certain moment, often triggered by a photo I just saw on the Internet or a story I just read, you name it. This type of scouting and preparation usually takes me a few hours, sometimes even a few days but by the time I actually arrive at the location I just know where to go to, where to stand, and what the ideal position is. Of course, there are always surprises.
On Location
Whether you’ve done any preparations or not – of course it can happen that you stumble across a beautiful location, scene, or beautiful architectural structure completely by accident and unexpectedly – first of all, just walk around the area and look for the angle that you like and match your vision, before setting up your tripod. Try to get a feel of the specific characteristics of the environment, and its mood. Take a good look at the weather conditions, the position of the sun, and the tide of the water. Don’t rush, take your time setting up the shot and observing and absorbing the environment. It is better to take one good photo, than ten mediocre ones.
Step By Step
If you know all the steps already or you just need a refresher or a one-pager with all the basics on what you need to know for long exposure photography, then you can go straight to the end of this tutorial and download the Long Exposure Photography Quick Reference Card with Optimal Settings and print it out: it contains all necessary information you would need for long exposure photography on just one page.
- COMPOSE THE SHOT WITHOUT THE ND FILTER. Now you’re on location and found the perfect angle, you can set up your tripod and camera and compose the shot without the ND filter. Make sure your camera is secured and mounted tightly on your tripod head and the tripod head is tightly locked to the tripod. If it’s windy you could try to stabilize your tripod by hanging a weight like a bag with sand to the hook under your tripod. Every bit of vibration can result in blurry photos, an additional weight help minimize vibrations, and most of all: it will ensure your tripod with an expensive camera won’t smack onto the ground due to a sudden wind gust. It happened to me once.
- SET YOUR CAMERA TO APERTURE PRIORITY. Once you have done that, set your camera to aperture priority (Av) mode and choose your settings, still without the ND filter. I recommend ISO 100 and an aperture of f/8 to start with, see also the section on 5MF8 in this tutorial or, alternatively and more extensively, the section in the book From Basics to Fine Art. Focus your lens, either by using auto-focus or manual focus. Some lenses are manual focus only, but if you have auto-focus, then I can recommend going with auto-focus. Also, turn off image stabilization if your lens has that option. If you leave it on, then your image will be unsharp and blurred, due to the image stabilization. Note: if you’re using a tilt-shift lens then you have to focus first and take a proper meter reading before you shift or tilt the lens. The meter reading with a tilt-shift lens will only be accurate if the lens is in the normal position and not shifted or tilted.
- TAKE A TEST SHOT AND TAKE A METER READING WITHOUT THE ND FILTER. If you are all set up, make sure your subject is perfectly in focus and take a test shot in the aperture priority mode. I do this for several reasons. First of all, I want to know if the light that the camera measured was correct. Secondly, it serves as a reminder. The shutter speed of this image serves as the basis of the long exposure image. In case I forget, I can just look at the metadata of this image. Important: make sure that when you take a meter reading in the aperture priority mode that the viewfinder is properly covered and no light is coming in from the viewfinder. If you don’t do that then you will see that the meter reading is not as accurate as you wanted it to be and you will have an underexposed long exposure photograph as a final result.
- SWITCH OFF AUTOFOCUS AND SET THE CAMERA TO BULB MODE. Set the lens to manual focus, in case you’ve been using auto-focus, and go into bulb mode. If you leave it on auto-focus when taking the long exposure photograph, then you will lose your carefully set up focus since the lens will go try auto-focus the lens with the ND filter in front of the lens, completely in vain. Use the same settings that you used in the aperture priority mode. If you used ISO 100 and f/8.0, make sure that you use these same settings in bulb mode.
- MOUNT THE ND FILTERS. Mount the filters to the lens. After you’ve carefully composed the shot, focused the lens, and taken a meter reading, attach the filters in front of the lens. Always in this order because the ND filters are usually so dark that the camera can’t measure any light with the filters on. Also, if you haven’t done so yet, connect your remote shutter release to your camera so you can take a shot without pressing the shutter button on your camera and keep the shutter open by locking the remote shutter release. Important: If you have a tilt-shift lens then don’t forget to cover the lens barrel as well. And last but not least: cover the viewfinder against any light with the built-in cover, black tape or a hat.
- CALCULATE THE EXPOSURE TIME. Calculate your exposure time using the simple chart below or go directly to the Long Exposure Quick Reference Card. Or, alternatively, you could download one of the many apps available on the iTunes store. Now you have found the exposure time for the ND filter you have. Suppose it says that the exposure time is 30 seconds with the ND filter attached. This is usually not long enough for the type of long exposure photographs I like to shoot with the soft, ethereal looks of water and clouds. To get that effect you would need an exposure time of 5 minutes or longer. You could try to go for a slightly longer exposure time by dialing down the aperture a full stop to f/11 or a few third stops and then take a meter reading again, but then you will get an exposure time of 1 minute at the most. And that’s still not enough for me personally. The best is to add another filter to add a few more stops. On the other hand, if your exposure time with ND filters is around 10 minutes, then it might be a bit too long and you would prefer having one stop less to go with an exposure time of 5 minutes. What you could do then is dial up the aperture a full stop to f/5.6. More on this, in the examples earlier in this article, but also further down in this article and in the Quick Reference Card that shows you what you need to do or use to get an exposure time of at least 5 minutes during daytime and also at night. Tip: if you would just download the free-of-charge calculators you will find on the Internet or the iTunes Store, then all those calculators won’t tell you what the preferred long exposure time is for the type of photos I take, or how to get the ideal long exposure times of around 5 minutes or even longer. You can only find that in this tutorial, the book, and in the Long Exposure Quick Reference Card.
Long Exposure Photography Exposure Times Table
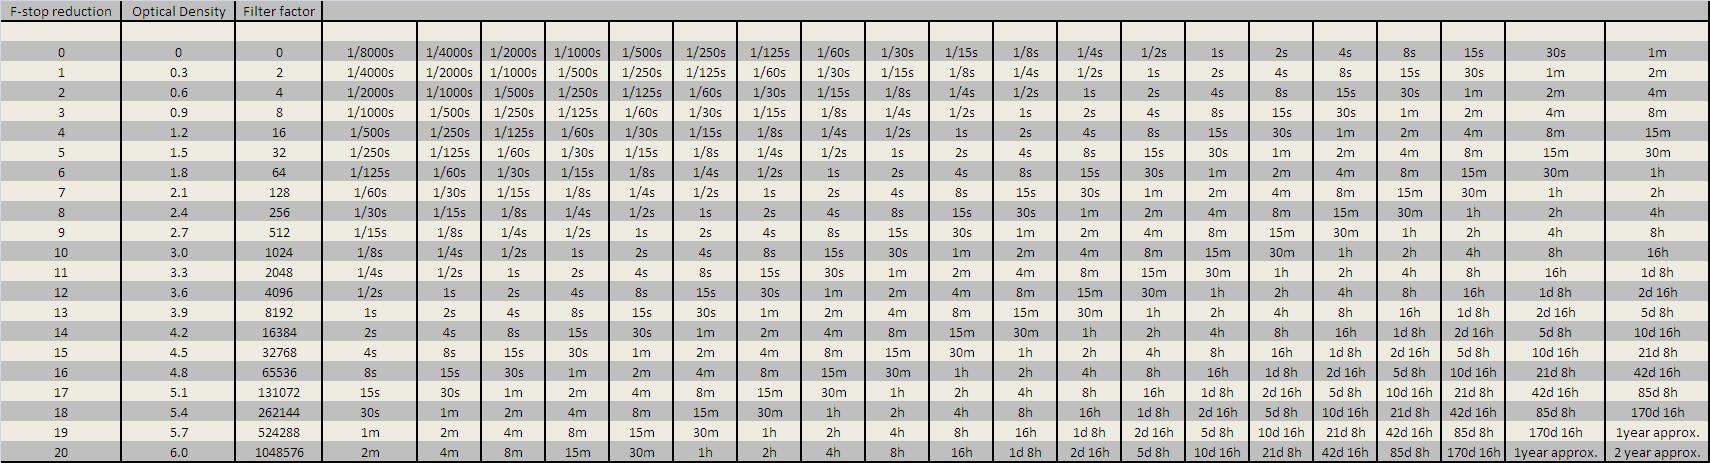
- The table might use a little explanation. The first line represents the shutter speed given by your camera without an ND filter (the line that starts with 0, 0, 0, 1/8000s, 1/4000s, 1/2000s, etc). That is your reference point.
- Suppose you’re using a 6 stops ND filter for your long exposure photo. First, you take a meter reading with your camera without the ND filter as described in the steps in the previous section.
- Your meter reads a shutter speed of 1/500s without the ND filter for example.
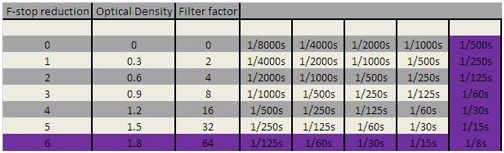
- To find the shutter speed you would need to use the ND filter: go to the top row, which is your reference point, then in this row, go to 1/500s. Go down in that column until you see a 6 on your far left in the F-stop reduction column. I highlighted this example in purple. You’ll see that you are going to need a shutter speed of 1/8s.
- If the suggested metering time is between two stops then always opt for longer since I always add 30 to 50% to the calculated exposure time.
A Few Remarks On The Exposure Chart And More Accurately Calculating Exposure Times With The ND Filter
In theory, this chart, or any other calculation method you’re using, should give you an accurate calculated time. But keep in mind the following remarks:
- The more accurate your meter reading without the ND filter, the more accurate this table or your long exposure calculator will be. To get an accurate meter reading without the ND filter, you will have to cover your viewfinder and any other possible sources of light leakage on your camera. Usually, you should take a meter reading with your camera and/or lens covered exactly the same way as you would when taking a long exposure photograph. Except, of course, for the ND filter.
- The darker the ND filter, the less reliable this table gets. For example, if my camera calculates an exposure of 1/30s without a 10 stops ND filter, you would need to use an exposure of 30 seconds with the 10 stops filter. This is true in theory but doesn’t always quite work out right in real life. I recommend adding around 25% as a correction. Keep in mind as well that light changes constantly: if you took a meter reading a few minutes before you would take the long exposure photo, then when you’re actually taking the long exposure shot, light can change during that time. Especially when you’re shooting close to sunset or sunrise: light will change rapidly. This is one of the reasons to include a correction. See more on this in the next section on dealing with weather and light conditions.
- For the lighter ND filters (until about 6 stops) this chart holds up pretty nicely. But if you use up to 16 stops then the recommended correction would be around 50% or even more, especially again towards dawn when light changes rapidly or during other moments in the day when light changes fast.
Tip 1: Always take notes while shooting. Make it as detailed as possible. What type of light (hard sunlight, moonlight, strobe, cloudy), what time of day, the subject, how did the sky look like, what shutter speed did your camera calculate, what shutter speed did you end up using, etc, etc. These notes will prove their use in the future.
Tip 2: Take your time and carefully compose the shot – Don’t just shoot your subject but instead walk around a building or any other location first, look at it through the viewfinder, step forward, step back a bit, look at it again, take some normal exposure test shots, etc. Often it can take me up to an hour before I really start setting up my tripod and camera to take the shot. After you’re quite confident of the shot you want to take, set up the tripod and camera – make sure it’s all levelled first. Then focus with auto-focus, switch to manual focus and do some additional focus correction. I do this with the live-view mode of my camera so I can zoom in to the object. Switch to Bulb, check all settings. Leave it on manual focus and start screwing on the filter very carefully or slide them into your filter holder. Always try to be as meticulous and disciplined as you can be. Take the time, it’s better to have 2 well composed and executed photographs than 10 failed poorly prepared and executed photos. Remember, often you need to wait for the right combination of weather, clouds and light, before you know it the ideal condition has flown into thin air. So make sure you’re prepared for that ideal condition.
Dealing With Changing Weather And Light Conditions In Long Exposure Photography
How to deal with changing light conditions by applying corrections
As stated before the exposure chart is of course just a theoretical chart: it assumes light conditions that are constant and stable over a longer period of time. It assumes that from the moment you take a meter reading until the moment that you have stopped the exposure of a shot after 20 minutes or so, the light is still exactly the same. Of course, such ideal circumstances are very rare and may be nonexisting. Depending on the weather and the time of day, sunset or sunrise, light can change very fast. How should you be dealing with those changing weather and light conditions in long exposure photography? There is a rule of thumb, but keep in mind this is not an exact science, it’s still an art, a skill that you have to master with a lot of experience. And even if you have mastered it, there’s still a great element of surprise. No matter how experienced you are in long exposure photography, you cannot anticipate everything, and that is also something that I really appreciate in this type of photography: the element of surprise.
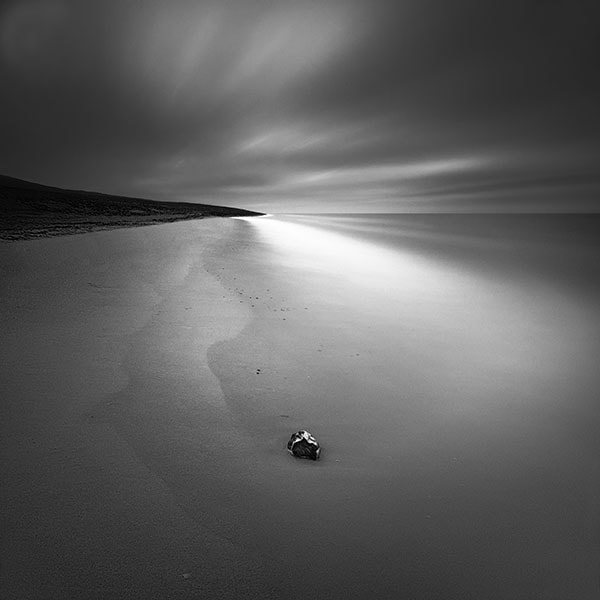
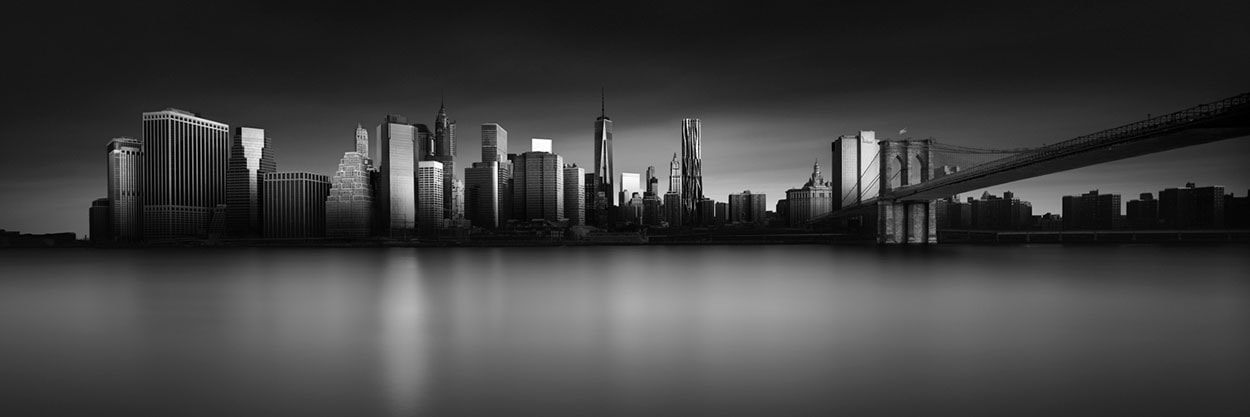 Visual Acoustics VIII – New York City Sunrise (c) Joel Tjintjelaar. This is a photograph I took around sunrise when light conditions changed rapidly. I had to adjust the calculated exposure time during the exposure of this photograph.
This rule of thumb has been mentioned earlier: after you’ve calculated the exposure time it’s recommended to add a correction of 25% to 50% exposure time depending on the density of the filter, the accuracy of the meter reading, and depending on the changing light conditions. Even if light conditions are more or less stable, it’s still recommended to add a correction. In my view this has a logical explanation: the darker the ND filter, the longer the exposure time, the more likely the chance that light conditions change during the time the shutter is opened, and the more correction you need to apply.
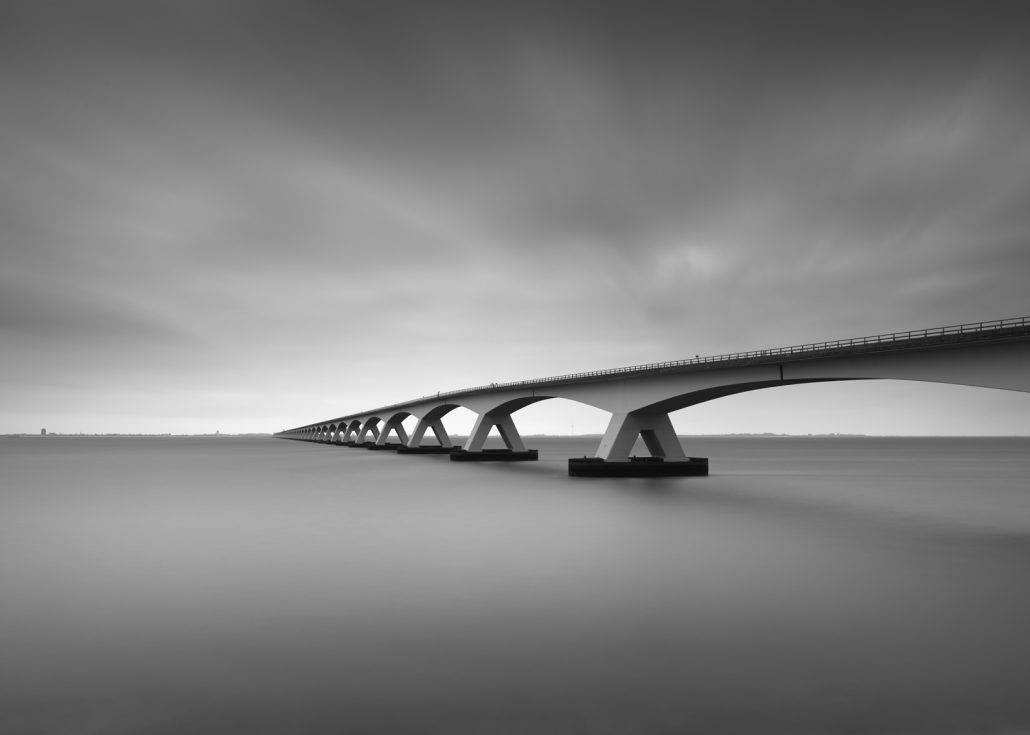
A practical example: if the light is changing rapidly, close to sunset for example, then often I just double the exposure time. My Zeeland bridge “Vanishing” shot shown below, was calculated at 256 seconds from the chart. It was getting dark rapidly and there was a heavy fog. So I just doubled the exposure time during the shot instead of going with only a 25% or 50% correction. This is all a matter of experience, especially in dynamic light conditions. But for more stable light conditions adding 25% if you use 10 ND stops to 50% exposure time, if you use more than 10 ND stops, is a good rule of thumb.
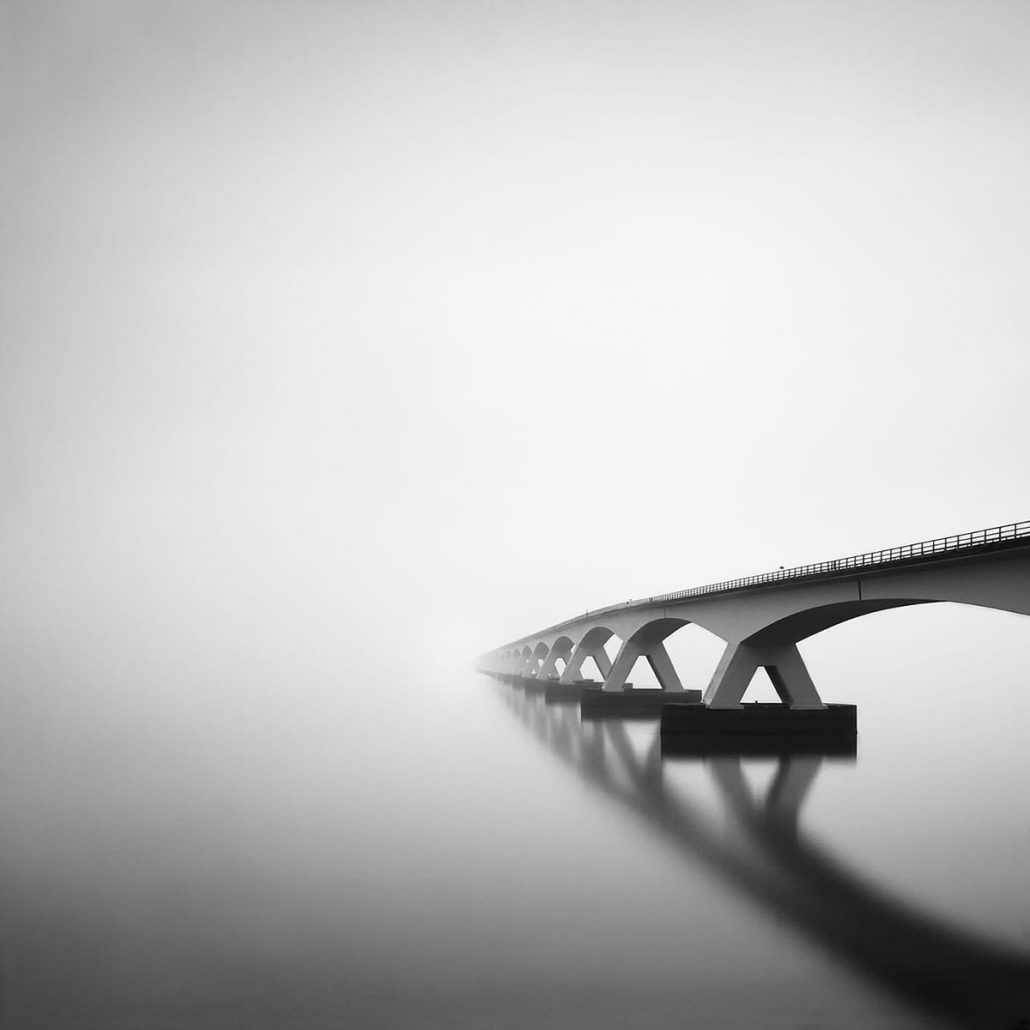 Vanishing © Joel Tjintjelaar. This is a long exposure photograph of the Zeeland bridge in the Netherlands, vanishing into the thick fog. I took this photograph when the light changed very fast close to sunset and on top of that, it was also very foggy. The exposure time I calculated from the chart was 256 seconds. I decided on the spot to double the exposure time to make it 512 seconds (8 minutes and 32) seconds since I felt the light was changing very fast.
Furthermore, it is important to realize that there are no ideal light or weather conditions for long exposure photography. It all depends on what kind of effect you want to achieve in your long exposure photographs. You can always try to make it work. This doesn’t mean I don’t have any preferences, I have them depending on the type of photographs I want to take. Usually, I prefer to shoot my long exposure seascapes in poor light conditions with a lot of clouds and cloud movement, never with a blue sunny sky. The light is just too bright and it will show in the photos with contrasts that are just too harsh. I want to have the best of everything that moves: I want to capture the effects that extended long exposure times have on moving clouds and on the water. Not only on the water. But that’s my personal preference. Besides that, I also think that by shooting under a sky covered with clouds, the light is more diffuse and can be controlled better by the photographer. It works like a softbox in studio photography. When I only had a 10 stops ND filter, I preferred to shoot close to or around sunset when light is fading fast and I can shoot longer exposures to achieve a more ethereal effect. These days with my 16 stops ND filter it doesn’t matter what time of day.
The Empire State Building in New York City – (c) Joel Tjintjelaar. This is a long exposure photo of the Empire State Building with an exposure time of 360 seconds. The sky was blue with some clouds. Roughly the ratio of blue sky vs clouds was around 65% blue sky and 35% clouds. My preferred blue sky and cloud ratio when shooting with the camera straight up to the sky.
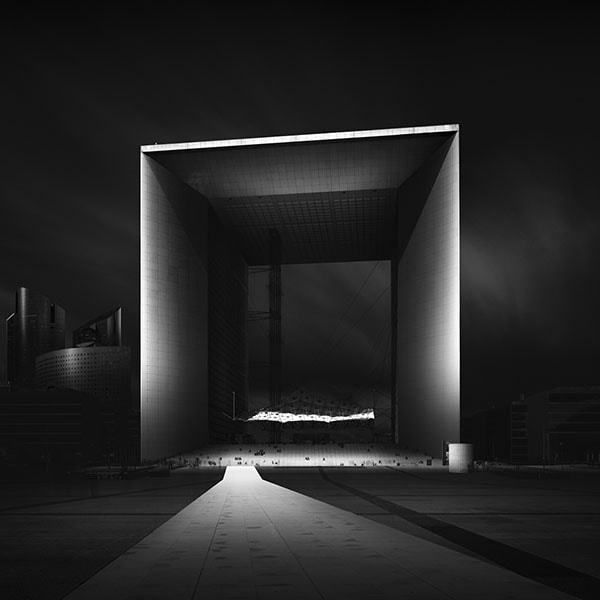 This is La Grande Arche in Paris. I took this long exposure photograph of La Grande Arche with a tilt-shift lens, shooting straight forward, maintaining the horizontals and verticals. The sky was more cloudy when I took this photo and roughly there were 80% clouds and 20% blue sky, which is close to my preferred sky-cloud ratio of a completely clouded sky without any blue sky.
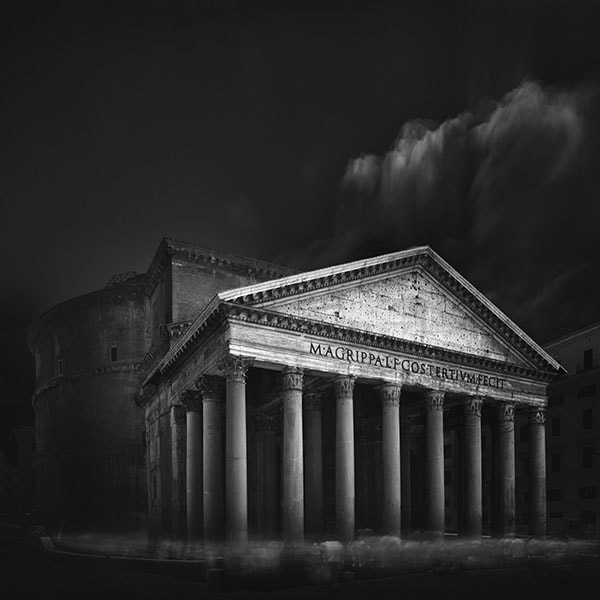
Preferred Blue Sky – Clouds Ratio For Long Exposure Photography
| Long Exposure Genre | Preferred Blue Sky – Cloud Ratio | Alternative | Remark |
|---|---|---|---|
| Seascapes | An overcast sky with fast-moving clouds, preferably darker, high-contrast storm or rain clouds in between rain showers, have my preference. Preferred ratio: 100% dark storm clouds | A completely blue sky would work as well, it would result in a very serene and minimalistic-looking image, in combination with the long exposure effect on the water | A cloudless blue sky would also work well since there are two typical long exposure elements in this type of long exposure photography: sky and water. In any case, I would always go for an extended long exposure of 5 minutes or longer for the softer ‘ethereal’ look, instead of the hard contrasty look. |
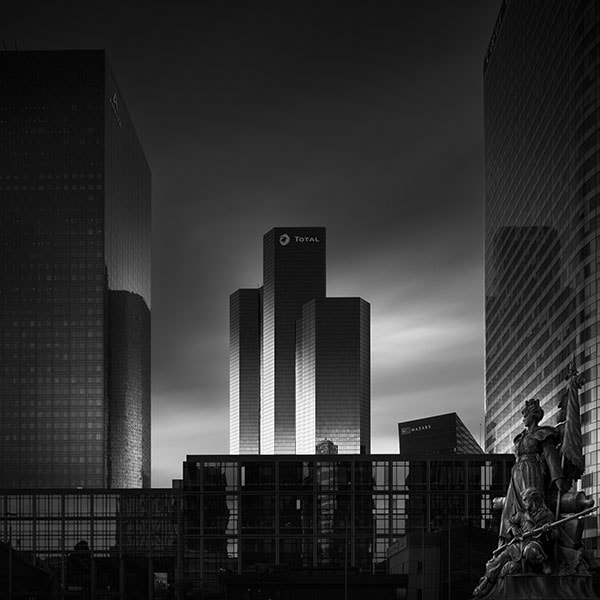
| Architecture – Classic Style (Shooting Straight Forward) | The same as with seascapes: I prefer an overcast sky with a lot of contrast: dark rain clouds work very well. Preferred ratio: 100% dark storm clouds | A completely blue sky wouldn’t add a lot of value in this type of long exposure photography, unless you’re aiming to create motion blur with traffic or people at the same time. Sometimes a bit of blue sky would work too. Alternative preferred ratio: 80% clouds and 20% blue sky | Too much blue sky would make the long exposure sky too contrasty for my taste and it would distract from the actual subject: the architectural structure. Again also here I would go for an extended long exposure time of 5 minutes or longer for the ethereal softer looking clouds an softer contrasts. |
| Architecture – Modern (Shooting Straight Up To The Sky) | In this type of long exposure architectural photography, an overcast sky wouldn’t work, due to the angle of the camera in relation to the clouds. Here I prefer 65% blue sky and 35% fast-moving clouds. | Any other ratio of blue sky and clouds would work, depending on your personal preference. But too many clouds and not enough blue sky would make the sky too flat often too white without any details. | This is a very typical way of shooting architecture and when used in combination with long exposure photography techniques, then the aim is always to create distinctive streaks of clouds. And the best way to achieve that is by having enough blue sky and fast-moving clouds. Especially with this type of architectural photography, I would go for extended long exposure times of 5 minutes and longer to make the streaks of clouds longer and more transparent with softer contrasts: the sky shouldn’t be overpowering the actual subject, which is the building. |
Light Leakage And Noise Issues In Long Exposure Photography
How to prevent light leakage and noise in long exposure photography
Light leakage is unwanted light entering the camera and causing overexposed areas with bands or random spots with color casting on your photographs which will effectively ruin your images. Light leakage is a phenomenon often encountered when shooting long exposure photographs during daytime when you’re not prepared for it and didn’t take the necessary precautionary measures to prevent it. Light leakage is very rarely an issue when taking long exposure photos during the night. The main cause of light leakage is sunlight entering the camera directly during a daytime long exposure shot. What you will see when you’re suffering from light leakage, is an overexposed, or differently exposed, magenta or purple-like band of light in an image. This is not due to faulty construction of your camera, it’s just that cameras are not specifically built for long exposure photography, where the extended times of an opened shutter will make the camera sensor more sensitive to light. With normal exposures, you won’t see any light leakage.
 The light leakage is clearly visible on the sides of the frame. The light leakage in this was caused by the light leaking through the sides of the stacked rectangular filters
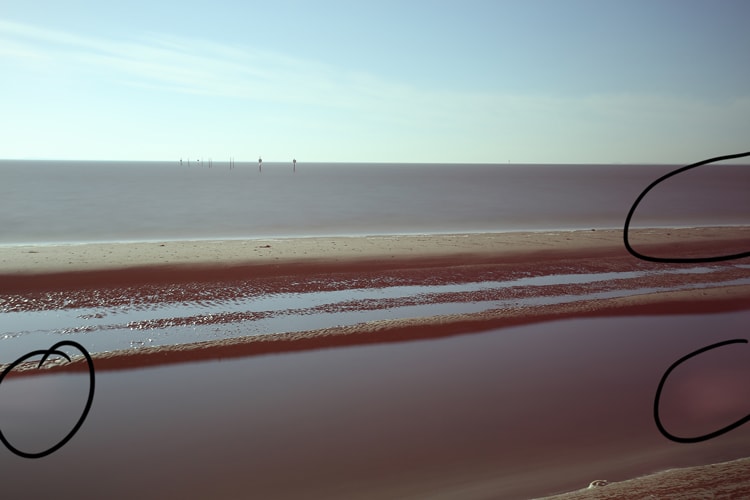
This is what happens when you don’t cover your viewfinder and the sun can leak light through it.
This light leaking through the camera can be caused by several reasons and you can easily fix them.
- Your camera might be “leaking” light. Cracks, holes, and other openings in your camera and/or lens cause light to fall through it and ruin your images with an overexposed area that has a magenta color cast. The longer the exposure, the more light falls through the openings and the bigger the color cast. Note: with openings, I’m referring to for example the sockets of your camera, the hinges of a tilt-shift lens, the space between two stacked filters in a rectangular filter holder, and the viewfinder. More on the latter below.
- Extreme light falls on your viewfinder. Never shoot directly into the sun when taking long exposures. Don’t even shoot directly into the sun with very fast shutter speeds. It can ruin your sensor. Having said that, it’s also bad to shoot with the sun directly behind your back when shooting long exposures. Exposing your viewfinder to the extreme brightness of the sun for several seconds or minutes can cause severe light leakage. Cover the viewfinder by standing behind the camera or use black tape to cover the viewfinder, while taking the long exposure. What I usually do is not only cover the viewfinder with black tape but on top of that cover the whole camera with a hat.
In general, the following rule applies to preventing light leakage:
Try staying out of direct sunlight hitting your camera when shooting long exposure photographs. Try to find a shadowed area to set up your camera and during the exposure, always try to cover your camera, lens and filter holder system with dark cloth, black tape or a hat or a combination of that.
More info and examples on light leakage in this article on my website.
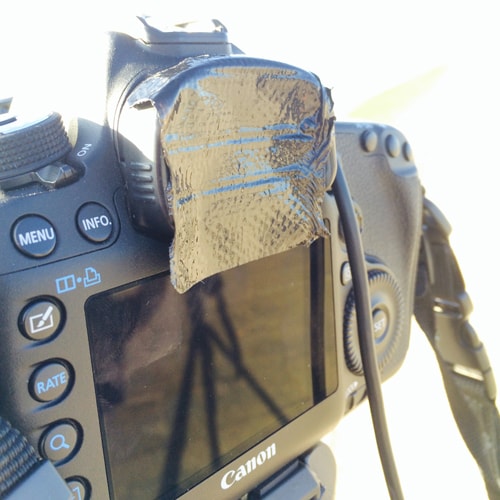
The viewfinder is covered with black tape on a Canon camera. Nikon cameras come with a built-in small shutter to close the viewfinder.
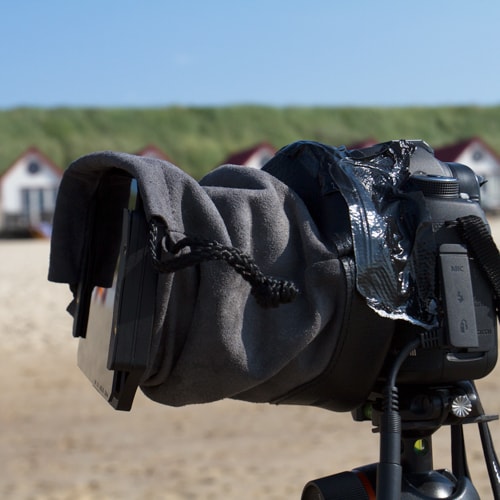 The viewfinder is covered with black tape on a Canon camera. Nikon cameras come with a built-in small shutter to close the viewfinder.
Noise Issues In Long Exposure Photography
A very common side effect when shooting long exposure photos is that there’s more visible noise in your photos when exposure times increase. How to reduce noise and is it useful to use the built-in Noise Reduction (NR) that comes with most modern DSLRs?
It’s a basic and physical rule that noise will increase with longer exposures. There’s a lot of literature on this subject available on the Internet but basically, the noise will increase in poor light conditions combined with longer exposures. There’s however a difference in how noise is handled by modern DSLRs when compared with older model DSLRs: modern DSLRs simply handle noise better. There are many websites discussing this issue with some great examples and I surely can recommend reading Ken Rockwell’s excellent website on this subject. However, and I mentioned this already in the section on equipment in this article, modern-day DSLR sensors have a number of megapixels that were within the reach of medium format cameras only, until just recently. DSLR camera sensors can now easily have 35 MP or more and the quality of photos by DSLRs when used in a regular way is fantastic. But when used in extreme and rare conditions as in long exposure photography, then those sensors don’t seem to hold up very well and will cause a lot of noise. Even with shorter exposures.
How to handle it in the field? Having a good camera doesn’t prevent noise in particular cases like shooting in very poor lighting conditions, or shooting with more than 10 stops. The first thing to do is to try to avoid noise by shooting at the lowest ISO (100) and if there’s still noise it’s easy to just get rid of it by using noise reduction software, in normal situations. The noise produced with the new generation of 35+ MP cameras however is so much that using noise reduction software won’t be an easy job anymore. It can be even so bad that you can’t remove the noise without accepting a reduction of image quality and details at the same time. At the moment of writing, I don’t have an idea what camera manufacturers will do with the noise issue with their high MP cameras when used for long exposure photography but my suggestion would be to not use or purchase those cameras if you’re using them for long exposure photography predominantly. You’re better off then with the older generation of lower MP cameras. But when I need to get rid of noise in post-production then my favorite software at this moment is Topaz Denoise. It’s easy to get rid of the noise without losing any details.
I never use the in-camera Noise Reduction functionality since I think, and with me other respected writers discussing this subject on the Internet, it is much more time effective to remove the noise in post-processing with for example Photoshop or with DFine from NIK software and controlling all parameters yourself instead of the camera. Besides that, and that is the most urgent argument to me: in-camera NR doubles the time of the exposure and since I usually shoot with exposure times of 5 minutes or longer this would increase exposure times for just one shot up to more than 30 minutes. This is not the place to discuss in detail here what in-camera NR does, but basically, it takes another shot right after the regular exposure, with the shutter closed. This results in a dark frame with noise or hot pixels from the image sensor, that’s being subtracted from the original shot and thus removing the noise and hot pixels. This is called dark frame subtraction and you can read more on this on Ken Rockwell’s website for example.
Optimal Long Exposure Photography Settings – Personal Preferences
My Ideal Settings: 16 stops, 5 minutes, f/8
16 Stops instead of 10 Stops – Preferred Aperture Should Prevail
Don’t dial down your aperture to f/22 or smaller to extend the long exposure times, but stack up your ND filters instead!
Too many times I’ve noticed that there’s still a large number of long exposure photographers who base their aperture setting on the preferred exposure time instead of basing it on the depth of field and sharpness they need. For example, a long exposure photographer only has 10 stops of ND filters and wants to shoot in bright daylight with exposure times of over 3 minutes. Most of the time that is impossible and you would need 16 stops of ND filters to do that generally speaking. Nevertheless, they close down their aperture to f/22 to reduce the light even more, simply because they only have 10 stops of ND filters and never considered stacking filters to more than 10 stops. Resulting in photos that aren’t sharp enough with a lot of diffraction and even worse: visible sensor dust. Needless to say this is an incorrect approach. Always base your aperture on what you need for your photo, which is mostly around the sweet spot of the lens which is f/8.0 and not because you don’t have enough ND filters. It’s much better to buy yourself a set of additional ND filters to cover at least 16 stops. Ten stops of ND filters together with stopping down the aperture to f/22 or even smaller, has been the rule for many years to extend exposure times. It’s an outdated rule. If you need to extend exposure times, then don’t compromise on your preferred aperture but stack ND filters to 16 stops. If you’re a serious long exposure photographer then you need at least a set of filters comprising of 10 stops, 6 stops, and a 3 stops ND filter to cover everything between 3 and 19 stops and to control any light condition from dusk till dawn and even at night. Scroll down to the Long Exposure Quick Reference Card to see a schematic visual representation of how an ND filter set covering every combination between 6 and 20 stops can extend your creative options in long exposure photography while not compromising on the sharpness and overall quality of your photos.
My Ideal Long Exposure Photography Settings And 5MF8 Rule
 The Calatrava Bridge near Amsterdam, a daytime long exposure photography shot with my preferred settings: 16 ND stops | f/9.0 | ISO100 | 406 seconds (6 minutes and 46 seconds). Print available as large limited edition prints at the Rotella galleries in New York City and Las Vegas.
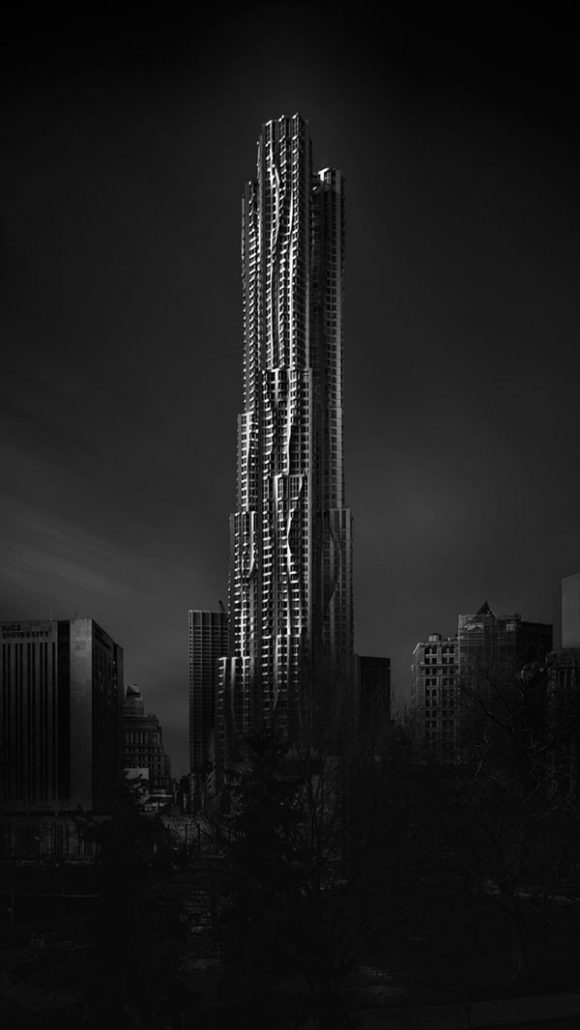
Another daytime long exposure photography shot: The Beekman building or 8 Spruce Street building by architect Frank Gehry in New York. This photograph has been taken on a rather sunny day, blue sky–cloud ratio was approx. 65% blue sky and 35% fast-moving clouds. It was shot with my 24mm TS-E lens with a maximum upward shift and my favorite settings: ISO100 | f/8.0 | 16 stops ND filter | 406 seconds (6 minutes and 46 seconds). Also this print is available as large limited edition prints at the Rotella galleries in New York City and Las Vegas.
Now you have all this information made available to you in this tutorial, and you know the technical aspects and some of the artistic aspects as well to shoot some decent long exposure photographs. But maybe you’ve already practiced a bit and you want something that’s even better or something that resembles somehow the great examples of the great long exposure photography masters. What are the ideal long exposure settings? What is the ideal long exposure time? I can’t speak for the other photographers and what I’m about to say should be taken as just another rule of thumb, but I’ve been shooting quite a lot of long exposure photographs over the years and along the way I’ve also studied many of them from other notable long exposure photographers. What I have observed is that in general the longer the exposure time, the more subtle, transparent, and soft the clouds and water look. The light is more diffused. It gives a more ethereal look to your photo and hence a more timeless and fine art look to it. This is the reason that I’ve started to take long exposure photographs with an exposure time of around 5 minutes or even longer. If you’ve read through this whole article then you’ve seen the results in the examples with extended long exposure times of 5 minutes and longer. In most cases, this requires at least 13 or 16 stops of ND filters, a 10 stops filter won’t do most of the time as you could read in the previous section since this would force you to dial down to very small apertures resulting in a visible negative impact on the image quality. I always aim to shoot with the ‘sweet spot’ of the lens, which on average is around f/8.0, no matter the lens you use, any time between dusk and dawn and even at night. And this can only be done if you have an ND filter set that covers everything between 6 and 20 stops.
This is how it works:
- take a meter reading without the ND filter and with your aperture set to f/8
- lookup a long exposure time that corresponds with an exposure time of 5 minutes or longer, in the long exposure calculation chart (or app on your smartphone) that at the same time also matches the (stacked) ND filters you have. If you have every ND filter between 6 and 20 stops, then you should have no problem finding an exposure time that is around 5 minutes or longer or whatever you prefer. If you’re not close enough to your preferred exposure time, then dial down your aperture, when taking a meter reading without the ND filter, one full stop to f/11 or a few third stops between f/8 and f/11 or vice versa: dial up a full stop to f/5.6 or a few third stops between f/5.6 and f/8.0 to come closer to your preferred exposure time. Or alternatively: remove or add more ND filters. It depends a bit on the situation. I sometimes play with the ISO too and would sometimes adjust it from my preferred ISO100 to a slightly higher ISO200, or anything in between, to add another full or 1/3 f-stop.
This described method is roughly what I call the 5-minutes@f/8.0 Long exposure rule or 5MF8, and it’s a rule based on the concept of shooting with the ideal aperture of the lens and an ideal exposure time of around 5 minutes. You can read more on this 5MF8 LE rule, including a very convenient 5MF8 printable chart, in the recently released eBook From Basics to Fine-art written in collaboration with co-author Julia Anna Gospodarou. In this book you will find even more information on long exposure photography and more examples of great long exposure photographs, but not only that: It covers everything related to fine-art photography like composition techniques, vision in fine-art photography, the concept of fine art, detailed step-by-step explanations of advanced black and white processing methods, architectural photography and much more.
A visual schematic representation or infographic of the optimal long exposure photography settings in relation to the ND filters available to you, the time of day and the recommended exposure times can be found in the downloadable and printable Long Exposure Quick Reference Card with Optimal Settings.
Long Exposure Photography Quick Reference Guide
A high-resolution, downloadable, and printable long exposure infographic or quick reference card with optimal settings, featuring the most important and relevant practical information when shooting out in the field.
The most important practical information available in this tutorial has been narrowed down to a visual representation or infographic, called Long Exposure Quick Reference Card with Optimal Settings, which you can download and print to bring with you as a handy reference when shooting in the field. It’s a high-resolution long exposure quick reference card with only the most used and most relevant information and tips and, what I also believe, the most optimal settings for long exposure photography. All on one page. So instead of presenting a large number of long exposure times, including useless and unrealistic times, like in the simple but detailed Long Exposure Photography Exposure Times table in this tutorial, I’ve only included the most relevant times and filter types. It needs to be mentioned that this is a quick reference card not only for beginners and more advanced long exposure photographers but it’s also designed for long exposure photography workshop instructors who want to give their students a (hopefully) easy-to-understand and portable quick guide to bring with them when shooting out in the field. Of course, it doesn’t have all the possible information. For example, I’ve only included exposure times and suggestions for the most commonly used ND filters and I’ve also only included the realistic exposure times with personal suggestions on what the best exposure times are, depending on the time of day and light conditions. If for example, on one hand, you live in an area with very bright light conditions and you only have a 6 stops ND filter then the best you can get at daytime is just an exposure of less than 1 second, which is not enough for the type of long exposure photography I propagate. But if you go out shooting at night on the other hand, then the 6 stops ND filter is very useful. Another example: a 16 stops ND filter is great for any type of daytime long exposure photography (and a filter I use all the time) but it’s not useful for nighttime long exposure photography and a 10 stops is ideal when shooting at dusk or dawn or whenever light conditions are poor. What you can also see from the quick reference card is that a 10, 13, and 16 stops ND filter is the best set of filters to cover anything during daylight under any condition and part of the evening as well. This type of information will all be visible in the quick reference card and it’s the way I’ve designed this card: to get a quick and clear insight into how long you can shoot with what settings and ND filters.
If you need to know more or don’t know how to start, then I would strongly suggest reading the full tutorial in this post first, then print this quick reference card and then go out shooting!
TIP: click here to download the high-resolution file. 
77 Responses
A test comment – feel free to post comments now comments option has been activated.
Joel Tjintjelaar – BWVision.com
soo much info 🙂 I have just started looking into ND photography. What a world!!!
Nicolai, thanks. I didn’t want to exaggerate when I said I wanted to have the most extensive and complete Long exposure tutorial available on the Internet, that is free of charge. If you can find another tutorial that is more complete, let me know:)
Joel
How is your signatures series suitable for arctic landscape photography?
The signature series is suitable for every type of photography where a minimum amount of color cast is critical when using ND filters. It’s the only ND filter in the world with 16 stops and one of the most color neutral filters.
A tip for Canon camera owners – you can fit the front body cap (removed before mounting lens!) over the rubber surround on the viewfinder as long as you don’t require to much tilt up to block backlight from the viewfinder.
….. applies at least to the Canon 5D2!
Every Canon I’ve used also has a viewfinder cover built into the strap that can replace the eye cup. I’m uncertain to it’s effectiveness, but worth pointing out it’s there.
All these recommendations are helpful too, my preference is just to use black tape to cover the viewfinder.
Some good information in this post – Thanks! What about the Canon ISO Speed Noise Reduction (4 options) Setting? Are you using this at all? According to Canon, at low ISO speeds the noise is further reduced in shadow areas.
Otis, I have never considered the Canon ISO Speed noise reduction since I always work with low ISO speeds for long exposure. This doesn’t mean that it isn’t an option worth considering but I think the nature of the noise in long exposure photographs is different than the noise with high ISO speeds and I just don’t know if the ISO speed noise reduction would work in the case of long exposure noise. I guess the only way to know is to just try that!
Joel
Joel, thanks for your feedback! It may even bee one of those camera settings that doesn’t even affect RAW files. Another quick question Joel, when your taking a meter reading without the filter are you metering the entire scene using evaluative or taking advantage of spot metering or is there really nothing to gain here and simply leave my camera in evaluative?
Dear Joel, firstly, it is a real pleasure to see your images and read your tutorials! But as I know there is one more ND 16 stops 77mm – circular, made by Marumi. Not aware of its qualities.
Assen,
It’s very well possible that other manufacturers have started producing 16 stops ND filters as well. But Formatt-Hitech was the first to do this with a filter that’s very neutral. I’ve been testing 16 stops ND filters from Formatt-Hitech as early as November 2012. But good to see that more manufacturers have 16 stops filters.
Joel
Joel, thanks for this great article. I’ve learnt so much. I’ve been trying my hand at long exposure photography recently but I struggle to create the very white water effect you’ve achieved in your Zeeland Bridge shot above. Do you do anything in post processing to accentuate the effect?
Yes, I do a lot in post processing in terms of processing to black and white. Please have a look at my free tutorials.
Incredible tutorial and discussion. Thank you very much. This tutorial is a cut above what one will normally find on websites. Just tried day time long exposure for the first time with a two stack 16 stop reduction and I just might get addicted. I am an amateur astrophotogrpaher and was very gratified to use similar skills and approaches here. For astrophotography with a DSLR, I am frequently shooting 4min exposures with a combined 2-3 hour stack using software. Thank you and hope to read more of your work!
Many thanks Ivan, glad you think so. It was my aim to produce the most complete free tutorial you could find on the Internet and include things that you can’t find elsewhere and are all coming from my own personal experience. Hope you will enjoy my other articles as well and good luck with daytime long exposure photography!
Joel
Hi Joel,
thanks for your this awesome and detailed tutorial. Although I am not new to long exposure (architecture) photography I recently made some experience with my new rectangular filters (and unfortunately light leakages). I will follow your prevention tips with the tape. This will be difficult to adapt for gradient filters. Perhaps a foam rubber stripe all around the mounted filters with a slit for the GND filter and a Velcro® strip will do fine.
Best regards,
Jens
Thank you Jens, happy to hear this. Rectangular filters are always more prone to light leakage, compared to circular screw on filters, due to its construction but it’s the only option if you want to use it with GND filters. I think if you use GND filters with ND filters then you can ensure that the ND parts aren’t leaking light by taping them. The problems arise when the filter closest to the holder is leaking light. If that’s the ND filter then tape that so the GND filter in front of it can be moved freely.
Joel
Thank you ever so much for sharing this very comprehensive well written inspiring article, very generous of you ! I have a 10 stop B+W on its way from Amazon, can’t wait to give it a try, inspired by your article and wonderful photos I hope to be able to create some magic.
Thank you Anders, all information and best practices are in this tutorial so I’m sure that with some practice you should be able to also create some magic!
Joel
Long exposure photography is not an easy task, due to the attention to technical details you have to take care of, while thinking of the artistic side of your image.This is of the best photography tutorials I’ve read up to now, for sure the best on long exposure. Everything explained with great clarity and depth. Very useful also the comments to the wonderful photos.
Thank you Enrico, glad you think so.
Joel
I’ve just started to try LE photography with some mixed results. I’m using a Canon 700d with a sigma 10-20 zoom. My main problem is I’m getting a light spot right in the middle of the image, its hexagonal and about the size the sun would be if it was in the photo.I’ve blocked off the viewfinder. It also may change size depending on what aperture I use. Can anyone suggest what is causing this and any solutions? Thx in advance
Simon, hard to judge from here what’s wrong but it would help if you’d provide more information. What filter did you use? Was it a fixed ND or a variable ND filter? Do you always have it or only under specific (weather) conditions? Is the light spot also visible when you’re not shooting long exposures?
Joel
Thx for replying so quick. I’m using the square 16 stop firecrest and i only see the spot on LE photos. Its right in middle of photo. I’m getting a few other fainter spots scattered around the pic ( i suspect these maybe dust on lens &/or filter).I’m going to try light proofing the camera as you suggest and see if that eliminates it. Strange that it’s in same spot every time tho.
Look forward to you thoughts. BTW your photos inspired me to try LE. Apart from the spots i’ve had some good results already:) Simon
Hi Simon, this sounds very much like a lens flare. It’s usually the result from some direct sunlight hitting the filters/lens and causing internal reflections. The hexagonal shape is the shape of the diaphragm in the lens, that’s why it changes with aperture. Normally you could use a lens hood to prevent this, but with filters attached that might not be possible. You can always try to position you camera so that it’s not in direct sunlight, or stand next to it so that you cast a shadow on the lens (without being in the frame of course 🙂
Have to disagree with your assessment of Long Exposure Noise Reduction. Yes, it doubles the time of the exposure, but in my experience the benefits far outweigh downside. I have used it on several cameras including the Nikon D810, Canon EOS 1D X, 5D Mark II & III, EOS 1Ds Mark III, and EOS 7D. The issue is that the sensor generates heat when exposing for so long. Long Exposure Noise Reduction (not to be confused with High ISO Noise Reduction) removes noise generated by that heat. The reason it doubles your exposure is the camera is performing dark frame subtraction. It charges the sensor for the same amount of time as the exposure, but producing only a dark frame. The camera then compares the noise in the dark frame with the noise in the exposure, and removes whatever is the same. It works very well and does not come at the cost of detail as noise reduction in Lightroom will. To each his own, but I much prefer the image quality I get when using in-camera Long Exposure Noise Reduction vs. noise reduction in post. I’ve tried it both ways. The image quality is much better letting the camera do its thing.
Thanks for the great article.
Do you have to take a bunch of pictures with bulb mode then stack them on top of each other with a 3rd party tool?
I don’t know what you’re referring to? But when shooting long exposure photos I follow the procedure in this article: only one shot, except when I shoot panorama photos of course.
Joel
Thanks for this tutorial, Joel! Your website and images have helped inspire me to get into this genre of photography. I’ll most likely be doing all of this with a Tamron 15-30mm and my Nikon D750, so it looks like I’ll be going for the SW150 system for filters. B&H seems to be permanently backordered on the 10-stop 150x150mm Firecrest filter, but I think I’ll be starting out with the 6-stop and the 16-stop anyway, with plans to add the 10-stop and the 3-stop later on.
Glad you liked it Tony! The 16 stops is a good choice to start with since you’ll be using that the most. Good luck with it!
Joel
This is such an inspirational, and very detailed tutorial. I am just breaking out into photography and did not know which way to go, however after reading this brilliant lengthy and very detailed tutorial, this has made my mind up of the route that I am now taking. I have purchased all the necessary equipment and shall be putting everything into practice very soon and will pursue this path indefinitely.
I would just like to take this opportunity and thank you so much Joel for this Great FREE in depth tutorial, I look forward to further tutorials on your website.
Have a great Day.
David
Many thanks David! I just wanted to provide interested photographers with a more than superficial tutorial on long exposure photography that is completely free!
Wonderful tutorial. In your book (“From basics to fine art”) you name several reliable filter manufacturers. NISI does not appear on that list, what’s your experience with using their filters (especially the V5 filter kit and related filters) for long exposure photography? Thank you.
Thanks Dragos, the reason NISI didn’t appear on the list in the book or here in my tutorial is simply because NISI was relatively unknown in 2013 when we wrote the book. It’s only since last year that they have become known to a larger audience. I haven’t used NISI filters so I can’t say anything about it’s quality or performance.
Joel
Arca Swiss is based in France, not Switzerland.
I have to correct you: I didn’t say Arca Swiss is based in Switzerland, but that Arca Swiss is a Swiss manufacturer. Which has always been the case: ARCA-SWISS Phototechnik AG were founded in Zurich, Switzerland and they still have a HQ in Horgen in Switzerland but founded an international division (Arca-Swiss International) in France in 1999. You can find this, among other sources, in the German wikipedia: https://de.wikipedia.org/wiki/Arca-Swiss
Joel
Hi Joel, I was very interested to read about what you had to say on the new generation of high mp cameras. I have a D800E and I have discovered that during a daylight LE of around 3-5mins with a 16stop Firecrest on a 24-70mm lens, I was getting white spots in the sky that only became prevalent in the blue parts of the sky, quite annoying, but now thanks to you I understand why. Keep up the good work.
Thank you for sharing this tutorial. I was curious if similar effects could be obtained by shorter but many exposures (say 20 exposures of 30s each) stacked by using a software. Shorter exposures mean less noise which means that reasonable quality could be obtained by less sophisticated / more economical cameras.
I have no idea Bared, I haven’t tried it myself. But if I can get something right in-camera then I always prefer that. But that doesn’t mean you shouldn’t try it.
Joel
I want to have a version of his book in Spanish. Thank you
Just wanted to say a big thank you for this interesting and very complete in-depth tutorial and sharing your personal experiences with us. I must say that the in-camera noise reduction for long exposures is well worth the double time as it removes noise and other artefacts without any noticeable image quality deterioration. I tested it with and without making a 4′ exposure and the difference is huge.
Anyway I prefer using film and my Bronica or 4×5 when I make long exposures because I simply prefer shooting with film.
Thanks Stephan. If in-camera NR works for you, then by all means do it. I prefer it to do it afterwards to save time when shooting.
Joel
Very useful information here. Thank you.
I use a D810 quite effectively for long exposures. For me, if you are going to take a measured approach to this kind of photography and understand it is rather time consuming there should be no problem using the in-camera NR. You seem a bit agitated about having to wait around for the NR to do it’s thing, but it works very well and I have done up to 30 minute exposures (and yes, waited another 30 while the NR did it’s thing). Just another part of the process. The Nikon is also more effective for me due to it’s built-in shutter closure. I am also using a Leica S which is sadly limited to two minute exposures, but still another effective camera.
A HUGE thank you for recommending Formatt-Hitech filters. I have about six different filter brands including the vaunted Breakthrough Technology and I place the F-H at the top of the heap.
And I am having a ball doing this type of photography – finally feeling I have a way to express myself as never before.
Thanks John, it’s all relative and a matter of personal preference of course. You have no issue waiting even longer for the built-in NR to do its work, but I prefer to use that time to take advantage of other photography opportunities and besides that, I very rarely have issues with noise. The small bits of noise I sometimes encounter can be effectively dealt with in post-production. Happy you like the Formatt-Hitech filters -know that they just launched a brand new filter holder system that is designed to eliminate light leakage with covers surrounding and enclosing the filters. I will post my test results with the new filter-holder system on this website. Joel
Sorry, just revisited this post and realized I meant to say “viewfinder closure” instead of “shutter closure”. My bad.
BTW, in addition to the D810 I am now exploring LE with a tech-cam. Interestingly a CFV-50c (Hassleblad) digital back does not take as long as the Nikon when doing it’s NR. Short exposures of under a minute only take a few seconds and LE of say 4-5 minutes takes about half the time say 2 or 3 minutes. Haven’t tried a 30 minute exposure yet…
I find your PP methods fascinating but at the same time daunting! I love the results but am not willing to put in that much time in post. Maybe some day.
Regards,
John
John, I had no idea the in-camera NR on a Hassleblad only takes up part of the normal time for a dark frame. As for my PP methods: it all depends on if you find it worth the time to increase the control on your images. If yes, then my workflow is very rewarding.
Thanks, Joel
Hi,Joel Tjintjelaar, I am a landscape photographer,want to know what part of your tutorial abt long exposure would help me in landscape?
Sanjib, all parts because it’s not meant for a specific genre only. Just look at the table with various effects.
Joel
Hi Joel, Like your article. Are there any extra exposure considerations to be made if using a circular ND stacked with a red or orange filter for more contrast, for night or day images with 120 film ? Or would the Quick Reference Card above still cover it ?
Angus, sorry for my late response but if you’re shooting film, then depending on the type of film you have to take into account the reciprocity failure correction for film. There are many charts available on the Internet that will give you the correction needed for a specific type of film at a given exposure time. Here’s one example but there are many more: http://www.huecandela.com/hue-x/pin-pdf/PinPLUS_Rfail.pdf – The quick reference card above doesn’t include any reciprocity failure corrections.
First I want to thank you for your generosity in sharing what must have been countless hours in the field. Your work is stunning. I will be going to Iceland next year for 10 weeks for an artist residency in the winter, the sun sets by 2pm. I am taking 2 cameras: 4×5 view camera using film, and my Leica type246 Monochrom. I have heard that anything over 10 seconds is not advisable with the Leica. Do you have any experience or know of any success with long exposures and the Monochrom? Once again thank you for the invaluable information here! Kind regards, Lisa
Hello Lisa, I’ve actually set my eye on the Leica 246 Monochrom myself. Not so much for long exposure photography but mainly to shoot regular photos. I too have heard about the amount of noise the Leica produces with long exposures even though I haven’t tested it myself yet. So I can’t say much about it right now but the beauty of a pure B&W sensor puts more weight on the scale for me than its flaws with long exposures. Best, Joel
Hi Joel,
First of all thanks a lot for all this effort that you have put into refining your BW photography and its tutorial over the last few years. I’ve been a huge fan of yours ever since I heard about you and your work through a good friend of mine -Sairam ( I believe you already know him and his photography). I’ve been following your work and tutorial since 2012 and its helped me so much.Always falling back on your charts and steps to improve my photography. always have had the metering chart on my phone.
I’m considering a D850 which was recently released and would love your opinion on its capabilities as a long exposure camera. Either through personal experience or through what you’ve heard through your friends, any help on this consideration would be super valuable.
Thanks a lot once again and looking forward to learning more from you.
Thank you very much for all the very useful and detailed information on your website. It is very helpful to have an insight in how you do things. Thanks for sharing. I am going to read it all.
Jaap Coorens
Leiden
Just came across this fantastic guide. More of a bible really. Thank you very much Joel!
Hello Joel,
Thanks for the information. I’m looking forward to going out and putting your information into practice.. I have a quick question(and I’m not sure if you covered it).. The FH filters you recommend are the 3, 6, 10, 13, 16 ND filters. You also talked about stacking the filters. How much of a degradation/problems are there with the images when you stack vs. using a single filter. If there is not problem with stacking, that would make the 13 and 16 filters redundant…. Is there a larger tradeoff in quality to stack vs a single filter. The 2 filters(13,16) is about $400 so can you comment about the extra $400 cost vs. using a single filter? Thanks..
Thank you Anders, all information
With your first black & white photo pictured here you talk about the passage of time. But precisely that is NOT recorded by your photo, the exposure was far too long, there is no movement whatsoever, all is DEAD. It looks as if a neutron bomb has fallen. Wherever you look, in every nook and cranny on earth you find life. Make that visible.
John,
None of the photos have an exposure that is technically far too long. They’re exactly right for me. If you think it’s far too long, then please do what you prefer. And if you prefer to see photos that express life, then do that. I take and create photos the way I see fit. The way I want it. Life, or no life. Don’t come to my website telling me what I should do with my photography, what the exposure time should be, what the intention should be of my photos and what they should depict or not.
Joel
Using the Canon abbreviations (e.g., Av) is NOT helpful. Just say what you mean. Shutter priority, aperture, Nikon priority, etc. I have made a translation card, but don’t aways have it with me.
Thanks for a very good, comprehensive article.
Jack
Hi,
I have been reading your article/lecture and I find it fantastic! I have only one question. Do these filters/times combinations apply to black and white films, or it is only for DSLRs only?
Thank you in advnace,
Yes, of course it applies to B&W film/analog photography as well. The only thing that you need to add is the compensation for the reciprocity failure that depends on the film you use.
Joel
Thanks a lot!
complete guide with perfect photography images. Your long-exposure photography gives special attention to every photographer. You have taken pictures with different kinds of angles. Am also very happy with your wonderful services.