

This article aims to give some insight into the technical essentials and logic behind black and white photography and also tries to establish an overview of the commonly available methods for processing to black and white. It describes why a black and white photo is not a color photo with the colors removed, but that a color photo is originally a black and white photo with colors added to it. This will form an important premise for the further discussion of black and white techniques. I will discuss the pros and cons of commonly available methods and also take the available plugins into the equation. I won’t go into much detail on how to process black and white photos using the various methods, that’s outside the scope of this article. Furthermore, when processing to black and white I will start from another important premise that it’s about working with luminance differences, or differences in intensities of light.

Disclaimer: First off I need to state that unlike my earlier blogposts, my most recent blogposts don’t intend to provide you with tips or tricks, although some suggestions can be considered as such. My real intention is to provide you with information, preferably information that finds support in other scientific or artistic disciplines, so you can distil tips or tricks yourself instead of accepting them from me. So if you expect a quick and easy read, packed with tips and tricks then just forget about this article and try browsing the tons of other articles available on the Internet that try to enlighten you with tips and tricks. If on the other hand you appreciate neutral but hopefully valuable information based on my experience as a black and white photographer, then by all means enjoy the read.
Introduction
In part 1 of this guide, ‘In Defense of Black and White Photography’, I wrote about why black and white photography could be used, and gave an overview of the artistic pros and cons of black and white photography compared to color photography. One of the conclusions in part 1 is that black and white photography is one step away from reality, which is a way of achieving beauty, necessary for art. Furthermore an elementary difference between color and black and white is that you can only perceive dimensional depth correctly when your view isn’t distracted by colors. Black and white is the ideal medium to create and perceive depth since it’s the art of working with luminosity differences to create a meaningful photograph. On the other hand, colors can add to the symbolism and mood in a photograph, which is a way of communicating a message in a photograph, necessary for it to be called art. In another article I wrote how you can combine the best or most valuable aspects of black and white photography with some of the most valuable characteristics of color, namely by working with split tones in a black and white photograph.
The article in front of you can be read without reading part 1 of this guide, but I would highly recommend reading part 1 for a better understanding of the artistic reasons behind black and white photography. This article is all about the technical reasons for a correct approach to black and white photography.
A black and white photo is not a color photo with the colors removed, but a color photo is originally a black and white photo with colors added to it.
From Black And White To Color And Back
Usually when we talk about converting to black and white we’re referring to the entire process from doing the basic conversion from color to black and white to the further processing of an image. It is important in the context of this article to separate ‘conversion’ from ‘processing’. Whatever phrase you prefer to use outside of this article, is entirely up to you, but I would recommend separating them to avoid confusion.
Conversion: the initial step to come from a raw color photo file to a neutral black and white version of it.
Processing: all other adjustments in photo editing software that doesn’t include a color to black and white conversion. Also applicable to color photographs. Of course.
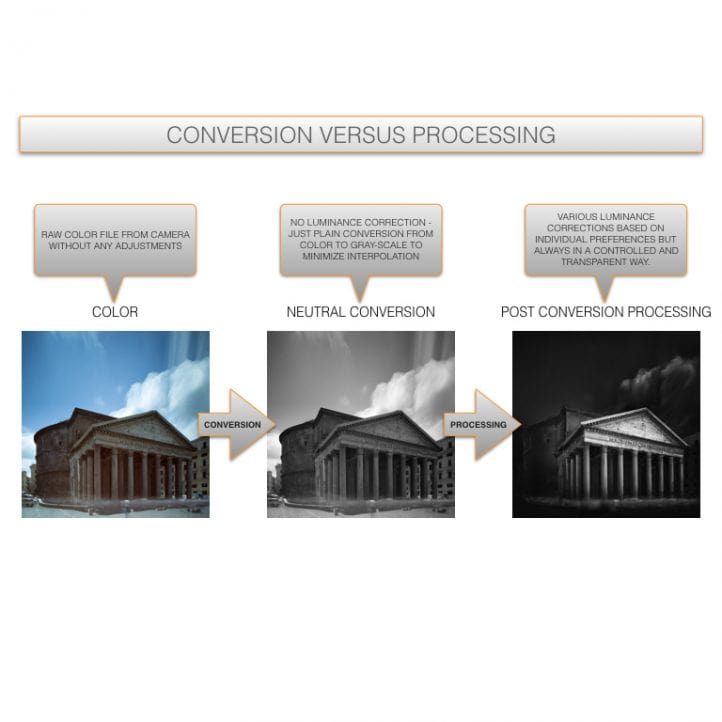

The visuals are representing the following:
- Color is added through a CFA (Color Filter Array) that’s placed on the digital sensor – the sensor itself, only captures light, or better yet, luminance values, and are always without any color information. Photographic sensors such as CCD or CMOS sensors, can only capture light intensities and are, due to its nature, incapable of separating wavelengths, which basically is the actual color. Contrary to common belief, black and white is not a color recording with the colors removed, but color originally is a black and white recording with colors added through the use of a CFA such as a Bayer filter, that can separate the different wavelengths.
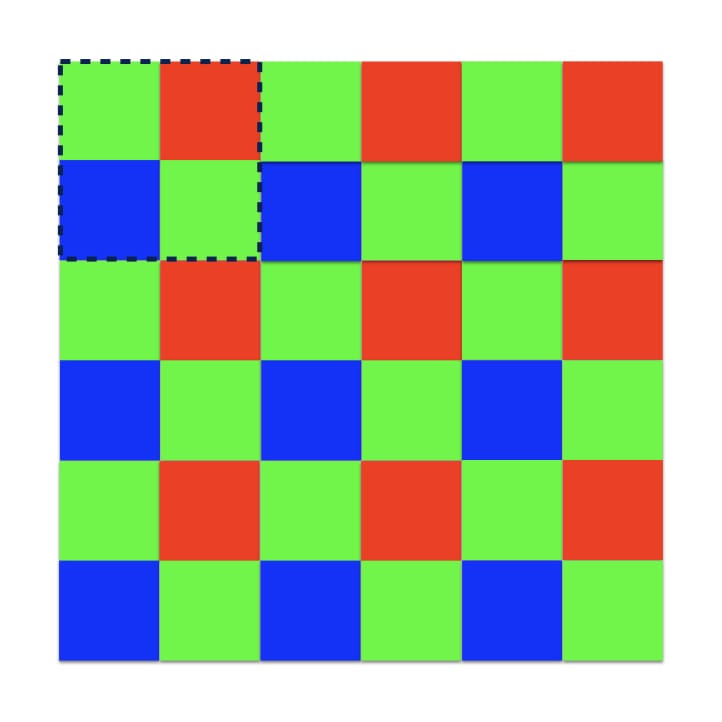
The Bayer filter is a physical layer placed on top of a CCD or CMOS photo sensor, containing a grid with a pattern of red, green and blue filters that can identify the various different wavelengths that represent the various colors. Each colored filter represents a pixel on a sensor and are literally placed on top of a pixel. In a Bayer filter there are always more green than red and blue filters since green filters are more sensitive, just like the human eye is more receptive for green. If for example light hits the red filter, it will only let through the red color component of that light and will discard the blue and green information. The discarded blue and green components will later be added through a demosaicking process that interpolates the missing colors to make up for a full color image. This implies that a color sensor will always miss 2/3 of the information per pixel that will later be guessed! The set of data, containing the red, blue and green data and the luminance values is the actual RAW data file and demosaicking is the process that takes place when we run a RAW file through the RAW converter in Photoshop for example. Despite the fact that demosaicking algorithms are very intelligent, it still is just an algorithm that can make very well educated and accurate guesses. Therefore it has its flaws that become more critical around edges of a photo and also in areas in an image where colors abruptly change. It is for this reason that a photographer working in black and white only, will benefit the most of a sensor that has no CFA and no interpolations will be part of the entire process.
- There are various interpolations in the pure color process that are inevitable to produce a color photograph. The interpolations indicated in the red callouts cannot be avoided in both color and black and white workflows with a full color sensor. Note that I’m also referring to the addition of color through the CFA as ‘interpolation’, which some may argue this is not strictly interpolation. For the sake of this article I’m also calling this interpolation since it has an impact on the original data of recorded luminance values.
- The interpolation in step 2 is inevitable with a full color sensor and consists of an algorithm that depends on the CFA used.
- There are various interpolations in the black and white process that should ideally be avoided to achieve a good black and white photograph
- The interpolation indicated in the blue callout in the black and white workflow can be avoided by choosing the right way of ‘converting’ the color image to black and white. With the right way I mean a neutral way of conversion that will leave intact the luminance values of an image and only removes the color information. The necessary adjustment of luminance values to express the artistic interpretation will then be controllable and individual and not the subject of algorithmic interpretation by the software. More on this further on in this article where I will discuss this in more detail.

- In some cases, as is the case with pure monochromatic digital sensors like the Phase One IQ3 achromatic or the Leica M Monochrom, all interpolations are canceled out even the interpolation in the blue callout. The result out of such a camera is the most neutral and least subjected to algorithmic interpretations and the conversion to remove the colors is eliminated. This is the most ideal starting point for a black and white photograph. Of course such a camera comes with a price, but I believe there should be a place for a monochrome camera only, in the marketing strategy of all mainstream camera manufacturers and not only in the strategy of high-end camera manufacturers like Phase One or Leica.
Black and White Conversion Methods Overview
As stated earlier on in this article: with a black and white conversion I’m only referring to a method for making the actual one-off step, to come from color to black and white. The adjustments that take place after the image has been converted to Black and White, will be referred to as post-processing methods or steps. After all, you only need to make the step from color to B&W once, while post-processing steps can be done multiple times and always have as a goal to correct the luminance values.
What happens with most conversion methods is that they’re aiming to use the characteristics of a black and white photograph, namely the visible differences in luminance values, to create or suppress depth, while at the same time they’re selection criterion is its original color values. This is quite arbitrary since you change a luminance value based on a property, color, that gives no clear indication of its luminance value (see previous article) unless its stripped from its colors. And you may argue that in the end you’ll end up with the right B&W image anyway, so it’s irrelevant, but it’s simply a fundamentally wrong approach.
To minimise the number of interpolations and to start with a neutral and ‘clean’ image, I’m suggesting here that the conversion method should preferably result in a neutral conversion without any luminance corrections that take place ‘behind the scenes’. Luminance corrections should only be part of the subsequent post-processing steps as an intended result.
Aim for an absolute neutral conversion that has no luminance corrections during conversion.
The overview of black and white conversion methods that is presented here can of course never be complete overviews since there are so many individual ways to create a black and white photograph from color and I surely won’t pretend I know all of them, nor do I want to discuss all of them. For every method I’ll try to select a representative set to get an impression.
Not part of this overview is an elaborate analysis of what the in-camera black and white conversion does, simply because there are too many cameras and more importantly: almost all of them, with the exception of a few that will be discussed here briefly, convert images to black and white in-camera to a JPG image. The same applies to all the apps and filters for mobile devices: I love what they can do but it’s also JPG. The quality of a JPG image is such that it’s not comparable to working with a RAW file and working in JPG will result in a loss of too much information that it’s simply not useful for high quality black and white post processing. But if you only want to use your photos for quick uploads to instagram or other social media and don’t intend to create fine art or other high quality images on printed paper, then that’s perfectly justifiable but then this article may not be for you.
Black and White Conversion Methods Photoshop
| PS Feature (image>adj) | Luminance Correction |
|---|---|
| Desaturate | Yes |
| B&W Default | Yes |
| B&W All Channels 0 | Yes |
| Channel Mixer | Yes |
| B&W Gradient Map | Yes |
| Luminosity Blending | No |
Black and White Conversion Methods Photoshop Lightroom (LR) & Capture One (C1)
| B&W Conversion LR and C1 | Luminance Correction |
|---|---|
| LR Black and White Auto | Yes |
| LR Black and White All Channels 0 | Yes |
| C1 Black and White All Channels 0 | Yes |
Black and White Conversion Plug-Ins
| Plug-In | Luminance Correction |
|---|---|
| Silver Efex Pro 2 – Neutral | No |
| Silver Efex Pro 2 – Other Presets | Yes |
| Topaz Neutral | No |
| Topaz Other Presets | Yes |
| DXO Filmpack – Zero Settings | Yes |
| B&W Artisan Pro – Neutral | No |
As can be concluded from the overview of most used conversion methods, there are only a few ways to create a neutral Black and White result without any interpolation. There’s no default setting in the B&W conversion features in Photoshop, Lightroom or Capture One that will create a neutral conversion. All conversion methods are based on the original color channels and increasing or decreasing the color intensity for the desired black and white output. Of course it should be possible to adjust the color intensity in such a way it results in a neutral B&W conversion, but again, there’s no default setting for that, nor does ‘all channels set to 0’ result in such a neutral conversion. From the plug-ins that I have used only the neutral presets in SEP2 and Topaz will offer a black and white conversion without any luminosity corrections. Some may oppose that desaturation in Photoshop should result in a neutral conversion. Theoretically, desaturation of colors should indeed result in a neutral black and white image, but practically, in Photoshop, for example, desaturation is not neutral and it will change the luminance values.
*Edit July 2018* After releasing my B&W Artisan Pro panel, also this panel will create an absolute neutral conversion.
There’s one very easy way though in Photoshop by which you can create a completely neutral black and white conversion, the luminosity blending method, that I demonstrate in the 1-minute video below.
TIP: to check if you have an absolute neutral conversion you can duplicate the converted black and white layer on top of the original color layer where it’s converted from. Then set the duplicated B&W layer to luminosity blending mode. This will result in a layer that should have exactly the same colors as the original color layer below. With no luminance differences.
Black And White Processing Methods Overview
There are as many processing methods as there are artists, trying to give an overview here would be impossible but roughly there are the following processing methods: using traditional darkroom tools such as dodge and burn only, methods that largely rely on presets and global adjustments like those available in Lightroom and Capture One. Methods that are based on a combination of traditional PS tools and Plugins like SEP2 and Topaz and finally there are methods like my method that are the practical reflection of one’s personal preferences. My method, for example, has a clear structure and underlying philosophy to make my workflow transparent and accessible to other aspiring artists. They’re not random tricks. More on my method can be found in my videos/books, and my most recent evolutions of this workflow start from an absolute neutral conversion. In principle, the objective of post-processing is the adjustment of luminance values for the sake of artistic expression. Conversion methods should be irrelevant in this phase. In the following overview, I’m trying to list the most used tools for luminance adjustments, when they’re most useful and what I prefer.
*Edit July 2018:* again, after the release of my B&W Artisan Pro panel in March 2018, there’s an entirely new method for B&W post-processing that is not based on traditional methods as listed below. This method doesn’t use any of the curves, levels or dodge and burning techniques to darken/lighten areas. It takes the exact luminance value of a tone (and also regardless of color) and makes it lighter/darker with an exact percentage. Therefore, this new method is far more accurate and non-destructive and involves a combination of my manual workflow to render the best possible results. I will talk about this method in future articles and in my workshops.
Overview Black and White Post Processing Methods
| Tool/Method | Recommended Application | Pro | Con | Remark |
|---|---|---|---|---|
| Dodge and Burn | Small areas and details that need tonal correction | – Quick and targeted correction– Is a ‘finishing touch’ tool in my opinion | – Not ideal for larger areas– Smooth transitions in for example gradations are almost impossible– Time consuming | This is not the tool I prefer for editing, there are more accurate and subtler tools than this for B&W processing. But very useful for the finishing touches and also for masking techniques |
| Curves Tool | Larger areas that need either a subtle or drastic local or global correction | – Very accurate tonal correction– Ideal for tonal corrections on large areas like skies or water– Is very effective when used locally through masks and layers | – Less intuitive– Knowledge of tonal zones is required– Is less effective as a stand alone tool and should be used in combination with masks, brushes and gradient tools. | Is best used in combination with layers and masks. Subtle tonal gradations can be made in combination with the gradient tool and masks. |
| Levels Tool | Very effective in increasing the global contrast. Not recommendable for local adjustments | – Effective in adding either blacks or whites or both at the same time to increase the global contrast– Very easy to use with a black point, mid point and white point slider | – Not very suitable for local adjustments, if local adjustments are needed then the curves tool is much more accurate and controllable. Whether you use the levels or curves tool for tonal corrections, for local adjustments you always need a mask. | Personally I use this tool in the finishing touch phase of my workflow if I need to add a bit more shadows or highlights. |
| Gradient Tool With Masks | This is the tool to subtly blend several layers, that contain luminance adjustments, together and create tonal gradations that aren’t possible in any other way. | – Subtle control over layers that need to be blended together– Enables creation of subtle transitions between blended parts with tonal adjustments– Far more controllable than a brush tool– Numerous other applications possible | – It requires a bit of practice, but once you know how to use it, it is the most powerful tool for me in Photoshop. | I don’t know any other tool in PS that is so powerful, so versatile and so subtle in its results, yet is always used in a way that doesn’t do this tool any justice. Very effective in combination with the mask and curves tool. Also my secret tool to create the most accurate selections, with the least effort in the least time. More information on how to use this tool can be found in my B&W Speed Workflow video (information on using this as a selection tool is not available yet). |
| Topaz B&W Effects – Plugin for PS and LR | Any easy and quick B&W conversion and processing, albeit more suitable for more global processing instead of controlled local processing. Very allround and will suit any black and white photographer who wants quick results | – Intuitive– Fast results through an enormous variety of beautiful presets that give you instant results– Includes global adjustments tool and color filters to affect the sky for example– Also includes local adjustments tools but they’re limited to dodge and burn– Very affordable. | – Local adjustments are limited to tools as dodge and burn– B&W conversions are based on the original colors, many adjustments are also color based | A very effective and great tool for beginners but also for advanced black and white photographers. I would recommend using this tool in combination with Photoshop as a plug-in to increase control through PS features such as layers, masks and selection tools. |
| Nik Silver Efex Pro 2 Plugins | Just like Topaz B&W effects this is a very easy to use and versatile tool for B&W conversion and processing. Various presets that will suit the preference of most black and white photographers, that can be tweaked easily. | – It has all the advantages of Topaz but one important tool more: the local adjustment tool using control point gives you more accurate and controllable results than the local adjustments in Topaz. | – Since NIK Software and all its tools have been taken over by Google, it went from being the #1 B&W plugin to a tool that is no longer supported. Google is phasing out SEP2 and that’s a big loss.– All conversions and the majority of adjustment tools are color based, which I think is not a plus. | Absolutely the trendsetter in this market and the most versatile for B&W photographers who want quick and great results but SEP2 will no longer be supported. |
Many people may wonder why I consider a tool or plugin that bases its conversion and processing on the original color information as a negative instead of a plus or even as neutral. To start with, you’re basing the end result on something that shouldn’t play a role in black and white. Moreover: the color information is interpolated information, now you’re using that for your B&W outcome! While I would recommend skipping as many interpolations as possible. Related to that, my personal B&W workflow is independent of the original color to avoid any interpolation. It is based on the basic elements of a photograph: light (or better yet: luminance values) and objects. If you base a black and white photo on those elements only then you have more subtle and also more local control over a photograph. More on this in my article on black and white processing techniques in the digital age. But also consider this: what if you have a black and white raw file only (such as from an achromatic back as the Phase One or Leica) or scanned a black and white analog photograph to process it in one of these tools? Then it’s obvious you can’t do much with the black and white adjustments features that are based on color only.
Finally, one might argue: perhaps converting to luminance values (black and white) based on colors is not the right way but since that will be followed up by color independent corrections, targeting luminance corrections only with color independent tools like the curves or dodge/burn tools, so all is still good? As long as you’re happy with the final results, then yes, all is still good. But you’re only adding more interpolations that will always deteriorate the image quality, and you may be happy with the end result, you won’t know what you have missed in additional and correct information during the process.
Final Thoughts
Considering that black and white photography is still being enjoyed by many people and actually never lost any of its allure and popularity, it is a question mark to me why not more camera manufacturers, also in the more mainstream pro-consumer market, aren’t offering pure black and white cameras. It isn’t a technical issue, it’s simply a matter of removing the CFA, so basically it should be cheaper. Granted, with a color sensor you are not limited to taking black and white photographs only and you can get close to the results of a black and white only camera, but it is definitely not the same. There are technical differences that indicate a loss in quality, but not only that, there are also differences in quality that can be very visible in critical areas. Simply due to all the interpolations that in fact aren’t necessary. As long as the mainstream camera manufacturers aren’t considering pure black and white sensors, and you can’t afford the Phase One Achromatic or Leica M Monochrom, then be sure to skip as many interpolations as possible to achieve a less compromised quality and start with a neutral conversion.
More Info And Resources
- My thoughts on black and white photography in the digital color age: In defense of black and white photography (blog post on this website)
- More on black and white photography (including my complete black and white workflow and Julia’s personal workflow), fine art photography and architectural photography can be found in the best-selling and widely praised eBook From Basics to Fine-art, that I co-wrote with Julia Anna Gospodarou
- More info and demonstrations on black and white post-processing can be found in my video tutorial Black and White Speed Workflow.
4 Responses
Hi Joel,
Thank you for this enlightening article. Like all your items by the way.
After reading, I made a conversion as you described and compared this to the conversion in LR.
A big difference. Now my question is; In your BW Vision Panel you also have a neutral conversion as a preset.
Does this work the same way?
Because I see a small difference, especially in the density of yellow and orange tones. They are a bit darker.
Or did I make a mistake somewhere?
Findest regards,
Hans Veldkamp
Hello Hans, thanks for your response. The neutral conversion in the BWvision panel is not an entirely neutral conversion but one I adjusted slightly. So you didn’t make a mistake at all.
Joel
Hey Joel, could you tell me, based on your experience, what is your noise reduction method of choice at the moment (I mean red noise, as in hot pixels generated by daytime long exposures). I`m having trouble achieving acceptable results when taking exposures 7minutes and above. Could be the fact that I’m stacking two 9-stop filters and that can throw my exposure time in the 10 minute range (and on a sunny day, even in the shade, I imagine the camera gets hot). I know I could stack 10+6 and lower my exposure time, but there are those rare cases that require more. Does Nik software give good results in this regard? Thank you.
Ioan, if you really want to get rid of noise caused by very long exposures then I would say the internal NR is the best option. It’ll double your exposure time but it will save on getting rid of noise in post. Usually anything more than 6 minutes is very prone to noise especially with hot weather. What helps is to turn off live view and the camera when you’re not using it to let it cool down.NIK gives good results but unfortunately NIK isn’t supported anymore and is out. Topaz gives very good results.
Joel