-BW-16-final-2-3-21-website-1920×800")

Listen to the AI-generated podcast of this article as a summary
INTRODUCTION
A FEW THOUGHTS ON FINE ART
A style of processing in which we deliberately deviate from what was there in real life and what was recorded on your sensor (or film), to express and amplify a personal vision to establish a personal visual style, that could only be achieved by additional processing.
A visual style that is not only aesthetic but also effective as a result of the aesthetic criteria we’ve chosen to support our artistic intentions and messages through the images we create.
Even more simplified: anything that is not straight-out-of-camera and is aesthetic and effective.
So, effective and aesthetic by way of post-processing. Beauty is in the eye of the beholder as the saying goes, but throughout the history of photography and of the visual arts in general some concepts and high-level principles have been developed and have been proven to be effective and that should serve as guidelines for creating aesthetic and effective images. I would go as far as to say that an effective image is also aesthetic and vice versa. Let’s try and break down what those high-level principles are, derived from my own personal experience which in turn is derived from, and inspired by, many great images and findings from the past and present in visual arts in general, and not just photography. Because, I believe strongly that in order to create images that can be considered authentic, meaningful, and aesthetic, we need to be visually articulate and literate. And for that, we need to study the masters of all visual expressions. In this analysis, I’m going to leave the meaning of images, or the artistic intention and message aside. I’m also going to leave out compositional principles like rules of thirds, golden ratio, leading lines. Those are important elements that come before post-processing the images and are out of scope for this article on post-processing.HIGH-LEVEL PRINCIPLES FOR CREATING AESTHETIC AND EFFECTIVE IMAGES
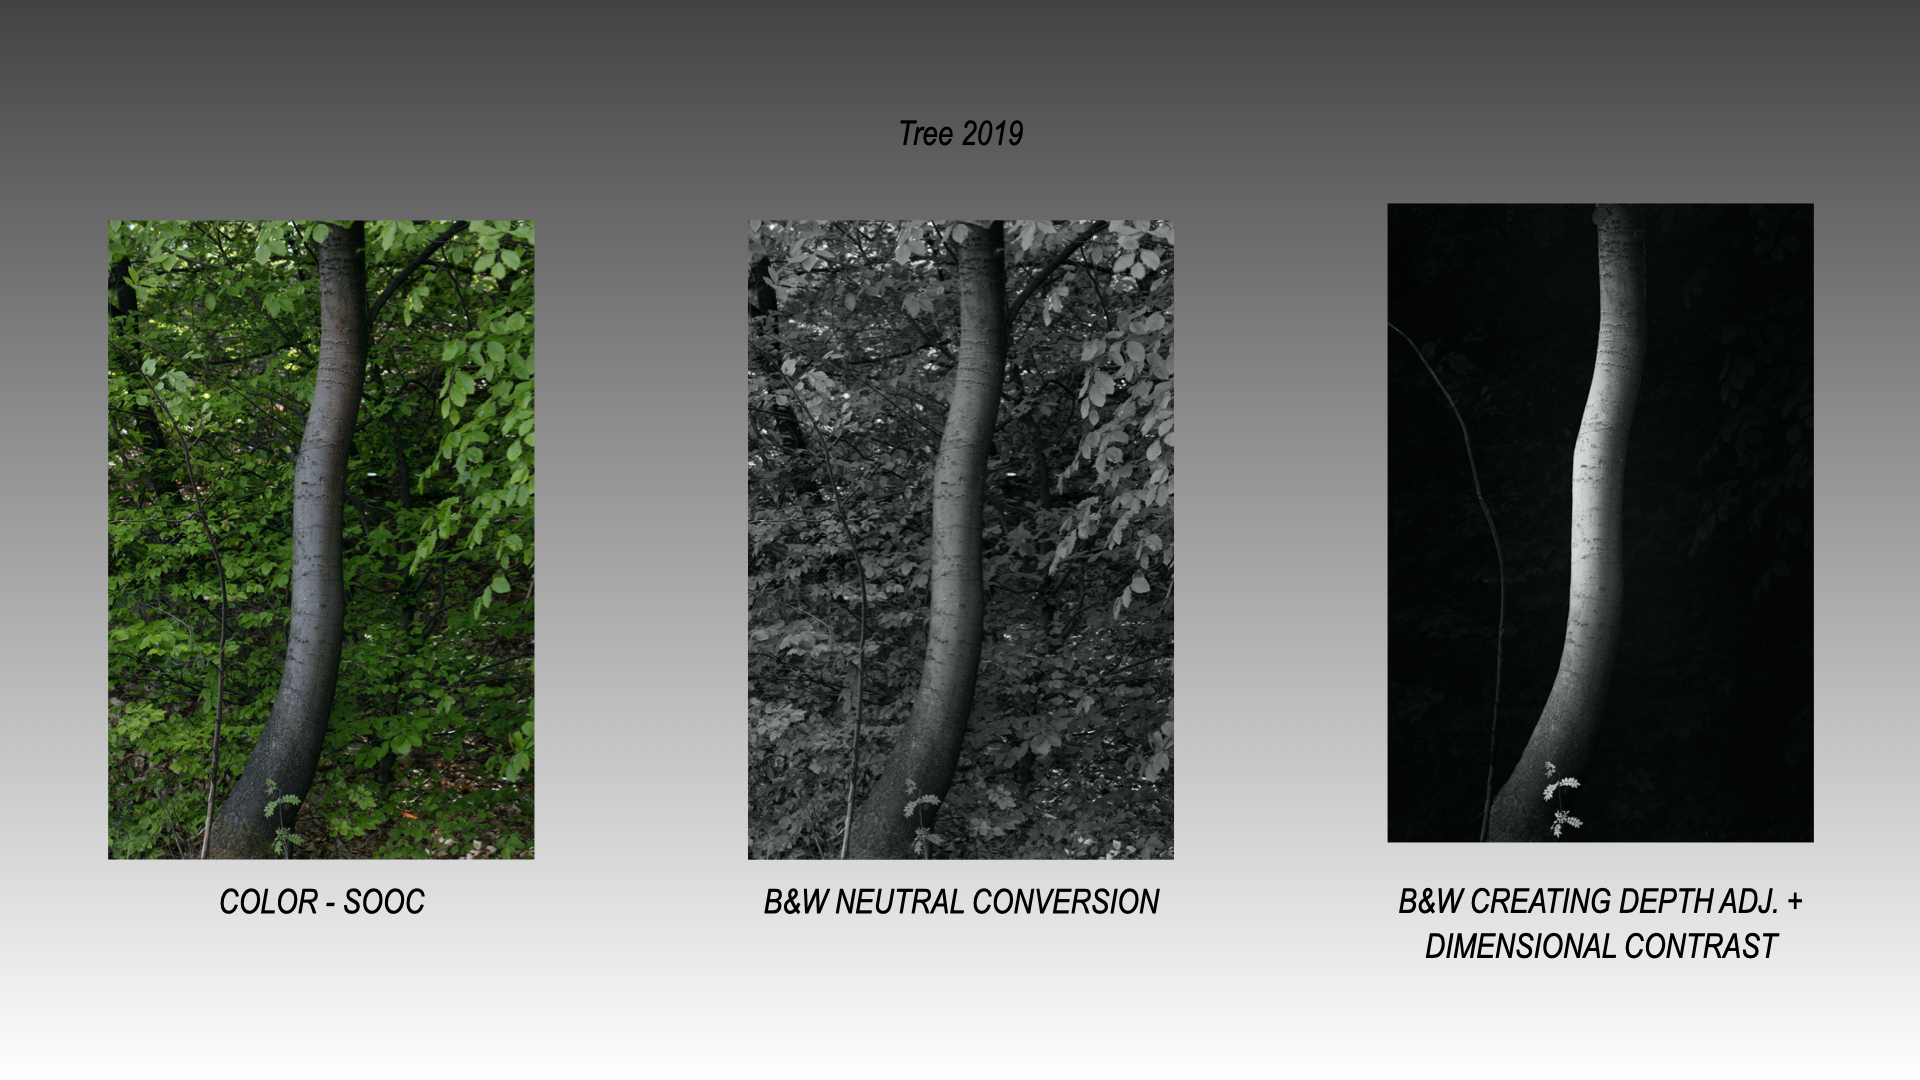
- Selective (tonal) contrast: The eyes are always drawn to the element with the highest tonal contrast and brightest light: the Figure
- The darkest tones are always in planes and objects closest to the observer: in and around the Figure
- The lowest contrasts (tonal/dimensional/color contrasts) are always in planes and objects farthest away from the observer and have therefore fewer details: usually in the Ground.
- The highest contrasts are always in objects/planes closest to the observer and therefore have the highest details: usually in/directly around the Figure
- Dimensional depth perception by Creating Presence: a sense of perception of dimensional depth that is created by subtle transitions from dark to light and vice versa and defining edges.
- Contrasting (depth) dimensionalities to enhance depth and isolate the most important elements we can use more than just tonal contrast (see 1 through 4), there’s also dimensional contrast: in the Figure alone or in Figure (more/less) and Ground (less/more) E.g. a 3-dimensional object (Figure) against a 2-dimensional sky (Ground) increases the contrast between figure and ground and therefore the effectivity of the image.
- Contrasting colors vs analogous colors or neutral colors (for color processing, will be discussed in future articles

A FEW EXPLANATORY NOTES
Before we apply those principles to an image we need to take note of a few basic concepts in image-making and add some explanation to the mentioned principlesDetermining Figure and Ground
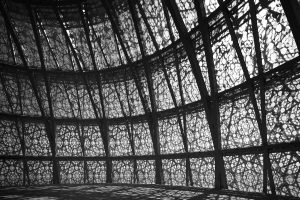
Perhaps the highest level of image analysis is to break down an image into 2 simple elements: the figure and the ground. A principle, very well described by author Mark Getlein in his book Living with Art. It comes down to establishing what your most important object is, the figure, and your supporting background, the ground. The ground can be anything that is not your figure. A foreground can be ground, and so can a sky or any other type of background. If you want to know more, I’ve also written about it in this post.Figure isolation and effectively drawing the eye
So what to do after you’ve determined your figure and ground? To effectively draw the eye in, the figure and the area of the ground that intersects closely with the figure should have the highest contrast and the brightest light, and the most details. Ideally, everything else should be lower in contrast and darker to effectively draw the eye in. Ideally, which doesn’t mean, always. If you understand this concept then you could play with ‘tension’ in other parts of the image and break this rule. Or perhaps there is more than 1 figure in your image. Let’s stick with the simplest version of just 1 figure and ground. You will find that even though you know exactly what your figure and ground are and had that in mind when taking the shot in the field, the amount and distribution of contrast and highlights and shadows aren’t as they should be to be effective. In that case, this will need to be corrected in post-production. And to do that effectively with the most control you will need to isolate the figure from its ground. And here’s where masking comes in. At the very least you need to at least have a hard mask from the figure and from the ground. Those two masks are called critical masks. From there, internal masks can be derived that are especially needed when you have geometric or manmade objects. And they are almost always a hard mask as they need to isolate a figure from its ground, not a soft or luminosity mask. Luminosity masks isolate light, not a figure unless the distribution of light intensities coincides exactly with the figure and ground, which is usually not the case. Masking and, often completely neglected, good mask analysis is a separate set of Photoshop and in-the-field skills that, if done the right way, requires more than just learning a Photoshop technique or trick. I have explained everything on masking and the correct methods, analysis, and workflow in my 5-hour Advanced Masking video, and is too elaborate to cover here. I have also written a blog post called Photoshop Masks and Selections Guide that you may use as a starting point.APPLYING THE HIGH-LEVEL PRINCIPLES TO IMAGES
Now we have described and explained the high-level principles, how can we put this into practice in post-processing, independent of what processing technique or software we use? For that, I have created a sequence of steps presented below. Note that all steps after step 2 are grouped in Figure and Ground steps, and I start with the Ground first, but this is just a personal preference. If you prefer to start with the Figure, you should. Also, note that steps 3 to 10 can be repeated as many times as needed. There’s a special place for step 10 in my personal workflow as that is a step, I would insert frequently after every step after step 2.PRACTICAL STEP SEQUENCE – A GUIDE
- Determine figure(s) and ground(s). See my post on how to do this.
- Isolate Figure from Ground by creating critical masks (hard masks). You can skip this step but then you have less control over the contrast, the light intensity, and the depth perception in both figure and ground. Processing becomes more difficult and less accurate. At the same time, the Figure can be broken down into separate planes with derived masks. Especially geometric objects in which the separate planes are bordered by edges always need separately derived masks.
- Lower contrast in Ground. Then darken if your Ground should be darker and low-key or lighten if it should be lighter and high-key. But lowering the contrast first is essential before darkening or lightening, else you end up with higher contrast in the ground no matter if it’s lightened or darkened. This is a step most people forget.
- Darken or lighten the ground – see step 3.
- Lower contrast in Figure selectively. Same principle as in lowering the contrast in Ground. The idea is that by lowering the contrast first, it is easier to see what needs to be lighter/darker/less or more contrasty. Also, it will be easier to control the tonality and contrasts.
- Darken or lighten Figure depending on how the light should fall. Essentially the same as in step 3 for the Ground but now more selectively
- Increase contrast in and around the Figure
- Bring back details in Figure selectively – often using hard masks with intersected luminosity masks in isolated areas.
- Bring back some details in the Ground selectively and more subtly than the details in the Figure. The goal is to add points of interest to accentuate a leading line for example. Or to enhance mood by accentuating clouds. There are several reasons why you would want to do this after removing the contrast but always keep in mind that it should be subsidiary to the figure in terms of contrast and light intensity. Use of luminosity masks with intersected hard masks in isolated areas.
- Create depth per plane using subtle gradual transitions from dark to light and vice versa per plane in Figure and in Ground. Often I would do this step after every step after step 2.
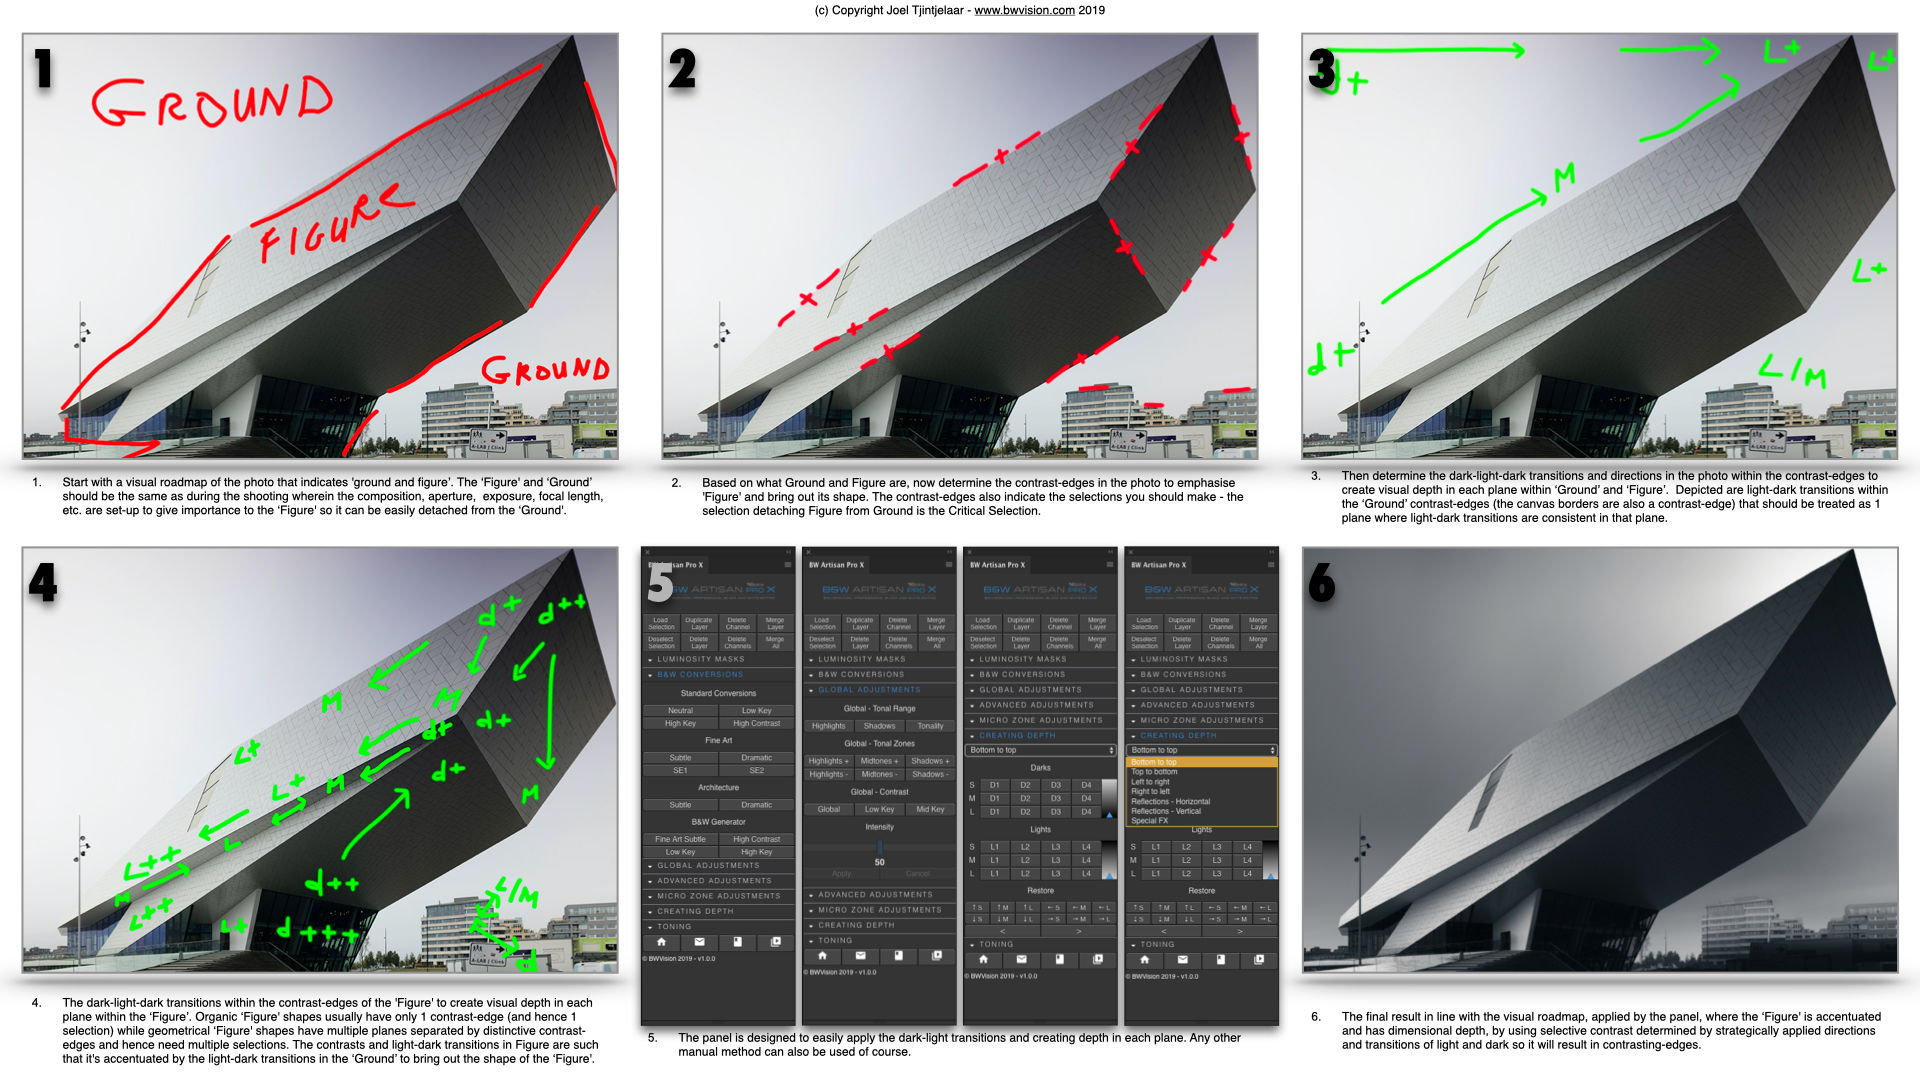
OVERVIEW OF RECOMMENDED TECHNIQUES FOR APPLYING THE HIGH-LEVEL PRINCIPLES
All steps are completely independent of the software or techniques you prefer to use. Having said this, isolating Figure from Ground (the creation of the critical mask) can only be done with the highest degree of accuracy and the highest chance of success with Photoshop. And to some extent this also applies to the other steps after step 2: the highest accuracy and the subtlest of any of the adjustments per step can be achieved in Photoshop and to a lesser extent in other software.RECOMMENDED TECHNIQUES
| STEP | More Recommended | Recommended | Less Recommended |
|---|---|---|---|
1.Determine Figure and Ground | Visually during editing and determining in the field. | Visually during editing | – |
2.Isolate Figure from Ground (critical masking) and derive masks | Multi Channel Masking – see description above | Pen tool | Traditional channel masking/lasso tool/color based, etc. |
3.Lower Contrast in Ground | Selective Curves by using hard masks | – | Dodge/Burn |
4.Darken or Lighten Ground | Selective Overlay and normal darkening/lightening with gradients/brush + hard masks | Selective Curves using hard masks | Dodge/Burn |
5.Lower Contrast in Figure | Selective Curves using hard masks | – | Dodge/Burn |
6.Darken or Lighten Figure | Selective Overlay and normal darkening/lightening with gradients/brush + hard masks | Selective Curves using hard masks | Dodge/Burn |
7.Increase contrast in/ around Figure | Selective overlay darkening/lightening with gradients/brush + hard masks | Selective Curves using hard masks | Dodge/Burn |
8.Bring back details in Figure | Selective overlay darkening/lightening with gradients/brush in isolated areas using hard masks + luminosity masks | Selective Curves in isolated tonal zones using hard masks + luminosity masks | Dodge/Burn in isolated tonal zones |
9.Bring back details in Ground | Selective overlay darkening/lightening with gradients/brush in isolated areas using hard masks + luminosity masks | Selective Curves in isolated tonal zones by using hard masks + luminosity masks | Selective Dodge/Burn in isolated tonal zones |
10.Create Depth per plane | Selective Gradient tools with overlay/normal darkening/lightening with hard masks per plane | Manual (PS) Gradient tools with hard masks per plane | Dodge/Burn |
On a side-note: my B&W Artisan Pro X panel, which is a plug-in for Photoshop, using Photoshop technology, is targeted at executing all those steps in the ‘More recommended’ column. That’s no coincidence: the method was initially a fully manual method (my iSGM manual workflow) and the panel is specifically built on that manual method and is, therefore, a ‘method driven panel instead of being the usual feature-driven software. For this reason, it takes time and effort to learn to use the panel, because you’re essentially learning a method and structured workflow instead of intuitively and often randomly working your way around a photo. That works for some of the great masters, but rarely for the average photographer.
MORE INFO
- The in-depth video version (9 hours): https://sites.fastspring.com/bwvision/product/bwfineartprocessingforartisanprousers
- My article on fine-art photography on this website.
- Architectural photography – real estate vs fine-art.
- More on B&W photography, fine-art photography and architectural photography in the highly praised eBook From Basics to Fine-art, that I co-wrote with fine-art photographer and architect Julia Anna Gospodarou
- There’s a substantial discount on my B&W Artisan Pro panel if purchased together as a bundle with the Advanced Masking video and also on the panels, only valid till May 10, 2021
One Response
Hi
I have recently purchased the Artisan Pro X 2022 via this web page but I cannot find where to download it from and I am wondering if you can assist me?