

Around 10 years ago when I first released my B&W editing workflow for Photoshop, called iSGM (iterative Selective Gradient Masking), many people, not familiar with the how and why of my workflow, have been referring to this manual and structured method for B&W post-processing, as a destructive method when seeing it for the first time. Despite the negative qualifications, this manual method has gained many followers worldwide over the years as it proved to be a structured and efficient way to have full control over B&W images and create the type of images I’ve had many successes with.
Very recently when I released the fully automated successor of the manual iSGM method with the Artisan Pro X panel, the negative qualifications, have only increased. Perhaps because the Youtube videos on the panel made my workflow more visible to a wider audience. And simply put, they didn’t understand the constant merging of layers and thought it to be destructive. But there are very good reasons for doing so and use an alternative workflow. Reasons that go beyond ‘destructive’ or ‘nondestructive’ qualifications and demonstrate that other criteria should be more important in the process of creation.
With this article, I’d like to shed some light on the reasons for alternative ways of post-processing, that are not the traditional ways of post-processing, and illustrate that the fact that they aren’t traditional, doesn’t mean they are destructive. And I’m not only referring to my alternative way of processing, because from what I’ve seen there are many of you out there, not working according to the traditional Photoshop way. Including many award-winning photographers, as I am myself. So they, we, must be doing something right.
Those alternative ways of post-processing aren’t born out of ignorance, lack of professionalism or plain stubbornness, but are born out of a necessity to match and enable an artistic style or preference that otherwise wouldn’t be possible.
Your artistic intentions and the visual result you’re aiming for to match your artistic intentions should never be limited by adhering to a recommended and traditional way of working, just for the sake of adhering to it without any insight into its pros and cons. And more importantly: by totally forgetting that it’s just a recommended method. There are alternative ways of processing that are just as non-destructive and might bring you closer, faster and more accurately to realizing your artistic vision than with the traditional way.
What is this traditional method of processing in Photoshop? The ‘grand’ and traditional method, encouraged by Adobe and all its protagonists, that is considered nondestructive, is a way of post-processing where each adjustment is being represented by an adjustment layer. It’s a linear sequence of adjustment layers stacked upon each other where each adjustment layer has a linear and causal effect on subsequent adjustments (layers). Change one adjustment layer and its change will cascade throughout all subsequent layers, affecting each layer. The thought being here, that the first layer is the original layer to which you can always revert to.
[...]subtlety is a key feature of my work and of my method. And this cannot as easily be achieved, practically and technically with the traditional method[...]
But this traditional workflow cannot be applied to my individual way of working that is built around the idea of creating many series of small subtle changes that lead to one bigger adjustment that has all the subtlety that I find important in the type of work I create. Subtlety is quintessential in my work and I find that an alternative workflow enables and supports that goal much better and more intuitively than the traditional workflow.
An alternative workflow such as my iSGM method that I developed in 2009-2010 is a non-traditional and also non-destructive workflow, that deviates from the traditional method with adjustment layers fundamentally because my method is designed to enable a very large amount of subtle, small changes to come to a specific end-result that over time has become my personal style. A personal style that puts emphasis on subtlety in tonal ranges, contrasts and especially transitions, in, across, throughout and between, the darkest, the brightest and all midrange tones. That subtlety is a key feature of my work and of my method. And this cannot as easily be achieved, practically and technically with the traditional method.
An example of practicality: adjustment layers can feel counterintuitive in my workflow and they make some essential corrections more difficult, sometimes nearly impossible, than working with layers and masks that need to be merged down first at specific points in the process before I can do a restore of an area (correction) and then saved as an iteration that I can go back to. After that, I build up a new set of iterations, merge down again, and save under a different file name. Therefore, I can always go back to iteration 1 or iteration zero, which is represented by the original color file that only contains selections (masks).
In the next image, you see how I save a series of adjustments as separate iterations with corresponding filenames (in this case numbered chronologically from 1 to 50) at key moments in the process of editing. Each saved iteration typically represents an adjustment to one specific area or sub-area, object or sub-object or detail in an image. An area can be the sky for example. A sub-area would then be the top part of the sky or the part with clouds. An object is, for example, a building, while a sub-object would be one side/plane of a building. A detail can be traffic signs in the foreground. Each saved iteration can have anything between a few subtle adjustments to a few hundred subtle adjustments, depending on the area/object/detail. Each subtle adjustment is a separate layer. Before saving the iteration the layers are merged down to on average 5 different layers, each layer representing a group of multiple subtle adjustments.
Also present in the working folder, the original color file, iteration zero, (indicated by the green arrow) that remains unchanged and contains all masks to which I can revert to in case I make a mistake. The RAW file is backed up on various drives. Usually, if I make a mistake in iteration 41, I would go back to iteration 40 maybe 39, but never all the way back to iteration 25 or 15, let alone to the color file or RAW file. If I didn’t see the mistake at iteration 41 I should find myself another profession. After I’m finished, and the image is ready to be presented and printed large, and that is always the objective, not just the online image, I would remove iteration 2 to 49 and only keep iteration 1, representing the neutral B&W conversion without any adjustments (indicated by the blue arrow) the final iteration 50 (red arrow) and the color file.

An important technical reason for not working according to the traditional workflow: with the traditional workflow I would end up with anything between 500 to a few thousand layers due to the way I build up a specific result through many small subtle changes instead of one big change. Add to that the channels that contain your masks and you’re setting yourself up for a PS crash, or at the very minimum, substantially decreased computer performance, even though PS has no restrictions anymore to file size.
Here are some numbers to illustrate what PS can handle, but looking at the maximum numbers and filesizes, they are very academic – most computers will already significantly slow down between 5 and 10 Gb.
- PSD file: 2Gb and 30,000 pixels on any side
- PSB file: 4 million Tb (4 Billion Gb) and 300,000 pixels on any side
- TIF file : 4 Gb
- Max number of channels: 53 (57 with RGB channels included)
- Max number of layers with PSB files: unlimited
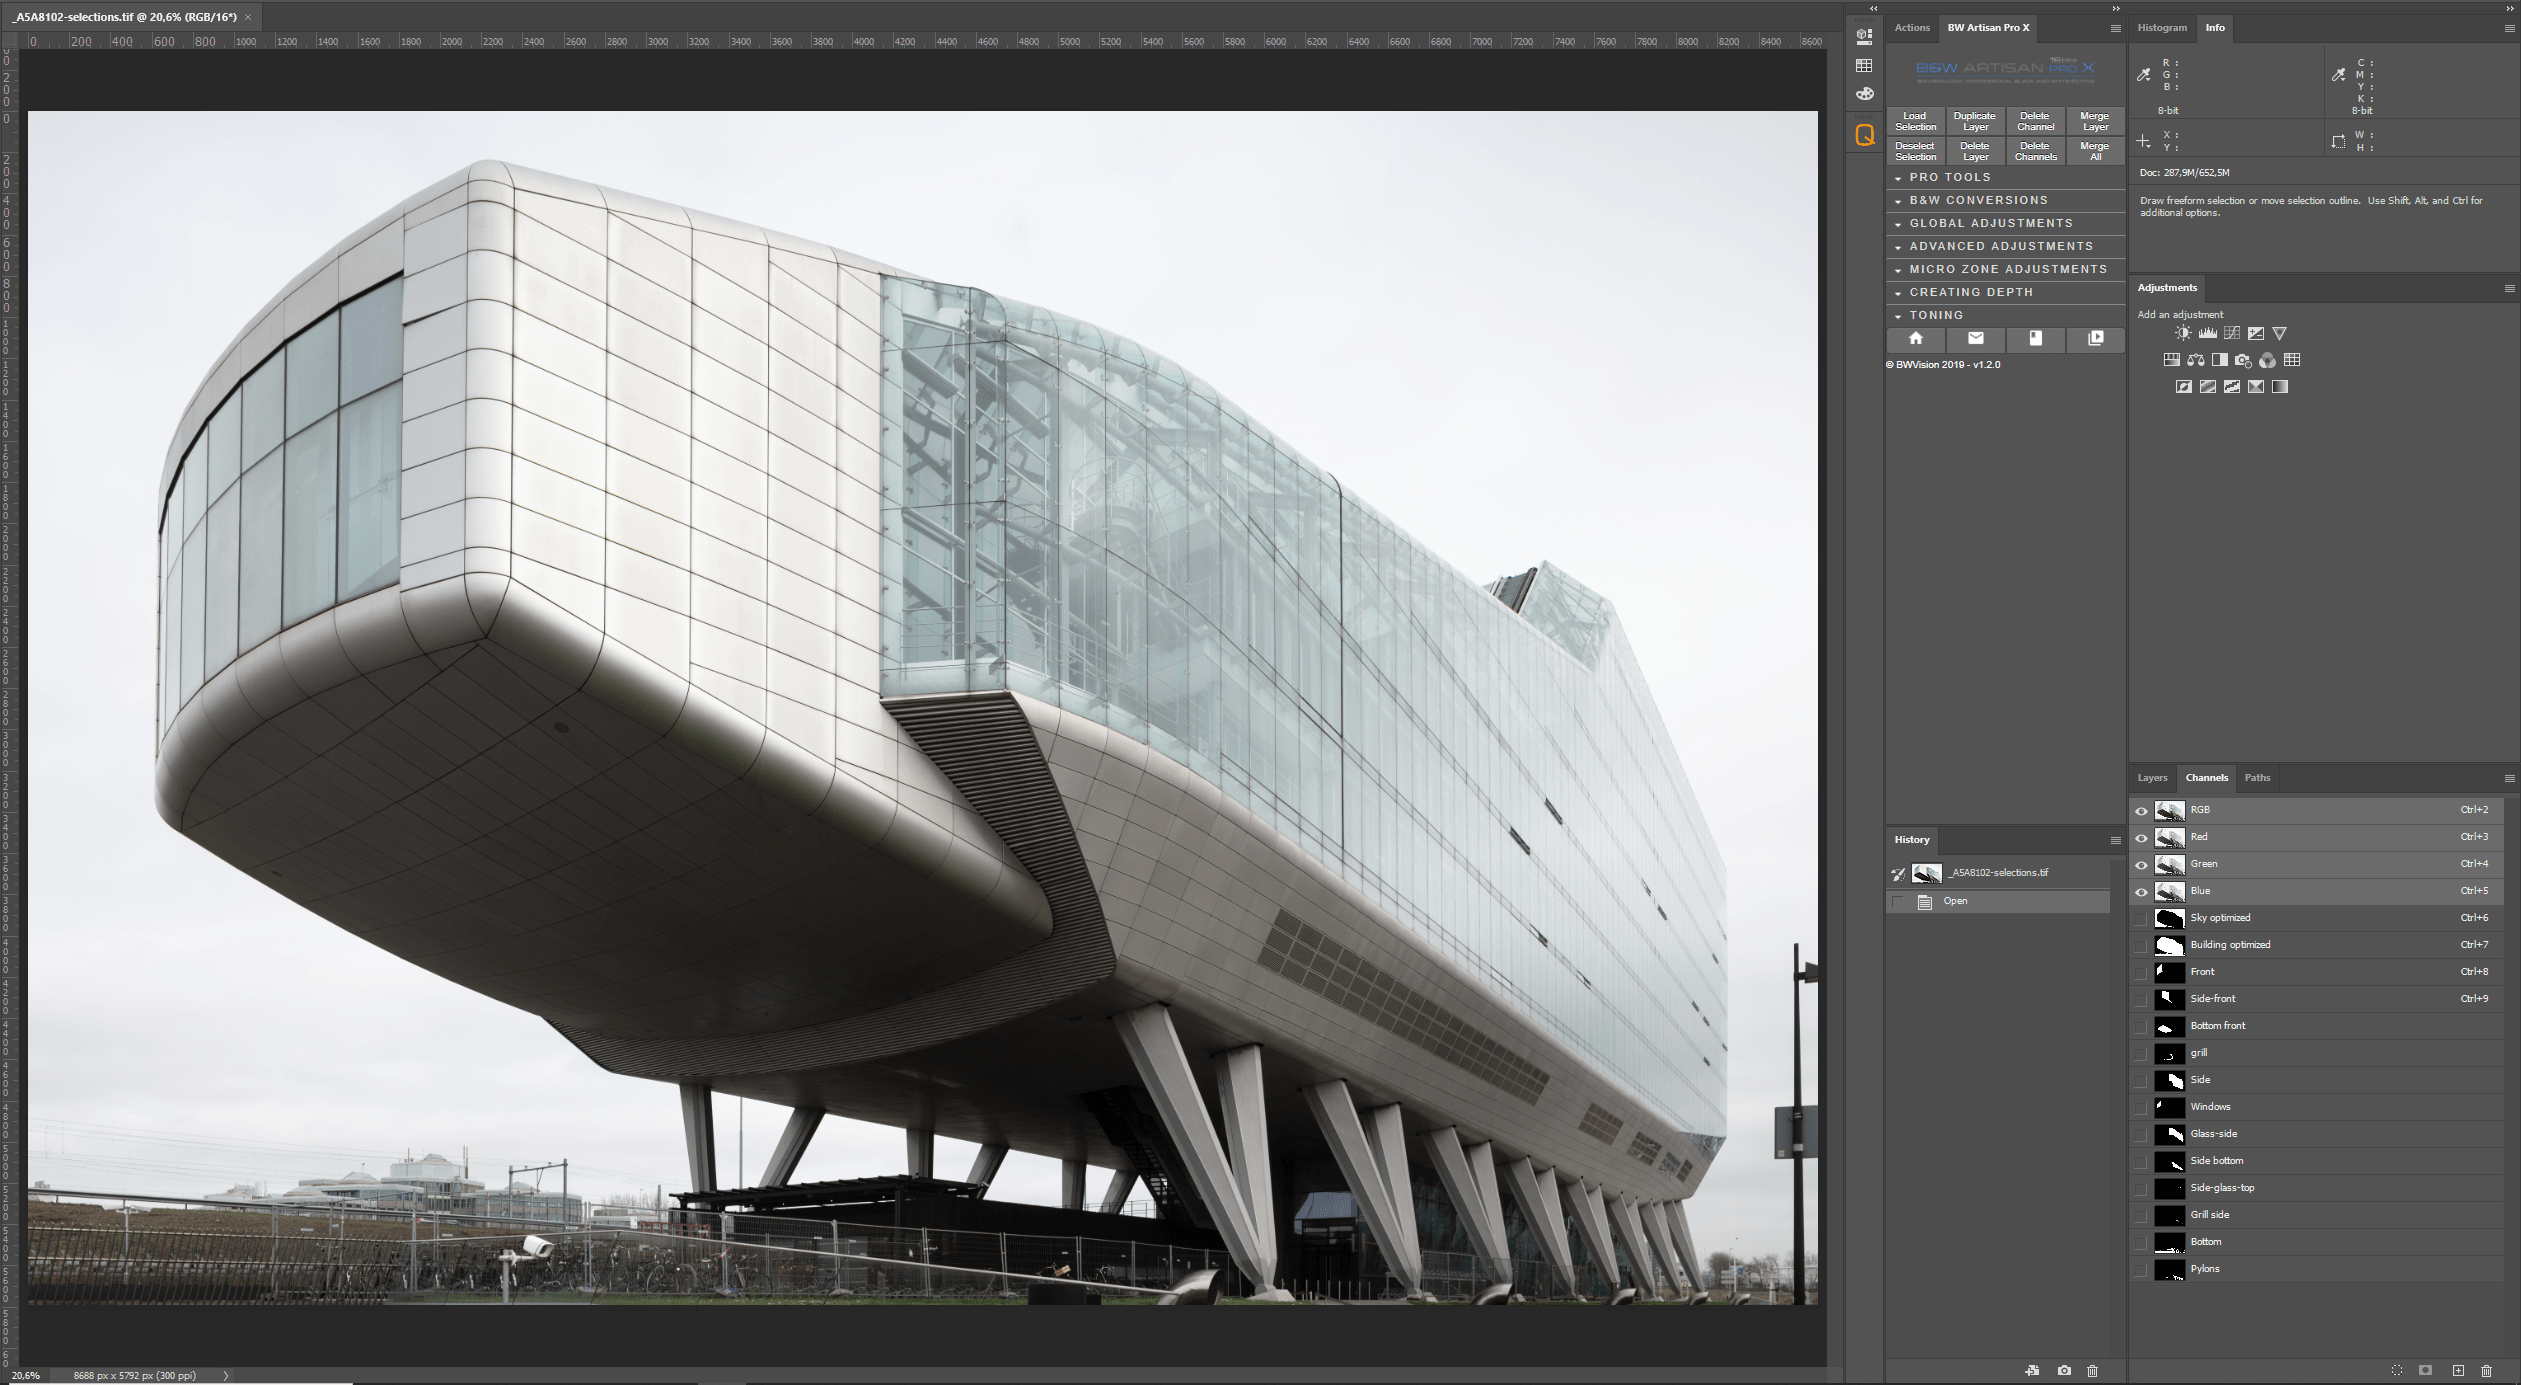
In the following screenshots, you see how I set up my files and even though I only have 6 layers in the B&W photo and no channels, it’s already 2.5Gb. The color photo shows the original TIF file in which I save all my hard masks, usually around 10 on average, and off of which I generate the luminosity masks. That’s the file I never touch and that I can always revert to and is already 1.7 Gb with no layers and only masks to keep it lean and relatively small.

So now the traditional and alternative workflows have been summarized, what type of workflow should you go for? What is better? The traditional non-destructive workflow or the workflow that has alternative principles and looks destructive at first sight, and I hope I demonstrated that is not the case but is designed to enable large amounts of subtle changes and to work with unaffected computer performance?
First off, the phrase nondestructive workflow is such a misnomer as basically every workflow is non-destructive as soon as you decide to save the original RAW file. Therefore I prefer to talk about traditional or non-traditional workflow to avoid biased qualifications and uninformed opinions.
I would recommend going for one that suits your needs and that qualifications as destructive or nondestructive should play a less important role than generally recommended. Because what’s destructive or nondestructive is less obvious than you might think. Isn’t the end-result more important? And what if the end result is so incredibly good and fantastic, so inspiring, so beyond everything that has ever been created, but has been created in a so-called destructive workflow? I would always prefer that end-result created in that way.
Technique is just a means of arriving at a statement
Jackson Pollock
The purists, swearing by the traditional ‘non-destructive workflow’ remind me too much of the people who find gear, megapixels, sharpness, and such, more important than just creating and enjoying great art. To paraphrase Cole Thompson in his entertaining and imaginary conversation between Van Gogh and Picasso: you’re not going to ask Van Gogh or Picasso what brushes, canvas or easels they used. And you’d be a fool to disqualify the importance of Jackson Pollock’s work simply because he didn’t follow the traditional way of brushing the paint on a canvas on an easel but instead threw and dripped his paint from buckets and added cigarette butts and shards of glass to the mix while standing on the canvas. ‘Technique is just a means of arriving at a statement‘, to quote Jackson Pollock.
Let’s go a bit deeper and find out what’s actually meant with a nondestructive and traditional workflow. A good place to start is by literally quoting what Adobe says about nondestructive editing on their Adobe website:
[...] Nondestructive editing allows you to make changes to an image without overwriting the original image data, which remains available in case you want to revert to it. Because nondestructive editing doesn’t remove data from an image, the image quality doesn’t degrade when you make edits. You can perform nondestructive editing in Photoshop in several ways: [...]
Adobe then continues by listing several examples of nondestructive editing, but not limited to those. The traditional way with adjustment layers is just one way.
A key phrase in Adobe’s definition – and also without knowing their definition, common sense should give you an idea of what nondestructive means – is being able to revert to the original image data at any given moment. Basically, this means that as long as you have the original RAW file, you can do whatever you want to get to the end-result as long as you keep the RAW file to revert to and still call it nondestructive!
Another important phrase in the definition is ‘ the image quality doesn’t degrade when you make edits’. What does ‘degrade’ in this context even mean?
I want to posit this: even if you’re working the traditional way with adjustment layers, you can still degrade the image quality in a multitude of ways, depending on what you consider ‘degrading image quality’.
Let me illustrate this with an example: replacing skies in an image is quite ‘the thing’ these days. Suppose you, like many others, work traditionally with adjustment layers, in 16 bits, and you replace that sky from an 8-bit JPG or better yet, a 16-bit file. Is that degrading the image quality to a lesser extent than when you don’t work with adjustment layers, hence in a ‘destructive way’, but you don’t replace the sky but instead solve your ‘sky issue’ in a more traditional way, using all the knowledge you have about light, contrasts and tonal relationships, with the same photo? I would argue that if you replace that sky from another photo you’re actually degrading the image quality more than by not replacing it. Even more so if you replace the 16-bit sky with an 8-bit version, no matter how strictly you applied the principles of the traditional workflow. Not that I judge anyone who likes to replace skies, this is more to illustrate that you can degrade images regardless of using a traditional non-destructive workflow or not. And if that doesn’t convince you, then at the very least you have to conclude that it depends on sometimes arbitrary criteria that in turn can also vary depending on the context.
Another example and this touches the deeper reasons for an alternative workflow such as mine: I see people preferring to use the curve-tool in such a way that they get the intended effect with just one curve setting, in one big single leap. What, if you can get a better and more subtle result by using a sequence of small subtle changes with 10 layers (I for one know that some effects, if you go for subtlety that is, and subtlety is always important to me, cannot be obtained with just one curve-setting, no matter how sophisticated the curve setting, so this isn’t hypothetical at all) and then merge it down to one layer, just like the curve-adjustment layer is just one single layer. Is that last example with 10 layers merged down to one layer, degrading the image quality more or is more destructive, than when you do it with one all-in-one big curve adjustment layer setting? Is it only destructive because I removed the other 9 layers that cannot be accessed anymore while the version with one big curve setting never had those in-between layers in the first place? The answer is yes, if you’re a purist, no matter if the result of those eliminated layers, were never the result that mattered and where intended to be temporary. No, if you’re the type of artist to whom the end-result matters and it just happens to be better in terms of result and subtlety.
To impose a specific way of working onto your artistic intentions is absurd and you’re setting yourself up for missed opportunities only to comply rigidly with that traditional workflow. That’s your prerogative of course, but to then disqualify other methods as inferior or destructive says more about the person dismissing other methods than about the method.
To come up with another analogy from the world of painting again: who would want to deny the importance and beauty of Marc Chagall‘s famous Fiddler on the Roof painting because it was painted on a checkered table-cloth he got from his beloved Bella, (because he was too poor to buy a traditional linen canvas) and the checkered pattern of that table-cloth is actually visible throughout the painting in such a way it adds to the beauty of the painting?
What I’m saying is that your artistic intentions should be leading, and you shouldn’t be blinded and restricted by some good suggestions made by Adobe and other workflow experts in your artistic expression. They’re just recommendations. There’s no such thing as a true destructive workflow in this day and age where we always have a back up from the original RAW file. There are so many other ways of creating the end-result you have in mind than just the grand old traditional workflow. Just experiment, be inspired, but stop the rigid adherence to suggestions if another way leads to more subtle results and suits your needs better. There’s not one workflow that is unequivocally, objectively and factually the best. The best workflow is the one that suits your needs the best.
But most of all, refrain from disqualifying alternative and non-traditional methods, based on limited knowledge but plenty of bias. Judge their work, that’s what photography and art are about.
More Info
- More on B&W photography, and fine-art photography in the highly praised eBook From Basics to Fine-art, that I co-wrote with fine-art photographer and architect Julia Anna Gospodarou that has a 25% OFF stay-at-home discount for a limited time.
- There’s also a temporary 40% Stay-at-home discount on the B&W Artisan Pro X panel that is only valid for a limited time. Note: this panel has a ‘destructive’ workflow but imposes a subtle building up of adjustments resulting in award-winning images:)
- More ‘stay-at-home’ discounts on selected videos created with Armand Dijcks here

4 Responses
Very interesting article Joel. I have to admit that when I initially learned about your workflow I was confused as well, thinking it was destructive and that you wouldn’t be able to get certain details back after each step of merging layers. But then I realised that the actual image information is contained in the luminosity masks that are created from the original, and that with each adjustment, some of that original information is brought back in. So in the language of destructive vs non-destructive, your workflow could actually be called “constructive”. Once you have the luminosity information, you could theoretically construct your whole image starting from a plain grey background.
Oh, and there is actually such a thing as a true destructive workflow. That’s the workflow you get when you don’t back up your raw files and then your computer crashes 🙂
Thanks Armand, as you know by now, my workflow is constructive and smart. Smart because I can work on 180 Mp or larger files on my old laptop computer applying hundreds, sometimes thousands of adjustments, safely and without crashing the computer. I would even argue that with the high Mp cameras we have today and the artistic possibilities we want to explore (panorama/vertorama and other stitching, multiple and bracketed exposures, etc.) it’s not doable anymore to keep all adjustments in separate adjustment layers and leave them all in one file together with the channels. Especially, now there are several ways of working nondestructively. The only real benefit of working in the traditional way, is the linear and causal effect of an adjustment that impacts all subsequent layers. But an alternative and smart workflow like mine, can easily overcome that ‘disadvantage’ and give far more important advantages in return. You’re right, not backing up your raw files is truly destructive. But not having made a habit of backing up all of your files, whether they’re photo files or other important documents, in this digital age, is like driving a car without safety belts on. We don’t do that anymore!
I am in almost complete agreement with your article Joel. The traditional workflow does have a few weaknesses. Use layered smart objects too often and the file grows too big, too quick. Use luminosity masks in the upper layers and these will loose track with the image below when you adjust lower layers.
Then I started to think of possible improvements to the panel:
The panel can be thought of as a precision dodge & burn application.
How about if the panel generated a new empty layer for each tone change instead of a new image layer as it does now? The new empty layers would have overlay blend mode, 50% opacity by default – not unlike the method of the popular dodge and burn layer when used with brushes etc.
In this way, as the layers built up with each tone change, the layers below would remain adjustable, and previous layers could have opacity and fill values adjusted later. These layers could be merged if required to save space, or grouped.
In fact – the panel will do this already if you manually add a new empty layer with overlay blend mode before each tone adjustment. You just need to delete the extra blank layer generated each time.
A by-product of this method is that the increase in file size is much less per layer than with image layers.
Maybe an check-box could select between empty layer method and the legacy method as user wishes.
Is this viable Joel?
Hi Andrew, first apologies for my late response, I normally get notifications but with the enormous amount of spam people are dumping on my website through the ‘contact me’ section of my website (thanks to all the spammers in this world), this comment of yours has gone completely unnoticed. Anyway, to respond to your suggestion: I think it’s a very interesting idea. I’m going to put some effort in this and see how it works out as an alternative way of working with the panel, with a check-box for example. Not sure yet if it’s viable, but I’m surely going to put some effort in investigating this.
Thanks for the suggestion!
Joel